What to do if Windows 10 keeps getting blocked?
If you are a Windows PC or laptop user, you may be familiar with some of the features your system is equipped with. Especially in Windows 10, several features have been added that have proven to be great assets. One such asset is the screen lock. Whether at work or at home, locking the screen on a PC or laptop is of paramount importance as it is necessary to keep it on the phone. Without a screen lock, anyone can easily access your personal files and data on your system. Hence, it is extremely important to set a screen lock on your Windows device. While this great boon can sometimes turn into a frustration when there is a problem with Windows 10 itself locking up. If you are experiencing your laptop locking up while playing games, you have landed on the right page. In our today's guide, we will introduce you to this problem in detail by developing several methods that can help you prevent Windows 10 from locking up. Not only that, but we will also discuss a number of things related to random PC lockup. So, let's start with our guide and find out what can be done to fix PC auto-lock.
How to fix Windows 10 lock issue
Here we have shown in detail the ways to solve the problem of laptop locking during the game.
Reasons for locking the laptop during the game
Your system may lock up by itself while you are playing a game, watching a video, doing work, or simply browsing the Internet. There are a number of reasons why your system might do this:
- The power and sleep settings can put your system into sleep mode, causing your PC to lock up.
- Because sleep mode is controlled by the display driver, if the driver is outdated and needs to be updated, it may start to work, causing the screen to lock automatically.
- Sometimes random PC lockup can also happen due to recent system updates.
- Another reason that can cause random blocking is screen saver settings.
How to Prevent Windows 10 Lockdown
Your system may lock itself and require you to enter a password. This problem is undoubtedly annoying, especially when you are busy with something important. But don't worry, as we have several tried and tested fixes that will help you fix the problem in minutes, let's take a look at them below:
Method 1: Perform a Clean Boot
Finally, to fix Windows 10 auto-lock, you can try to clean boot your device to see if an installed program is forcing your device to hibernate. You can easily clean boot Windows 10 with our guide.
Method 2: Run the power troubleshooter
The easiest solution to try when it comes to auto-lock is to run the built-in power troubleshooter on your system to rule out the possibility of problems with the power system itself. To run the troubleshooter, follow these steps:
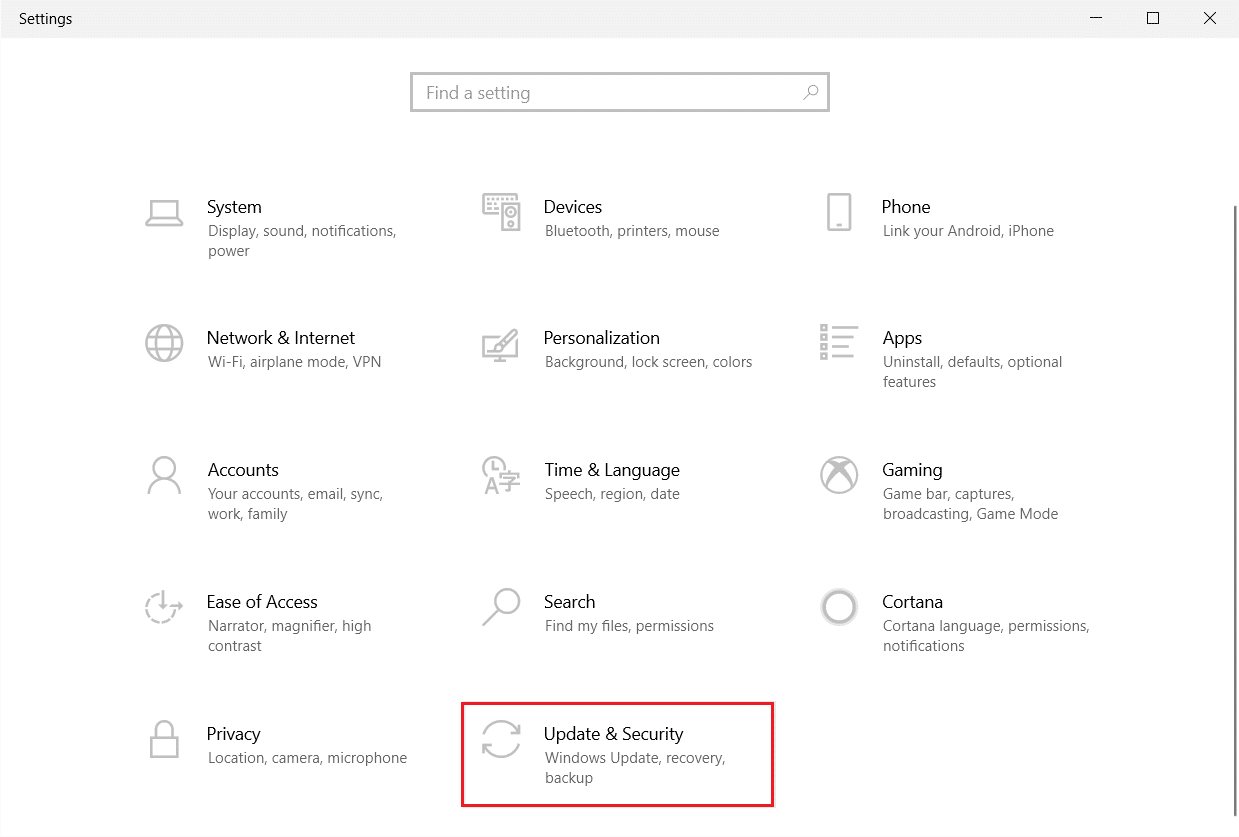
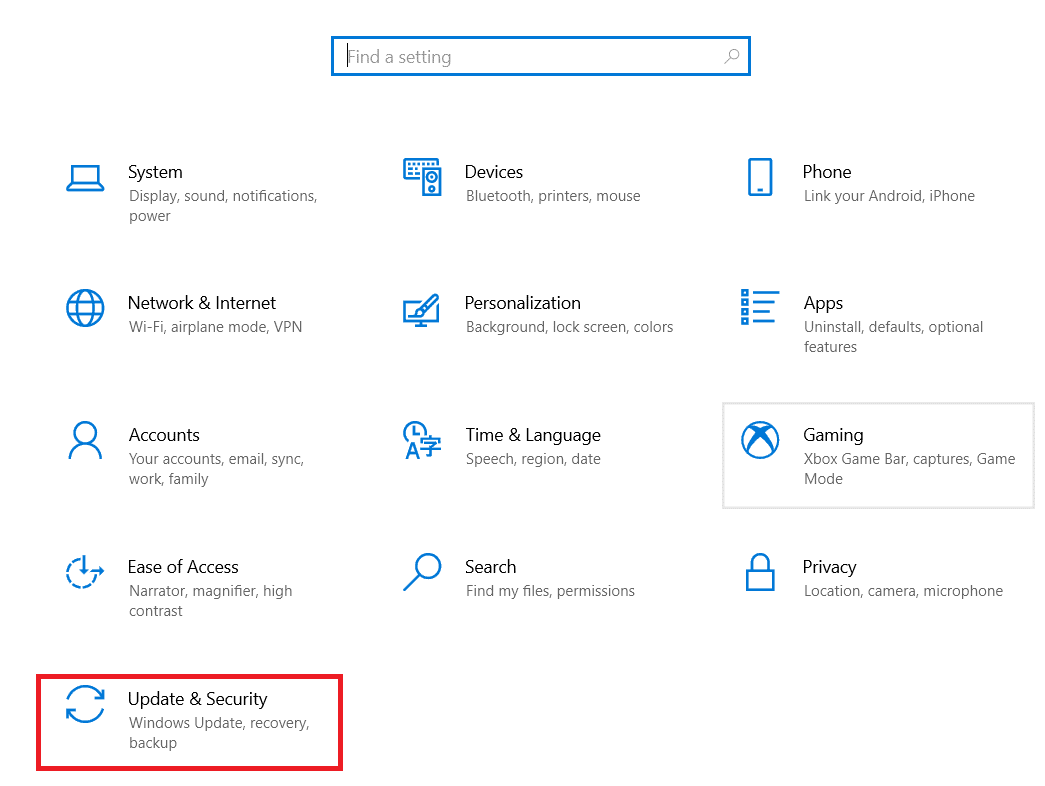
1. Press the Windows + I keys at the same time to launch the settings.
2. Click on the Update & Security tile as shown in the picture.
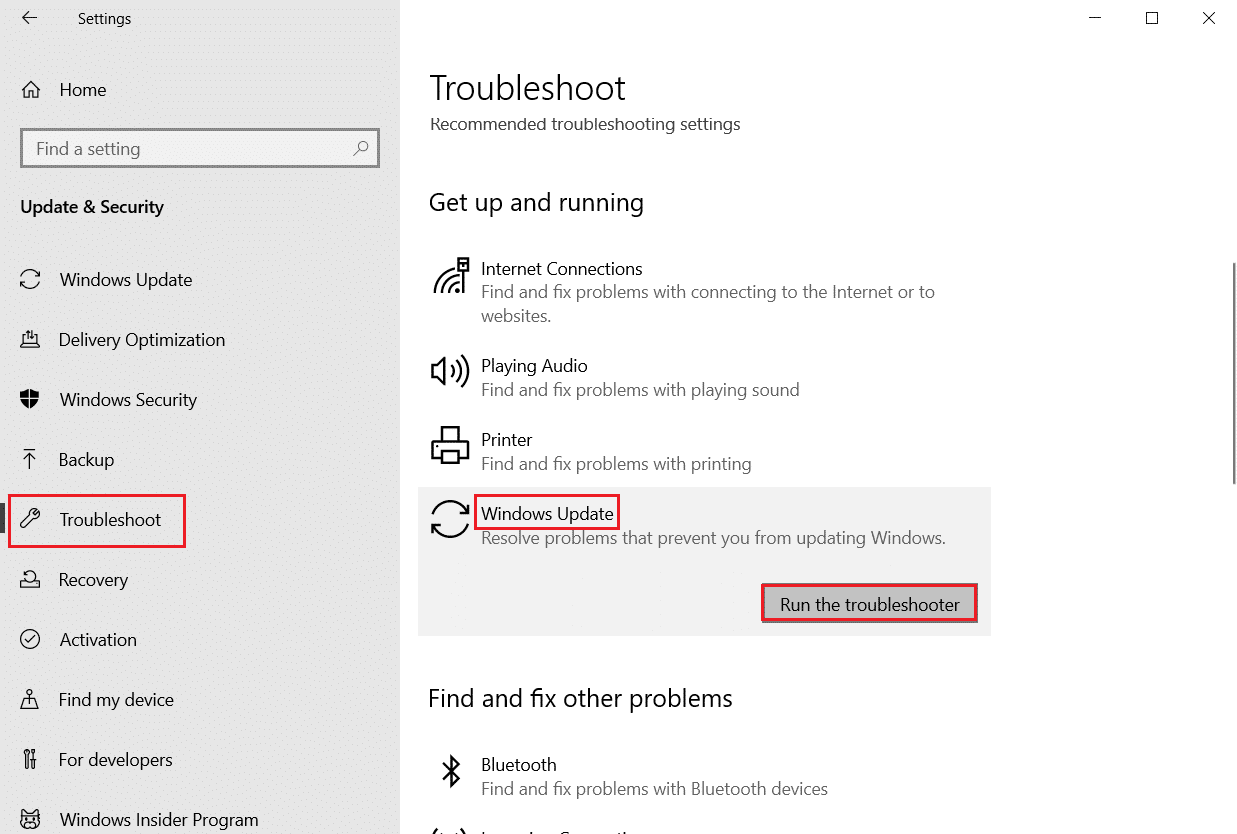
3. Go to the Troubleshoot menu in the left pane.
4. Select the Power Troubleshooter and click the Run the Troubleshooter button highlighted below.
5. Wait while the troubleshooter detects and fixes the problem. Once the process is complete, click Apply this fix and restart your computer.
Method 3: Remove the login requirement after sleep
Random PC lock can also be easily solved by removing the requirement to log in after sleep. This method is applicable for users who have set a password that is required when the system is turned on or wakes up from sleep. Windows automatically locks your system when it goes to sleep. Therefore, removing this requirement will help you deal with accidental blocking:
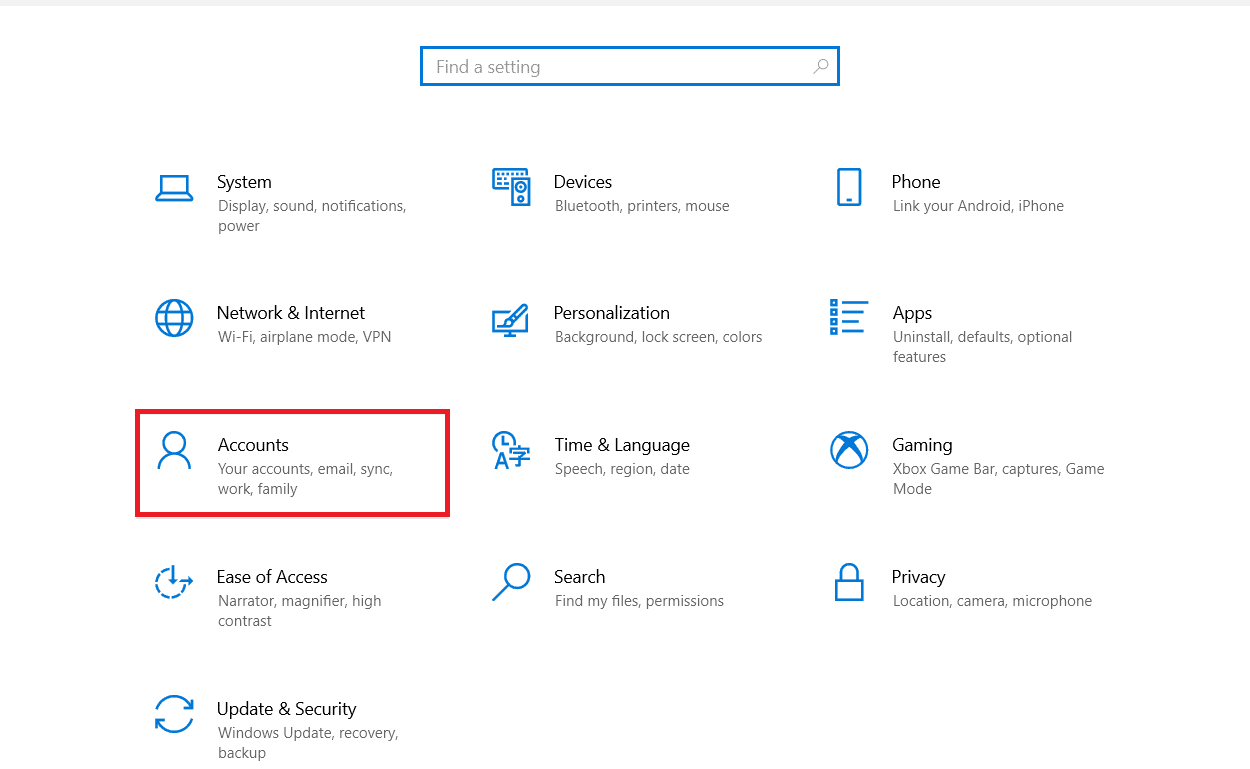
1. Launch the Settings app by pressing the Windows + I keys at the same time.
2. Now select account settings.
3. Then click Login Options.
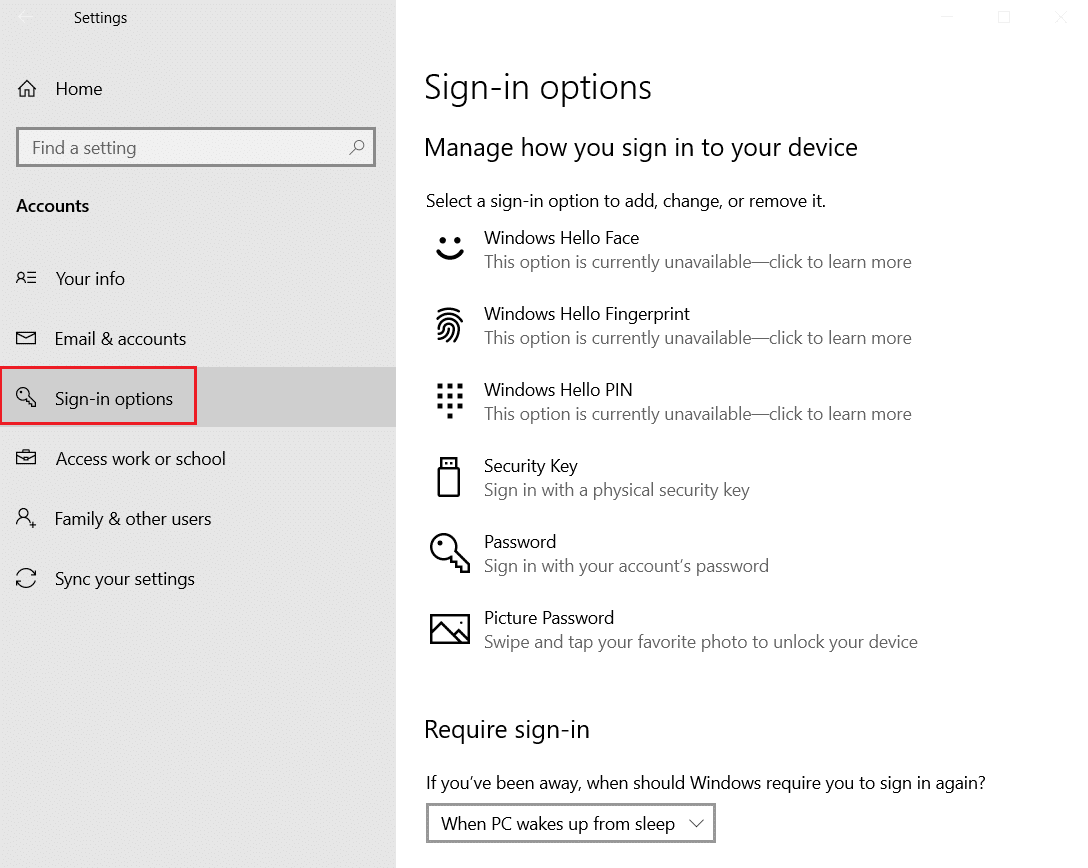
4. Now in the "Login Required" section, change the setting to "Never".
Method 4: Disable Auto-Lock in Power & Sleep Settings
As you already know, Windows PC requires login after going to sleep, you can change this automatic lock in power and sleep settings to avoid Windows 10 lock. It will also help your system never lock after a certain time. You can look at the steps below to disable auto-lock:
1. Open Windows settings on your PC.
2. Now click "Personalize".
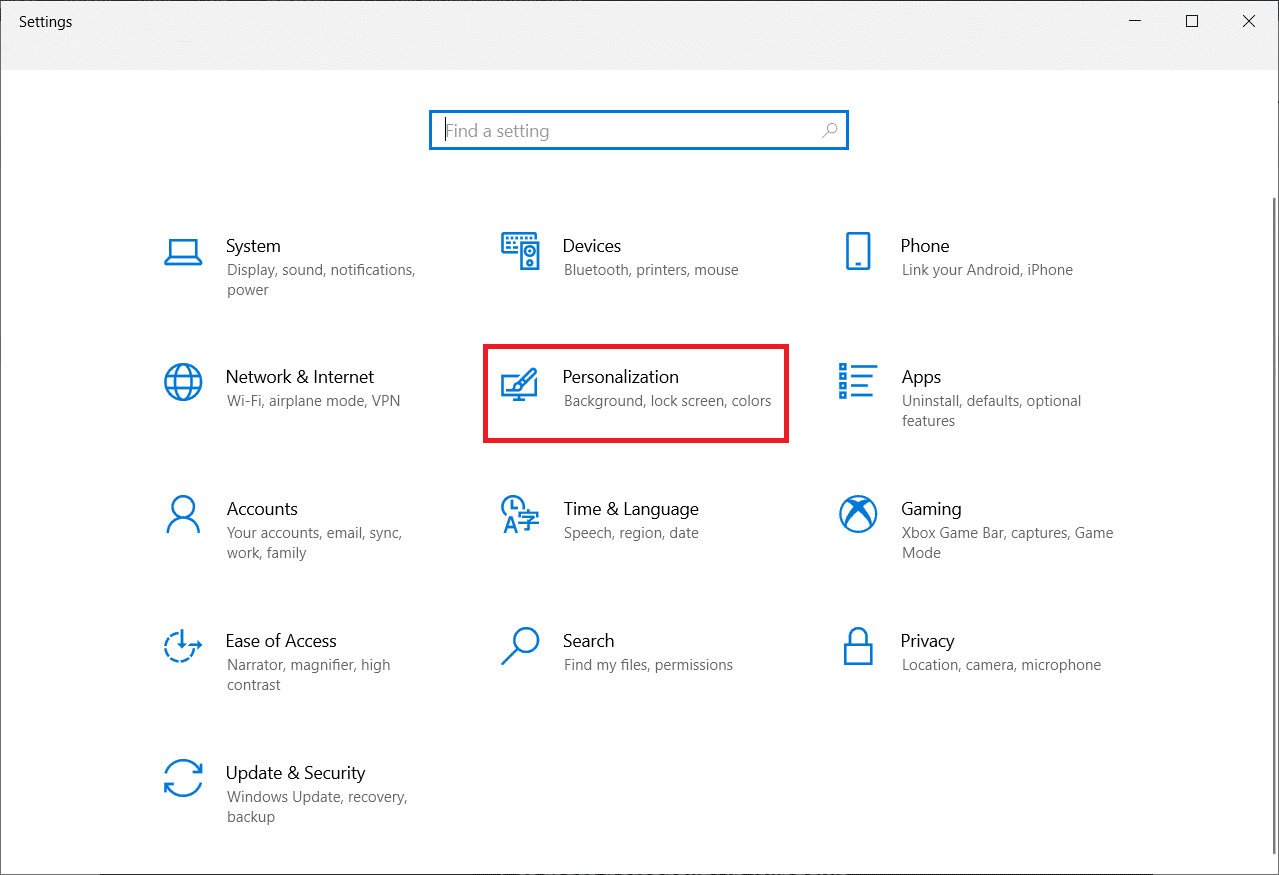
3. Go to the screen lock menu.
4. Then tap Screen Timeout.
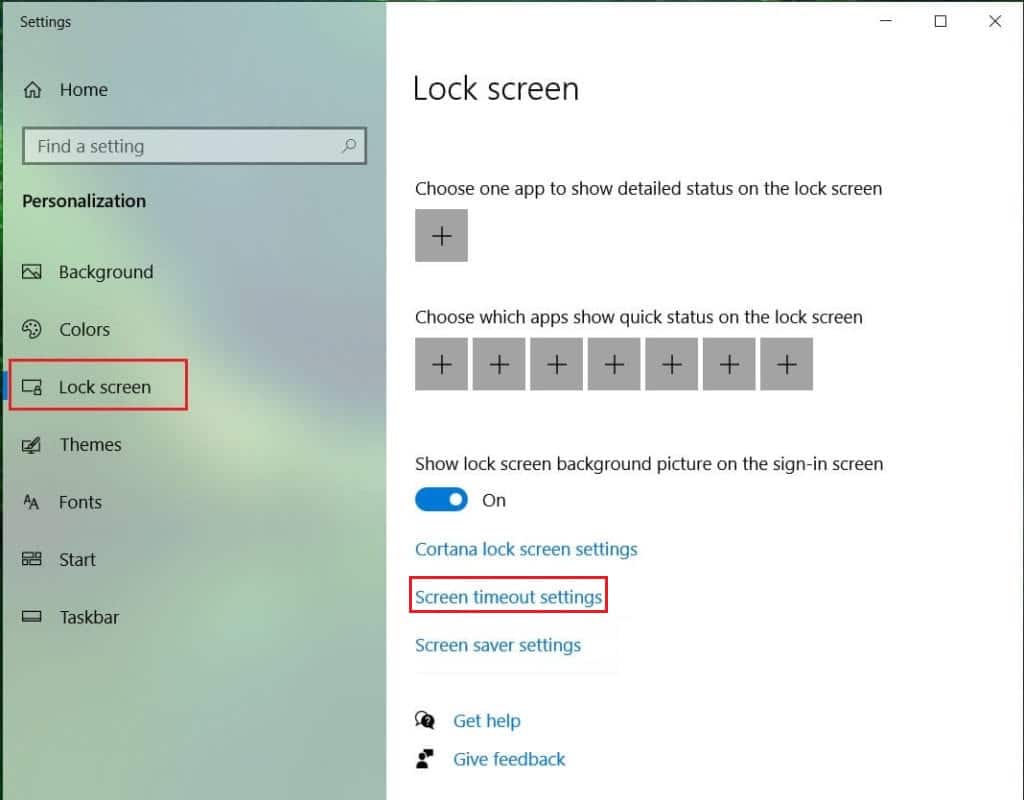
5. Now open the Screen & Sleep tab and set the maximum time in all options or just select Never.
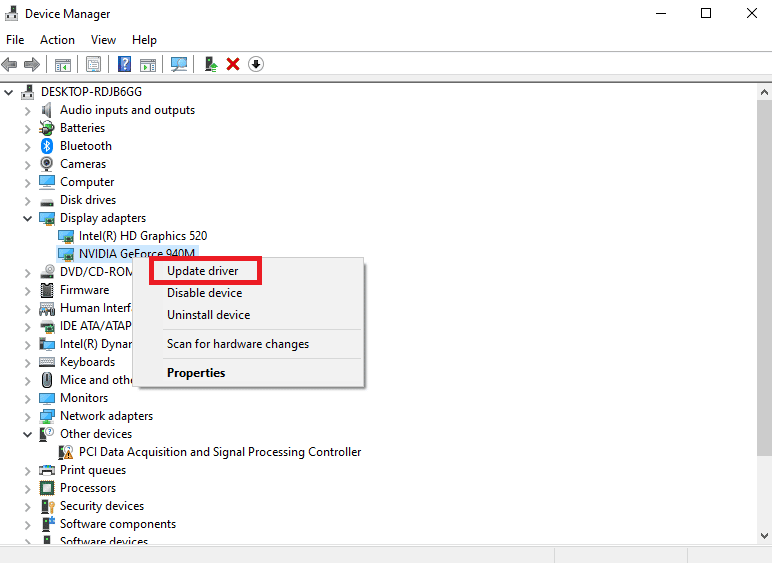
Method 5: Update the device driver
Your system's display drivers control sleep. Therefore, you must make sure that these drivers are up to date, otherwise they may interfere with your system and cause your laptop to lock up while playing games. So, you must update your graphics driver, if you don't know how to do it, read our 4 Ways to Update Graphics Drivers in Windows 10 guide which has detailed instructions to help you complete this method.
Method 6: Uninstall the latest Windows updates
For other possible reasons, a recent system update may also cause your system to shut down automatically. If this is the case, you should check for a recently installed update and remove it if necessary.
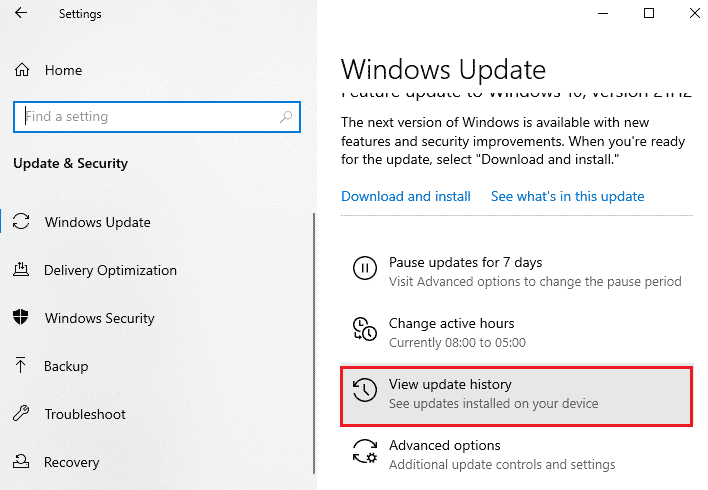
1. Press Windows Key + I at the same time to open Windows Settings.
2. Select update and security options.
3. Now click "View update history".
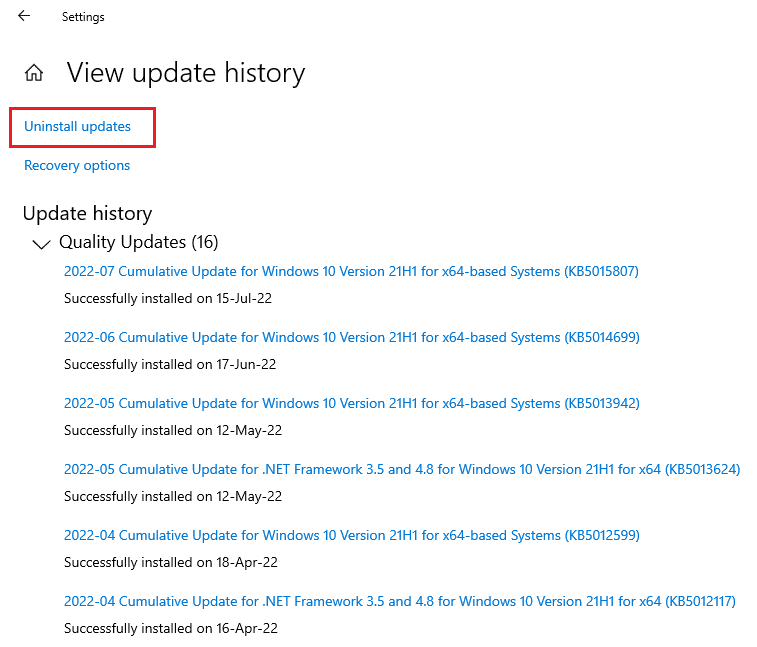
4. Select Uninstall updates.
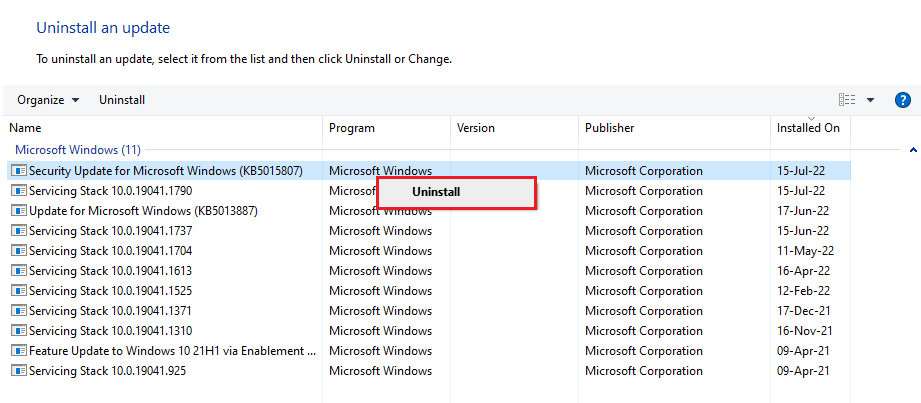
5. Now right-click on the latest update and select Uninstall.
Method 7: Change the System Auto-Sleep Timeout
Another way to prevent Windows 10 from locking up involves changing the system's automatic sleep timeout. Tweaking these settings will help you at least increase the time before your system locks up. To access these settings, you need to launch the control panel:
1. Open the Control Panel utility from your PC's search bar.
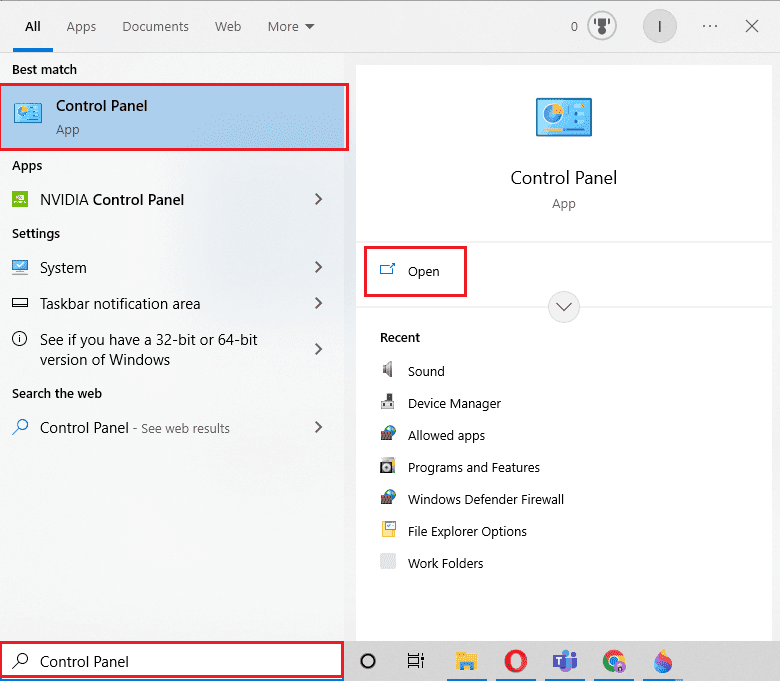
2. Set View by > Category, then select Hardware and Sound.
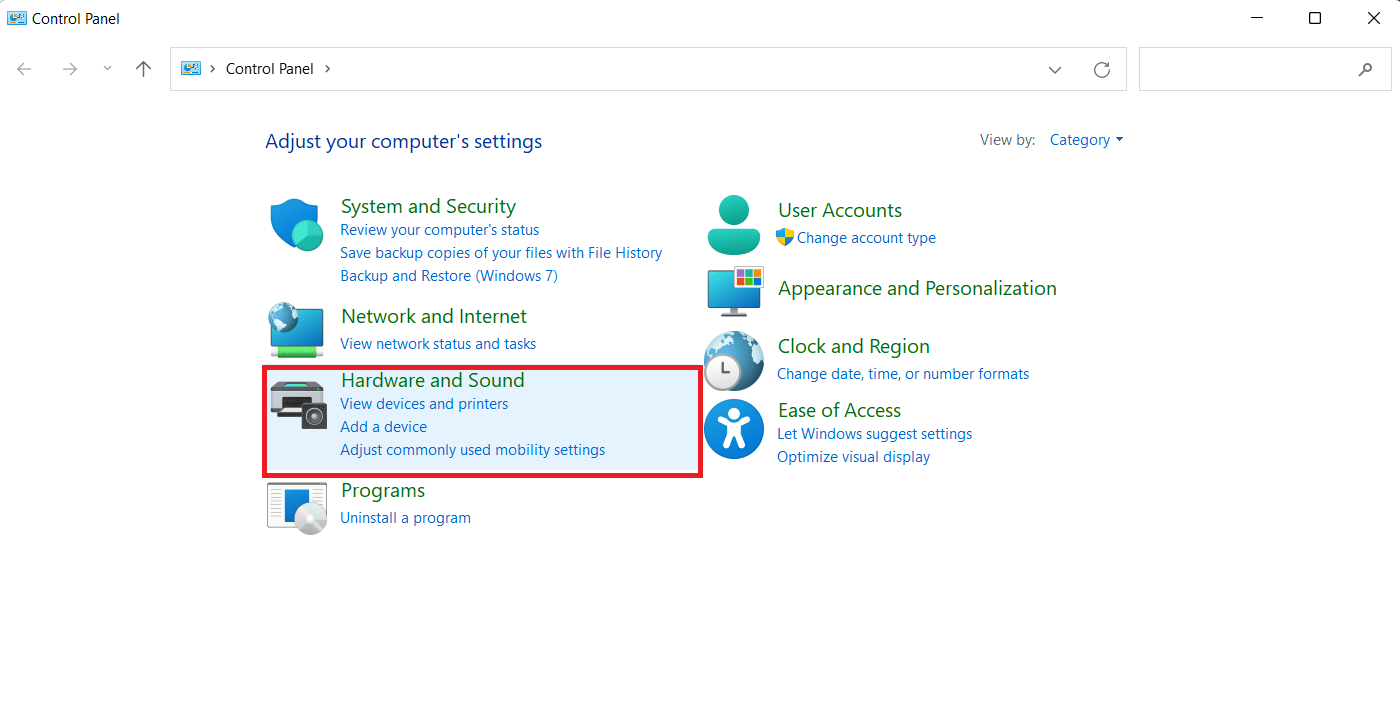
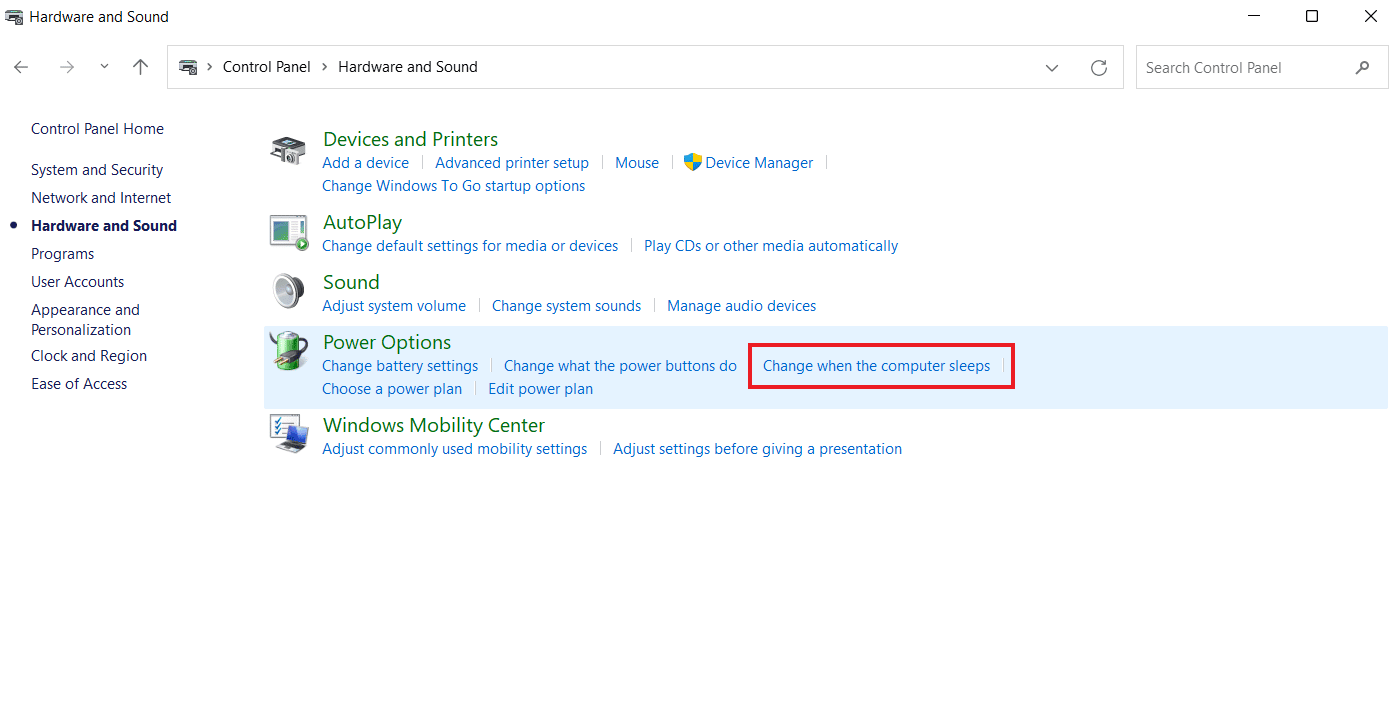
3. Then, in the Power Options section, click Change when the computer goes to sleep.
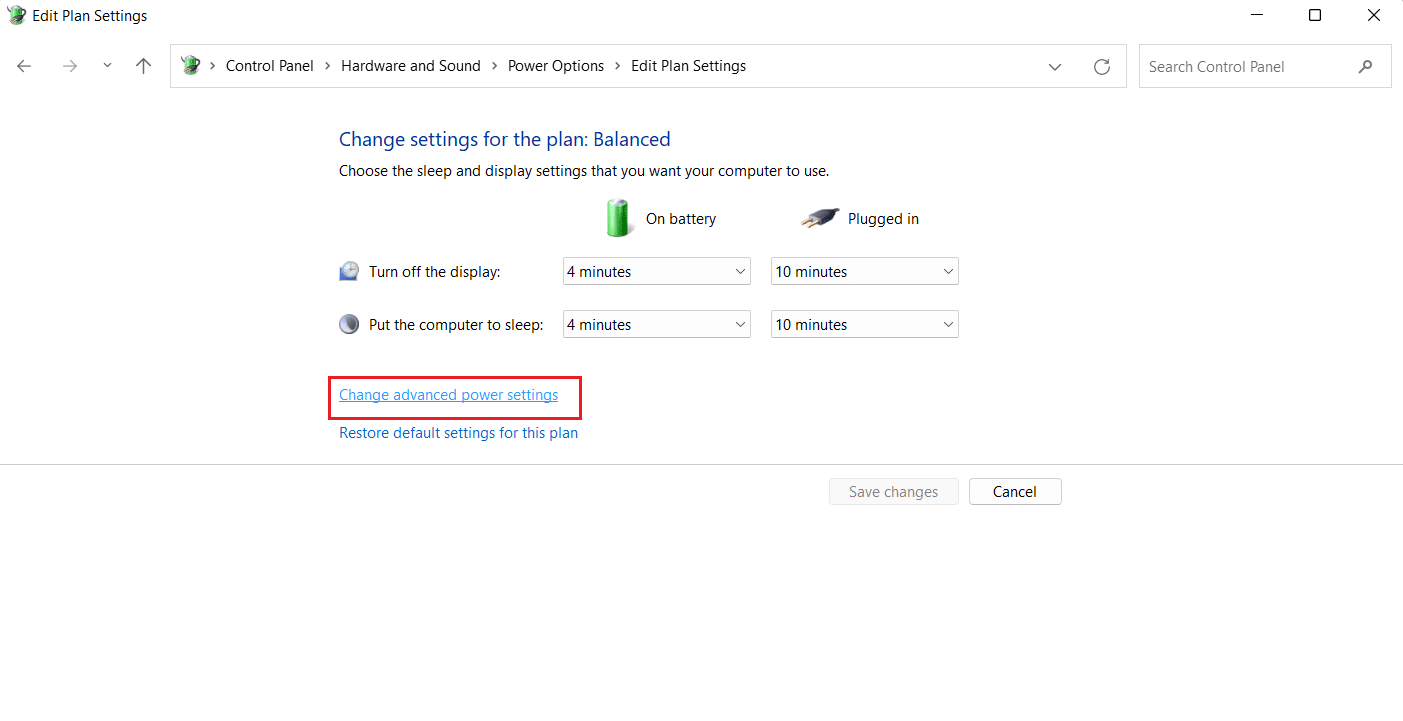
4. Now click "Change advanced power settings".
5. Now expand the + Sleep option in it.
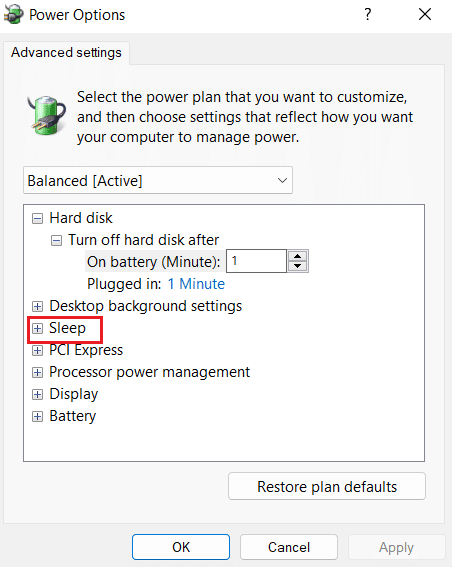
6. Then expand the options + Sleep after and + Allow wake timers.

7. Now set the time according to your preference or select 0 for Never.
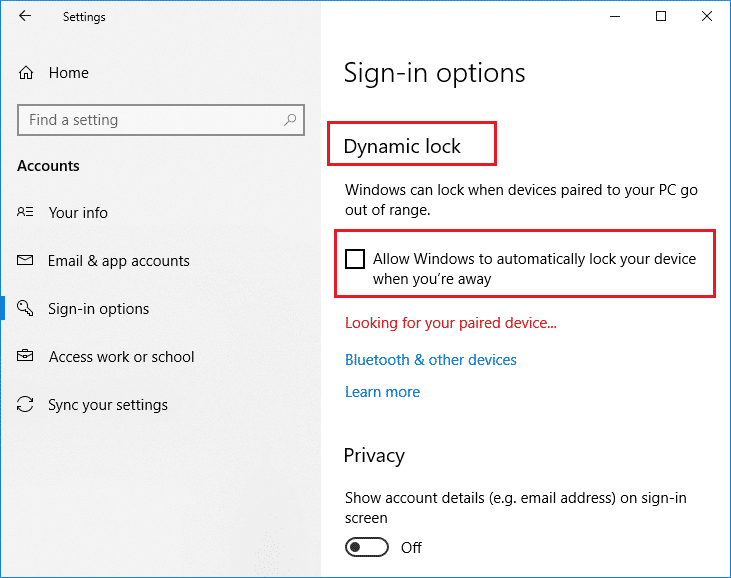
Method 8: Disable Dynamic Lock
The next method is to disable Dynamic Lock if your phone is synced with your computer. This is because if your phone goes out of range of your system, your computer will automatically lock up. Therefore, disabling this feature will help you randomly allow PC lock.
1. Launch the Settings window and open Accounts in it.
2. Now go to the Login Options tab.
3. Navigate to the "Dynamic Lock" option and open it.
4. Uncheck Allow Windows to automatically lock your device when you're away.
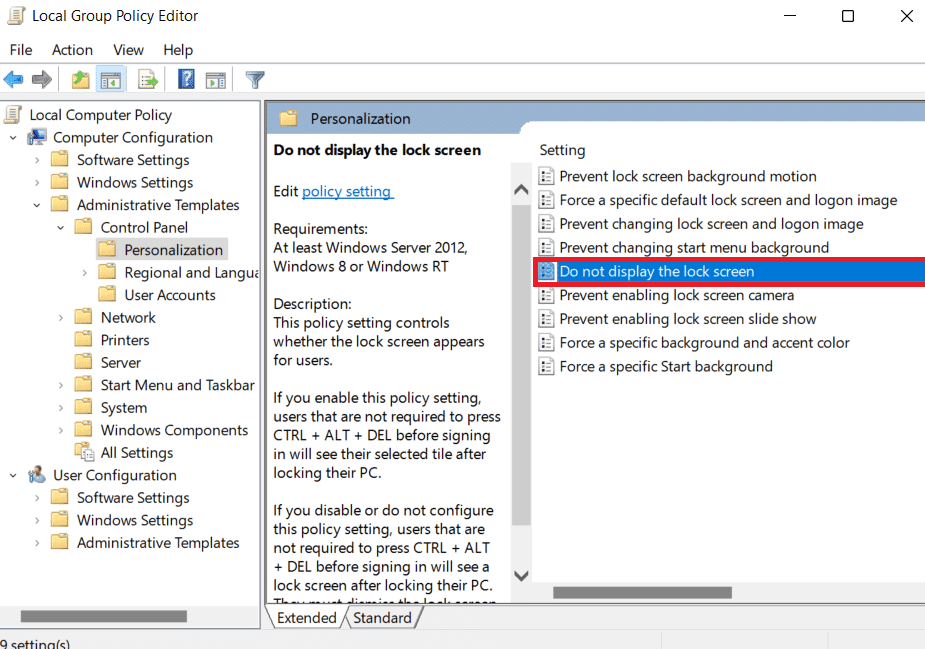
Method 9Disable Lock Screen
This method will help you solve all your device lock issues. There are two ways to disable the lock screen, one is by enabling the NoLockScreen key in the Registry Editor, and the other is by changing the settings in the Local Group Policy Editor. You can follow these methods and fix Windows 10 lock easily with our How To Disable Lock Screen In Windows 10 guide.
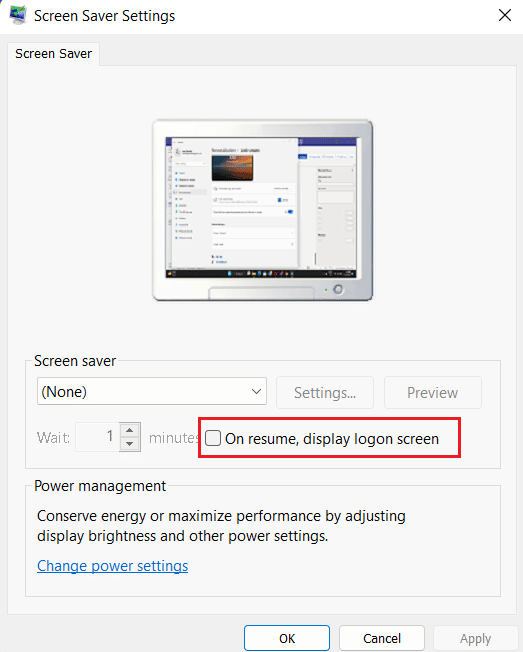
Method 10: Change screen saver settings
Changing your system screen saver settings is another way to fix auto-lock on your PC.
1. In Settings, launch "Account" and select "Login Options".
2. Now go to the lock screen menu.
3. Then click "Screen Saver Settings".
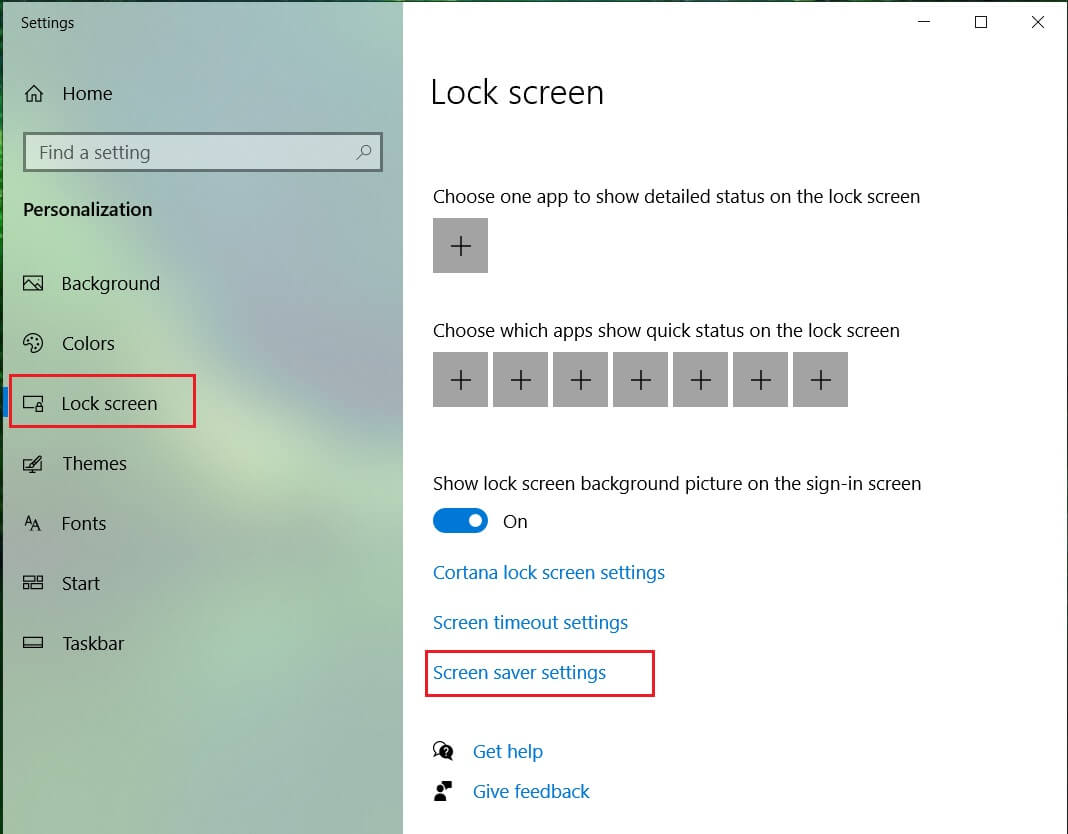
4. Now uncheck "When I resume work, display the login screen".
Hence, you can use the above methods to fix the problem of laptop locking while playing games.
Frequently Asked Questions (FAQ)
Q1. Why is my computer automatically locked?
Answer There are several reasons for being automatically away from the computer, including problems with the operating system, incorrect driver installation, or even a recent OS update.
Q2. Is there an auto-lock feature in Windows 11?
Answer Yes, Windows 11 has an auto-lock feature similar to Windows 10. Also, the process to enable this feature in Windows 11 is the same as in Windows 10.
Q3. Why does my system frequently lock up and shut down?
Answer If you are experiencing frequent lockups and shutdowns on your system, you should check its battery as this can be a problematic factor.
Q4. What is meant by Dynamic Lock on PC?
Answer Dynamic Lock on a Windows PC helps you automatically lock your PC when a connected Bluetooth device (usually a phone or smart watch) is out of range. When the PC goes out of range, dynamic lock also goes out of range, and the PC will usually automatically lock itself after 30 seconds.
Q5. How can I stop Windows 10 from shutting down in idle mode?
Answer The best way to prevent Windows 10 from closing in standby mode is to turn off hibernation. You can turn it off by opening your system's power and sleep settings.
***
Windows 10 lockup itself is a major problem, but we hope our guide to fixing it with various methods has helped you succeed. Let us know your thoughts on the document, and if you have any other questions or suggestions for us, please leave them in the comments section.