How to edit the Windows Hosts file to test a website locally?
Let's see how to edit the hosts file in Windows 10/11 in order to test a website locally without making DNS changes.
The hosts files act as local DNS servers. But before we go any further, let's check out this incident with Jack.
Jack was a website administrator for a regional e-commerce store in Toronto, Canada. He was asked to ensure a seamless transfer to another web host.
He did it perfectly, and shortly after making changes to the DNS, the site was up and running. The only problem was the lack of images for a significant number of products.
Although they mitigated the problem as soon as possible, several thousand dollars accumulated in the form of lost profits. And Jack was asked to leave his job.
His mistake, you ask? Skipping the simple but important step of testing a new website before changing DNS records.
hosts file
Jack could have prevented the crisis by making a single line in the host file on his Windows PC using Notepad, like so:
241.32.87.165 domain name.com
This would help him test the migrated website without touching the live online store.
The hosts file stores local DNS records that each computer checks before contacting DNS servers. The goal is a faster connection without increasing latency.
How does the hosts file work?
Let's take another example.
Suppose you need to go to a newly opened supermarket, but you do not know its name and exact address. Leaving Google search aside for a moment, you can consult your brother (host file) or neighbor (DNS server).
The second method requires extra time (latency), and it's faster to ask a brother.
In the same way, when we enter a domain name (for example, toadmin.ru.com), our computer, which is a machine, needs the corresponding IP address to load the website in the browser.
First, it looks for the localhost file. If it lacks the necessary information, the request is passed outside.
These DNS servers then match the domain name with the IP address and send back a response. And finally, we see that the site is loaded.
By editing the hosts file, we trick our local machine into believing that the migrated website is live. It also avoids connecting our PC and DNS server for this particular request.
Thus, when we visit this website, it is loaded from the IP address listed in the host file, and not according to the DNS records at the domain registrar.
It helps to check if everything works flawlessly before launching.
Editing the hosts file in Windows
The hosts file is located inside C:WindowsSystem32drivesetc
Although it does not have a text file extension, you can edit it with any text editor. However, the process is a little delayed.
You will open this file in Notepad to make the necessary changes, save it to another location, delete the original file, and finally move the modified file there.
But we will take the shortest route.
Start by opening Notepad as an administrator.
Then click "All Files", then "Open" in the drop-down list and browse the hosts files directory:
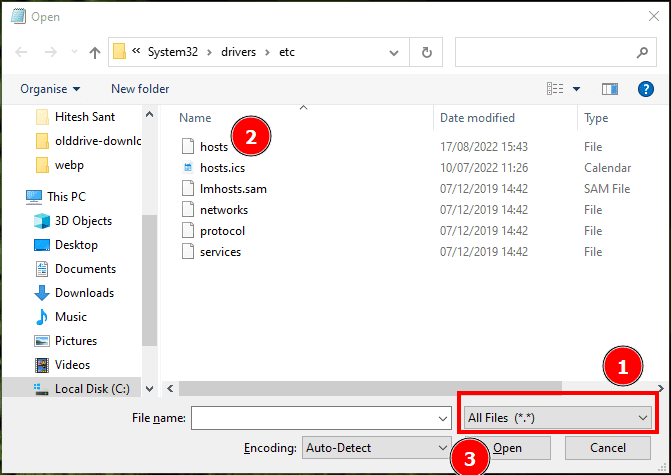
Now follow the first step and change it to "All Files" (*.*) because there is no text file in the folder, so it will appear empty at first.
Next, select the hosts and click Open.
Part of editing the host file involves entering your website name and the IP address of the server you moved the files to:
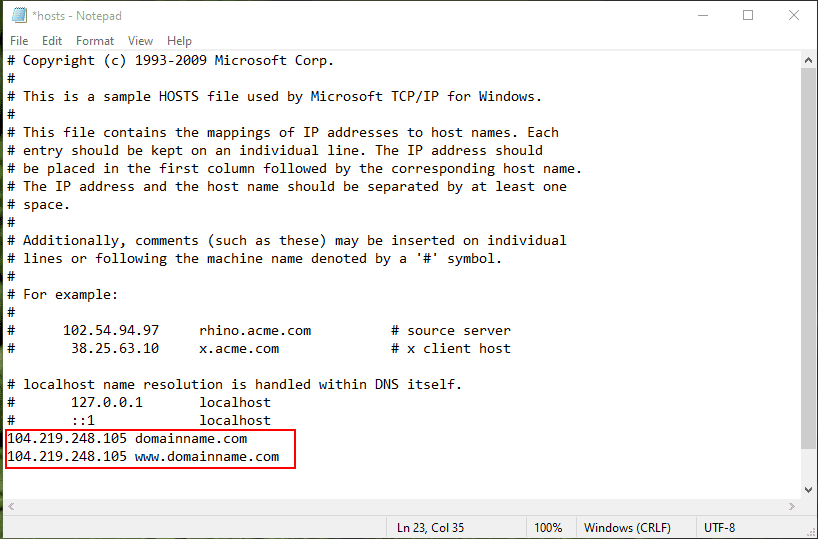
Don't forget to leave out the #, as this will make the statement a comment that won't work.
Finally press Ctrl+S to save changes and exit.
Checking
You can now login to the site and see any issues.
But wait! How do you know it's downloading from a new server and not a live one?
To verify this and check the new web address, you must first close your browser.
Then open a command prompt and type. ipconfig/displaydns.
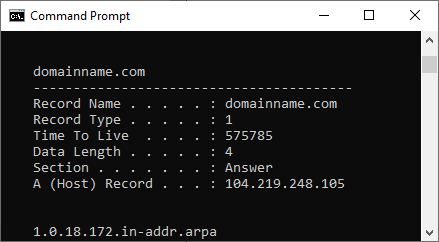
The domain name will be listed next to the record name and IP address with an A (host) record.
The list of displayed DNS can be long, and you can flush DNS to remove existing entries. It's a one-step, completely harmless process when you open a command prompt and type ipconfig/flushdns.
Finally, open your browser again and enter the web address to visit the test site.
While the process was simple, there is an easier alternative if you don't mind using free software.
Host file editor
Host File Editor comes as an install and a portable application. This is very intuitive and will come in handy if you do this often.
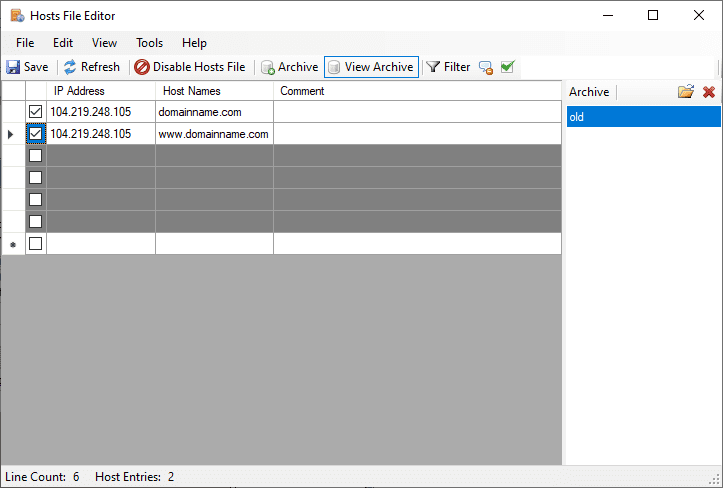
You can start entering data in the gray boxes and click Save at the top. And yes, don't forget to check the records; otherwise, they will appear as comments in the host file.
Finally, you can delete the files created by this application if you decide to return to the normal way.
There will be three folders named hosts.bak, hosts.disabled and one archive folder. Or save the folder before using such applications as a backup.
Summary
Editing the host file in Windows makes it easier to test a website before changing DNS records. You can use a text editor such as Notepad and make the necessary changes that apply to your local computer.
Although there is another way to do this with a temporary URL, this method has some disadvantages, especially if you are using a content delivery network (CDN).
And while the screenshots are from Windows 10, they will also work fine on Windows 11.