How to Customize/Disable the Windows 11 Lock Screen
Over the years, the Windows OS has improved a lot in both design and functionality.
With the release of Windows 11, we are seeing a much cleaner interface and features that are better than ever before.
Don't forget that performance also improves with an update, so if you're currently running Windows 10, you'll see a noticeable difference when you switch.
With all the new features and interface design, it's possible to get confused in some areas. For example, not knowing how to set up or disable the Windows 11 lock screen.
If this is exactly what is bothering you, then you have nothing to worry about anymore, because in this post I will show you the easiest way to do it.
Personalization aspect of Windows OS
From something as simple as changing your lock screen background to creating custom collections of your favorite websites, the personalization possibilities in Windows 11 are nearly limitless.
It covers luxury as well as basic options that can be easily accessed. For example, when you go to the Personalization tab on your Windows 11 system, you can change interface colors, font, size, and even apply themes.
In addition, you can enable voice input, use widgets, change icons, customize the toolbar, and more.
You can literally change its appearance to make sure it belongs to you according to your preferences.
Read also: Why Windows 11 is better than Windows 10
Introduction to the Windows Lock Screen
Windows introduced the screen lock feature in its 8th version and it worked until its 11th version. This feature is expected to remain in newer versions.
The lock screen is the screen that you get to as soon as you turn on your device. It displays information such as:
- Time/Date
- Background
- Preferred Applications
As well as the ability to enter a password to unlock the device and go to the main screen.
Why do you want to change your lock screen background?
Depending on each person, there may be different reasons for replacing the default lock screen background.
If it's for personal use, it might be because you're sick of seeing the same old wallpaper. Or if you just want to set the background of your choice.
On the other hand, if you are running a business, you should make sure that the background contains an element of your own branding. Thus, replacing the default background with your company's background would be a good option.
This ensures that your business is properly branded. That being said, let's learn how to do it without problems.
Setting the Windows 11 lock screen background
Fiddling with the lock screen in Windows 11 and changing the background is a pretty straightforward process. Here are the steps for that:
Step 1: From the Start menu, go to Settings.
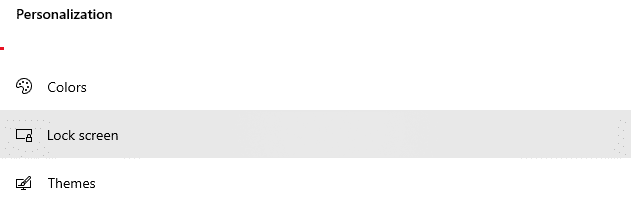
Step 2: Click "Personalization".
Step 3: You will notice that there are various customization options. You can change the background, colors, fonts, themes, etc. Since we want to change the background of the lock screen, let's click where it says Lock Screen.
Step 4: Now when you click on the drop down menu, you will get 3 options:
- Windows in the spotlight
- A picture
- Slide show
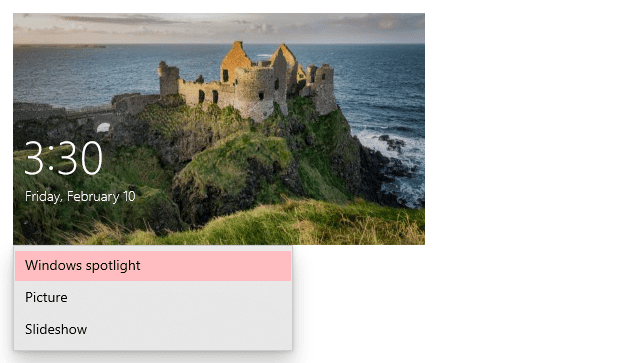
Windows Spotlight is essentially an option that automatically displays a beautiful photo by default. You don't need to do anything other than turn it on. Everything happens by itself. Images change daily.
The Image option then allows you to add your own static image as a background. You can choose any image from your gallery and put it as your lock screen background.
Finally, the "Slideshow" option allows you to display an entire album of images, which continues to work as a slideshow on the background of the lock screen.
For this example, I'll select the Image option to add my own static image as the background.
Step 5: Once you select the Image option, you will be given the option to upload an image from your gallery or select one of the sample images.
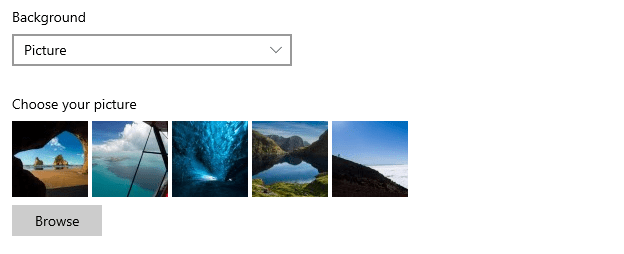
Once you select one of the two, you will notice that the lock screen background has been successfully changed.
Disable Windows 11 lock screen
While this is a nice feature, not everyone may need it. If you are one of those people who don't like the lock screen, you can simply turn it off.
There can be various reasons for not wanting to use the lock screen. Here are some of the common ones:
- When you want to log into Windows directly, which will result in faster access
- When you don't want to spend time remembering and entering passwords
- If you want your laptop / computer to be accessible to everyone (especially in the office
NOTE. Disabling the lock screen does not remove the login screen. It simply removes the first page you see when you turn on the device. Optionally, you can also remove the login screen if privacy is not a concern for you.
There are several ways to disable the lock screen in Windows 11. Here are the steps for the two easiest ways:
Method 1: Using the Group Policy Editor (GPE)
The Group Policy Editor is an important Windows administration tool that can also be used to turn off the lock screen. Here are the steps you need to follow:
Step 1: On your keyboard, press the Windows icon + R to run the run command.
Step 2: Now type gpedit.msc and press enter key or click OK.
Step 3: You will see that the Group Policy Editor will open. Go to Computer Configuration > Administrative Templates > Control Panel > Personalization.
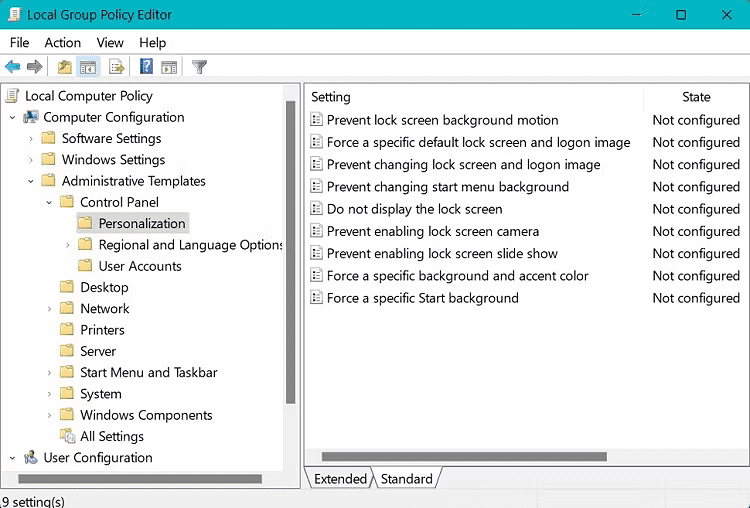
Step 4: Double click where it says "Do not show lock screen".
Step 5: A new window will open; click where it says "Enabled" if it's not selected by default. Then click "Apply" and then finally click "OK".
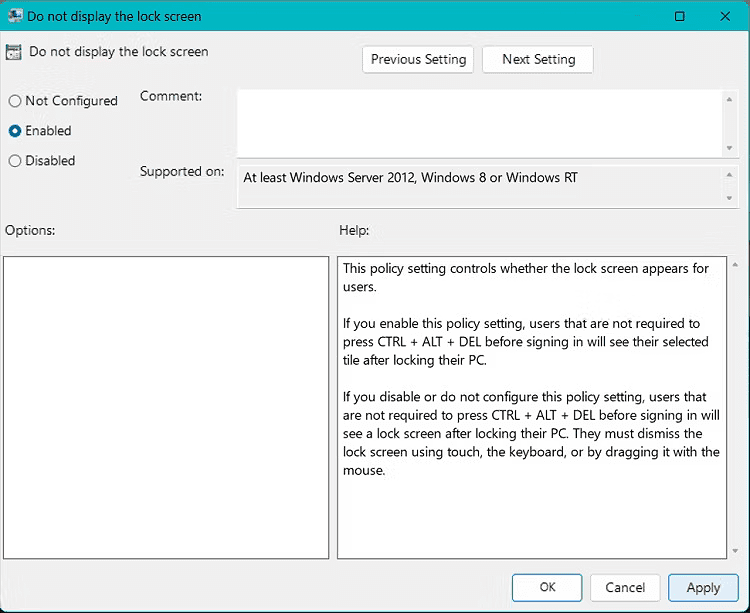
You can now reboot your system and verify that the changes were successful.
Method 2: Using a Third Party Application
If you don't want to mess with the above method, you can use a third party app that will do it for you instantly and in much less time.
I recommend using this free app called WinAeroTweaker. Here are the steps for that:
Step 1: Download, install and run the solution.
Step 2: Tap "Turn off lock screen" under "Boot and sign in".
Step 3: Check the "Turn off lock screen" box.
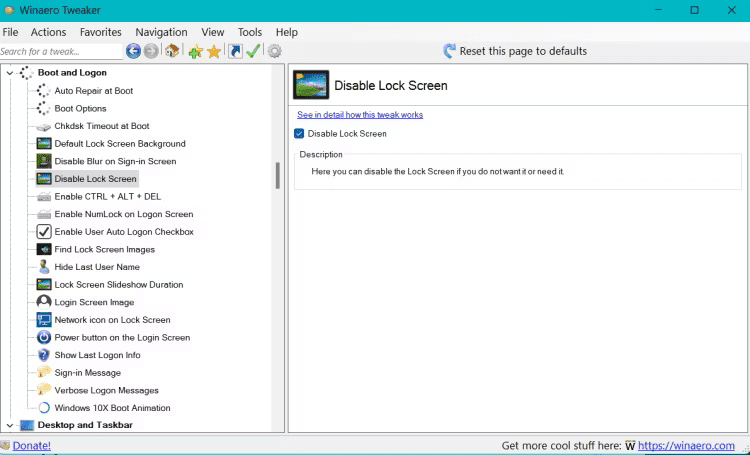
Restart your computer to check if the changes were successfully applied.
Also Read: Must-Have Windows 11 Apps You Just Can't Miss
Turn off the password requirement to sign in to Windows 11
Once you have disabled the lock screen, if you also want to disable the login screen (login with password) and go straight to the home screen instead, you can follow these simple steps:
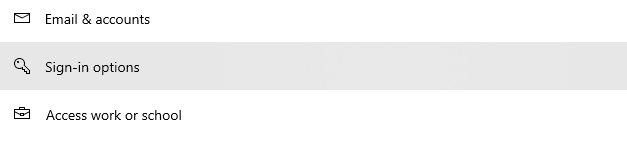
Step 1: Go to Settings > Accounts.

Step 2: Click on login options.
Step 3: Click the drop-down icon If you were away, when does Windows require you to sign in again? and select Never.
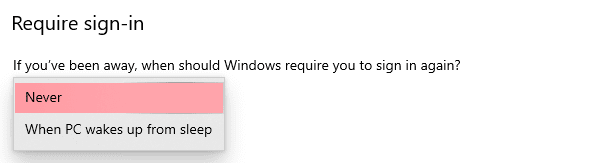
The password login requirement will now be disabled on your system.
Final words
While it's a personal choice whether to disable the lock screen and login screen on your Windows 11 PC, I personally disabled mine because I'm the only one using it.
Plus, it saves you time and makes things convenient.
Then try these settings that you should tweak in Windows 11 for the best results.