How to Check CPU Temperature in Windows 11 (6 Methods)
There are many tools for CPU stress testing in Windows, but you need to constantly check the CPU temperature when you are doing this kind of taxing process. This will help you assess the thermal performance of your processor and how good your cooling system is. Other times when you are experiencing overheating issues, you can check the CPU core temperature readings to see if it is caused by the CPU. So, in this guide, we have included six different methods to check CPU temperature in Windows 11. You can even check CPU temperature without any third party software or with some basic and advanced programs. On that note, let's go ahead and learn how to monitor CPU temperature in Windows 11.
Check CPU temperature in Windows 11 (2022)
In this guide, we have covered six different ways to check CPU temperature in Windows 11. You can see the temperature of each core for both Intel and AMD processors. We have also added warnings for AMD processors where appropriate. But first, let's find out what is the safe temperature range for processors.
What is the safe and ideal temperature range for your processor?
Ideally, your CPU temperature should be between 60 and 70 degrees Celsius (140 and 158 degrees Fahrenheit) when running core applications and between 40 and 45 degrees Celsius (104 and 113 degrees Fahrenheit) when idle. What's more, the safe temperature range for CPU gaming is around 70 to 80 degrees Celsius. If your CPU regularly gets above these temperature ranges, you'll need to clean your computer, improve your cooling system, and reapply thermal paste.
Now, many of you may be wondering - at what point should you worry about the high temperature of the processor? Well, I'd say that if you're within 10 degrees Celsius of the CPU's maximum operating temperature (also known as Tj. Max or Temperature Junction), you should lower the voltage and go for a moderate overclocking profile.
In addition, you should clean the dust inside your laptop or desktop and upgrade the cooling system. This should bring down the CPU temperature of your Windows 11 PC.
Check CPU temperature in Windows 11 without software
If you don't want to use third party software to check CPU temperature in Windows 11, you can do it via BIOS or UEFI screen. From there, you can monitor the CPU temperature in real time. We have written a detailed guide on how to enter BIOS/UEFI in Windows 11, so follow this guide for detailed instructions. In this guide, we will briefly explain how you can check the CPU temperature in Windows 11 using the BIOS or UEFI screen.
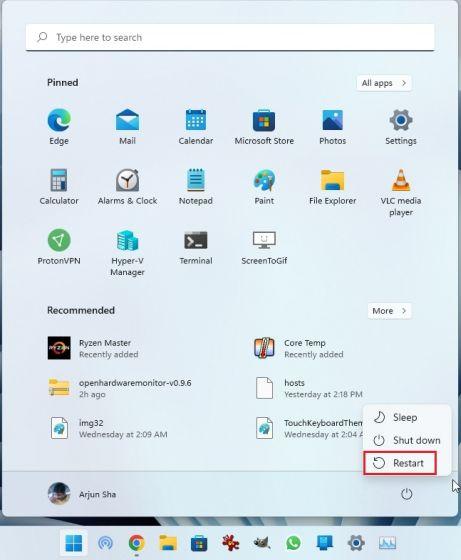
1. First, open the Start menu and move the cursor to the Power menu. Now press and hold the "Shift" key on your keyboard and click "Restart". You can now release the Shift key and your computer will immediately boot into the extended startup screen.
2. Alternatively, you can also open the Settings app and boot from the Advanced Launcher screen from here. Press the Windows 11 keyboard shortcut “Windows + I” to open the Windows Settings app and navigate to System -> Recovery. Then click the "Restart Now" button next to "Advanced Startup".

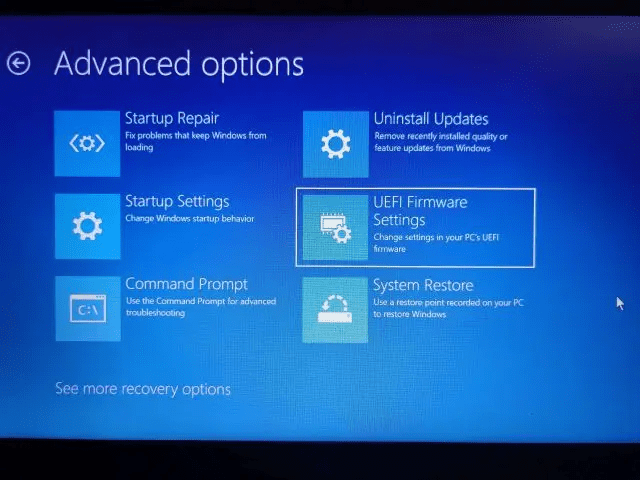
3. Then on the advanced startup screen, click Troubleshoot and then select UEFI Firmware Settings. When prompted, click Restart.
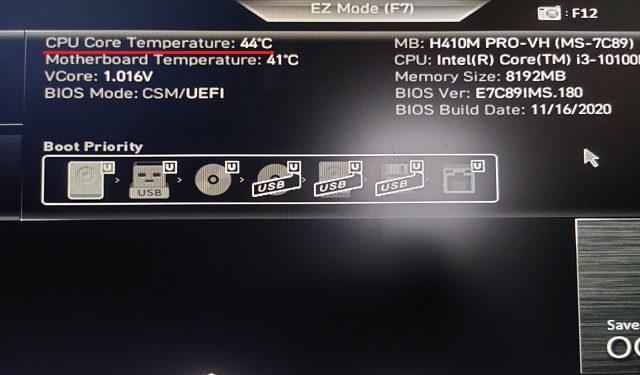
4. You will now boot into the BIOS/UEFI screen of your Windows 11 PC. If you have a modern UEFI interface, the CPU temperature will appear on the homepage itself. For example, my computer shows that the processor core temperature is 44 degrees Celsius.
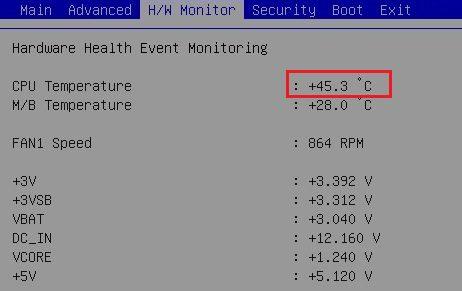
5. If your Windows 11 PC has a legacy BIOS screen, look for the CPU temperature in the Power menu or Hardware Monitor. If you can't find the CPU temperature anywhere, you'll have to install a third party program. Keep reading to learn about the best third-party apps to view CPU temperature in Windows 11.
 Source: ASRock
Monitor CPU temperature in Windows 11 with Core Temp
Core Temp is one of the best apps to check CPU temperature on Windows 11 PC. The app is lightweight, free, and offers accurate temperature readings of all CPU cores. The only downside to Core Temp is that it tries to install the bundled app during installation, which is a little annoying. However, you can disable it during installation. Now, with that cleared up, let's learn how to monitor CPU temperature in Windows 11 using Core Temp.
1. Download Core Temp from the link right here. After that, install the application using the downloaded EXE file, but be sure to uncheck the box to avoid installing malware on your Windows 11 computer.

2. Once installed, open Core Temp and it will start displaying the temperature of all cores in real time. You get the current temperature reading in the second column. Please note that "Tj. Max" is the highest temperature your processor core can operate at, but it's always recommended to keep it 20-30 degrees below the maximum to avoid damaging your hardware.

3. You will also find that Core Temp adds its icons to the system tray on the Windows 11 taskbar, allowing you to check the current temperature of all CPU cores at a glance.

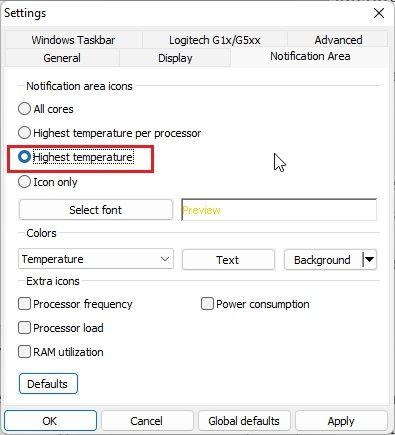
4. Also, I would suggest a few changes to make it easier to monitor CPU temperature with this app. Click Options -> Preferences in Core Temp and go to the Notification Area tab. Here, select "Highest Temperature" to reduce the number of icons in the taskbar area. Now it will only show the highest temperature among all the CPU cores, but you can see all the readings if you hover over the system tray icon.
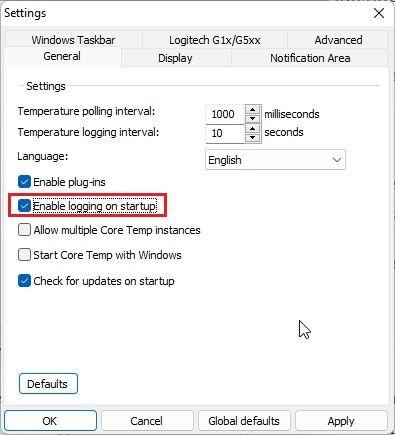
5. Also, go to the "General" tab and enable "Enable logging at startup". This will launch Core Temp automatically when you log into your Windows 11 PC.
Check CPU temperature in Windows 11 with HWMonitor
If you are looking for an advanced CPU temperature checker for Windows 11, HWMonitor is a great choice. Along with the current temperature of all processor cores, the program also shows the temperature readings of the motherboard, GPU and hard drive. In addition, you can find a lot of other information, such as the used core frequency, fan speed, etc. Basically, HWMonitor is a wonderful utility that does not just show the temperature of the processor. Here's how it works:
1. Open the HWMonitor official website and download the desktop version of the application. Then install it on your Windows 11 PC.
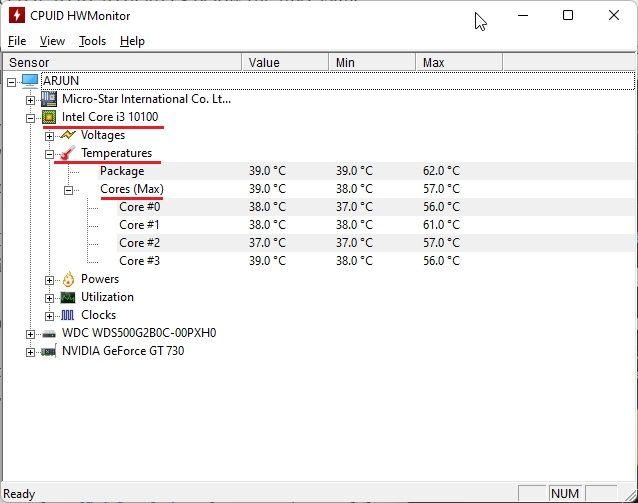
2. Next, open the program and look for the model of your processor. For example, I have "Intel Core i3 10100". In this section, you need to expand the Temperatures section to see the temperature of all CPU cores.
Be aware that it does not show the current temperature of all CPU cores in the taskbar area. To do this, you need to rely on Core Temp, described in the section above.
Check CPU temperature in Windows 11 with Open Hardware Monitor
Moving on, Open Hardware Monitor is one of my favorite apps for checking CPU temperature in Windows 11. It's open source, free, and most importantly, easy to understand for regular users. You don't even need to install an app. Just download and extract the ZIP file and run the program. After a few seconds, it will display the exact temperature of the CPU on your Windows 11 PC. Here are the steps to follow.
1. Go to this page and download Open Hardware Monitor. Then unpack the ZIP file using applications such as WinRAR and WinZip.
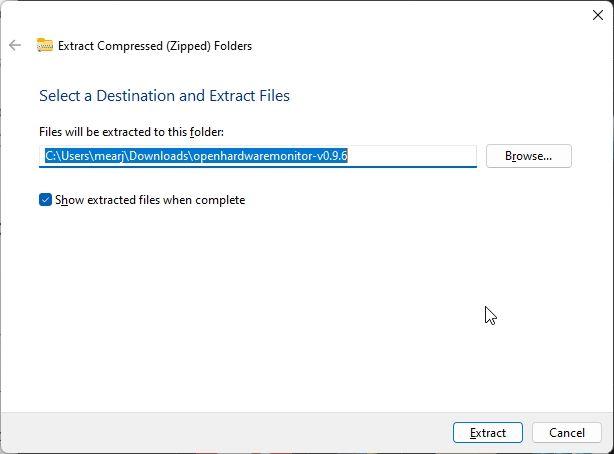
2. After that, open the extracted folder and run the "OpenHardwareMonitor" application.
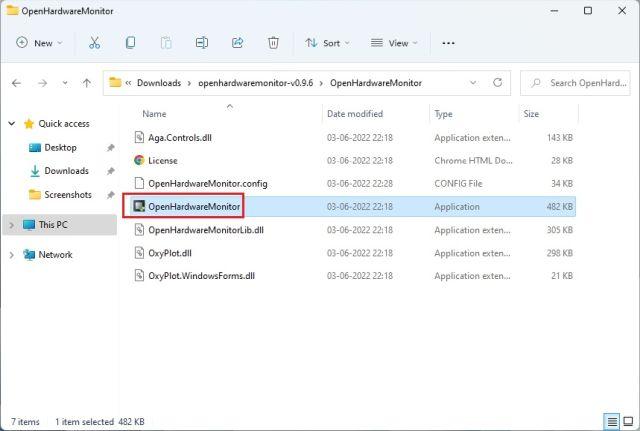
3. That's it! You can check the temperature of all processor cores by expanding the Temperatures section under the processor name in the app. It even shows the temperature of the CPU package as measured by a sensor inside the CPU.

Check CPU temperature in Windows 11 with HWiNFO
HWiNFO is another professional grade program to check CPU temperature in Windows 11. It is advanced and it lists all the sensors connected to your PC with various readings. You can see the temperature of all CPU cores and it works for both Intel and AMD CPUs. Here's how to do it.
1. Open this page and download HWiNFO immediately. Then install the program using the downloaded EXE file.
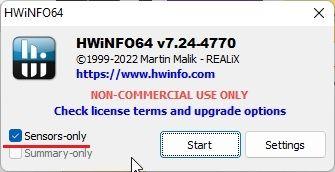
2. Then open the program and be sure to check the "Sensors only" box. Now click "Start".
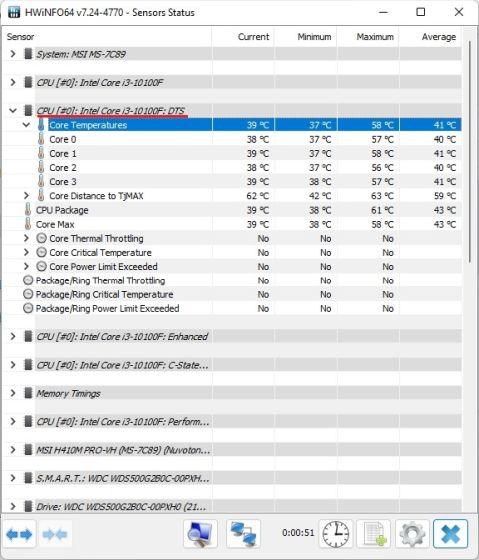
3. The window will look a little intimidating at first, but don't worry. Look for the name of your processor with the moniker "DTS" if you have an Intel processor. DTS is an Intel digital thermal sensor built into the CPU that reports the current temperature of all cores. In this section, find "Core Temperatures" and expand it. And here it is!
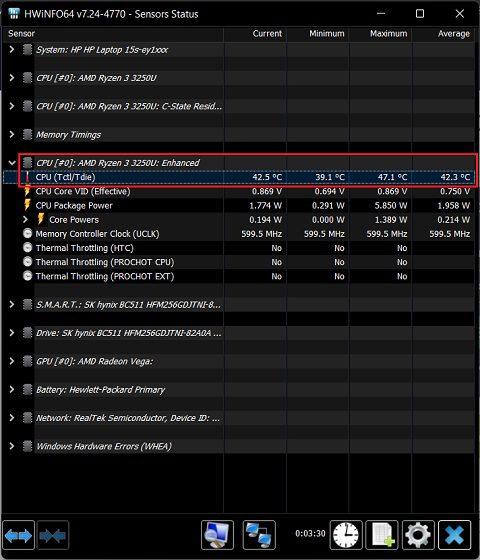
5. If you have an AMD Ryzen processor, you need to check the reading "CPU (Tctl/T die)" under the name of your AMD processor. This is the temperature of your AMD processor.
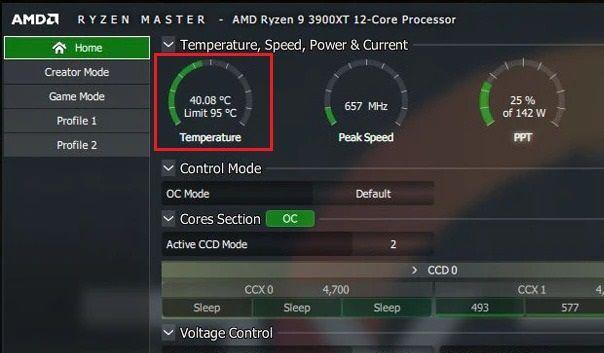
Check CPU temperature in Windows 11 with Ryzen Master (for AMD processors)
If you have an AMD processor, you'd better use Ryzen Master to find the most accurate CPU temperature in Windows 11. Unlike other programs that show "tctl" readings, Ryzen Master shows "tdie" temperatures, which are considered close to the actual CPU temperature . You will find that other applications add about 10 degrees Celsius to their readings (usually idle) when measuring the temperature of an AMD Ryzen processor. Therefore, it is better to use Ryzen Master if your Windows 11 PC is running on an AMD processor.
1. Open this page and scroll down to download Ryzen Master. After that, install the program.
2. Then open Ryzen Master and you will find your Ryzen CPU temperature at the top. Yes, it's that easy for AMD processor users.
Best Ways to Check CPU Temperature on Windows 11 PC
These are the six easiest ways to check the CPU temperature of your Windows 11 computer. I have mentioned all the simple and advanced programs to get accurate temperature readings of your Intel or AMD CPU. Core Temp should be enough for normal users, but if you need more information, you can try HWMonitor or HWiNFO. However, this is all from us. If you want to stress test your GPU on a Windows 11 PC, follow our helpful article. Finally, if you have any questions or suggestions for any other application that does this better, please let us know in the comment section below.