Fix MultiVersus not starting on Windows 10
MultiVersus is a well-known multiplayer online fighting game, amazing modern gaming world. However, few users are complaining about MultiVersus not launching when the game is launched on Windows 10 PC. If you are in the same boat, the troubleshooting tips discussed in this article will help you deal with the issue.
How to fix MultiVersus won't start on Windows 10
If you are unhappy that MultiVersus will not start the problem on your Windows 10 PC, here are some possible reasons why you should carefully analyze them in order to resolve the issue.
- The PC does not meet the basic requirements of the game.
- Some other background program is interfering with the game.
- You are using an unverified driver version.
- The game's graphics settings are incorrectly configured.
- The presence of malware and viruses.
- The .NET platform and operating system have not been updated to the latest version.
- The DirectX version is not up to date.
- Overclocking
- Any misconfigured or corrupted game installation files also cause the problem.
- The Microsoft C++ Redistributables are not compatible with the game and PC.
Here are a few possible troubleshooting steps that will help you resolve the issue in question.
Method 1: Basic Troubleshooting Methods
Follow these basic troubleshooting methods to resolve the reported issue.
1A. Check system requirements
Minimum System Requirements MultiVersus
- Processor: Intel Core i5-2300 or AMD FX-8350
- RAM: 4 GB
- VIDEO CARD: Nvidia GeForce GTX 550 Ti or AMD Radeon HD 5850 | Intel UHD 750
- PIXEL SHADER: 5.0
- VERTEX SHADER: 5.0
- FREE DISK SPACE: 6 GB
- DEDICATED VIDEO MEMO: 1024 MB
Recommended Requirements MultiVersus
- Processor: Intel Core i5-3470 or AMD Ryzen 3 1200
- RAM: 8 GB
- VIDEO CARD: Nvidia GeForce GTX 660 or AMD Radeon R9 270
- PIXEL SHADER: 5.0
- VERTEX SHADER: 5.0
- FREE DISK SPACE: 6 GB
- DEDICATED VIDEO MEMO: 2048 MB
1B. Check your internet connection
An unstable internet connection causes MultiVersus to not work, and if there are any obstructions between your router and your computer, they can interfere with your wireless signal and cause intermittent connection problems.
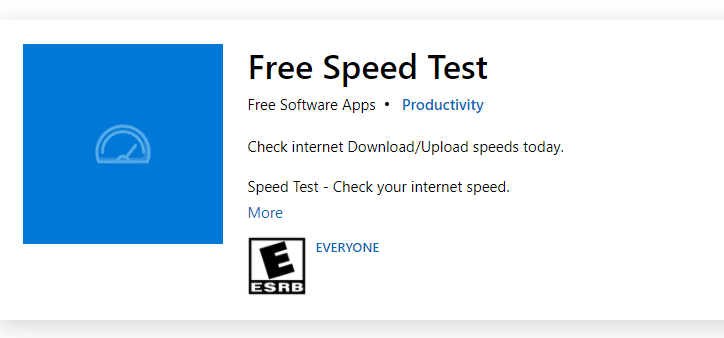
You can run a speed test to know the optimal network speed level required for a proper connection.
Make sure your device meets the criteria below.
- Find your network's signal strength and if it's very low, remove any obstacles in the way.
- Avoid having too many devices connected to the same network.
- Always buy a modem/router that is verified by your Internet Service Provider (ISP) and they do not conflict.
- Do not use old, broken or damaged cables. Replace cables if necessary.
- Make sure the wires from the modem to the router and from the modem to the wall are stable and free from interference.
If there are any internet connection issues, check out our Fix Network Connection Issues in Windows 10 guide to fix them.
1C. stop overclocking
- Every high-end computer comes with an overclocking feature that helps put out more power than your specs you already have. Running a graphics card or processor faster than the default speed is referred to as overclocking.
- When this happens, your computer will reach its maximum temperature after a certain amount of time. The computer detects this and adjusts the clock speed to normal until it cools down. The clock speed increases again after they cool down.
- This increases the performance of your computer and helps a lot if you don't have a powerful computer.
- It is worth noting that not all games support overclocking. The same applies to MultiVersus. So, you should try disabling all overclocking on your computer and try launching the game. If it starts normally, the problem is fixed.
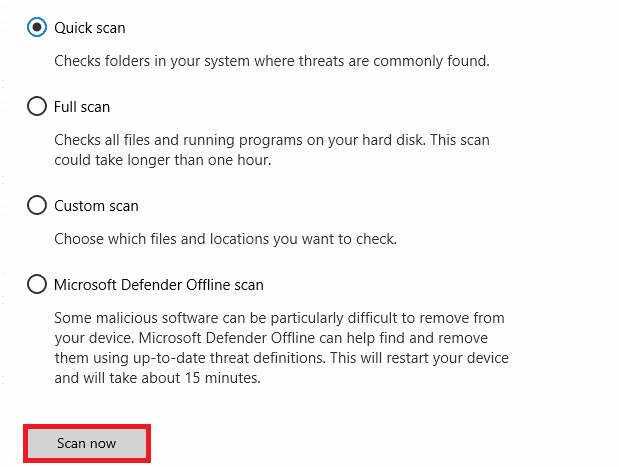
1D. Run a malware scan
Having a virus or malware attack will result in gaming problems on your computer. In the event that the virus attack is very serious, you will not be able to constantly connect to any online game at all. To fix this problem, you need to completely remove the virus or malware from your Windows 10 PC.
We recommend that you scan your computer according to the instructions in our guide How do I run a virus scan on my computer?
Also, if you want to remove malware from your computer, check out our guide How to remove malware from your computer in Windows 10.
1E. Update your GPU drivers
Graphics drivers are responsible for heavy graphics and video processing in games. If you encounter any launch conflicts with MultiVersus, make sure you are using updated device drivers as they act as a link between your hardware and your PC's operating system. Many users have suggested that updating drivers fixed the MultiVersus not working issue. Read and follow the steps in our guide 4 Ways to Update Graphics Drivers in Windows 10 to do so.
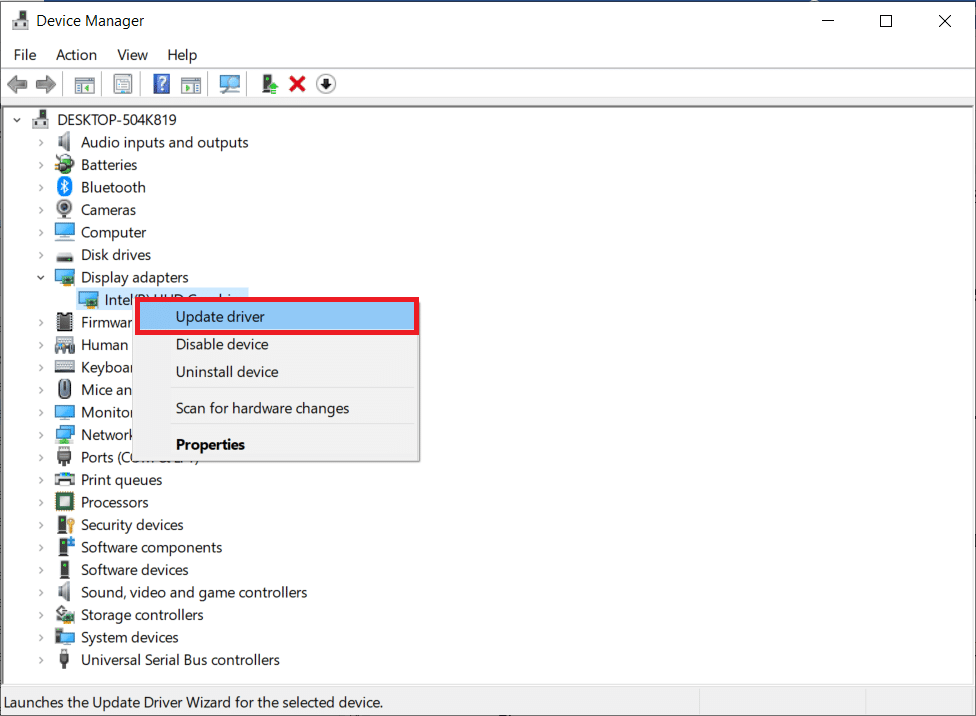
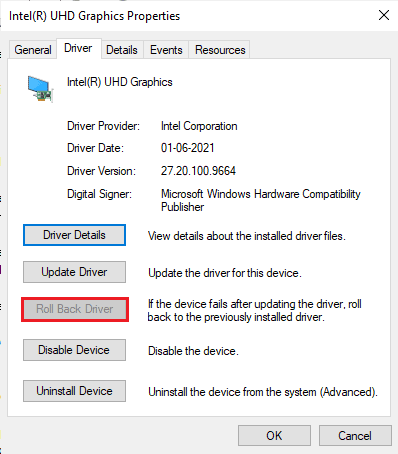
1 floor Rollback GPU Drivers
Sometimes the current version of the GPU drivers can cause the discussed startup problem in MultiVersus, in which case you need to restore the previous versions of the installed drivers. This process is called driver rollback and you can easily roll back your computer drivers to their previous state by following our guide How to roll back drivers in Windows 10.
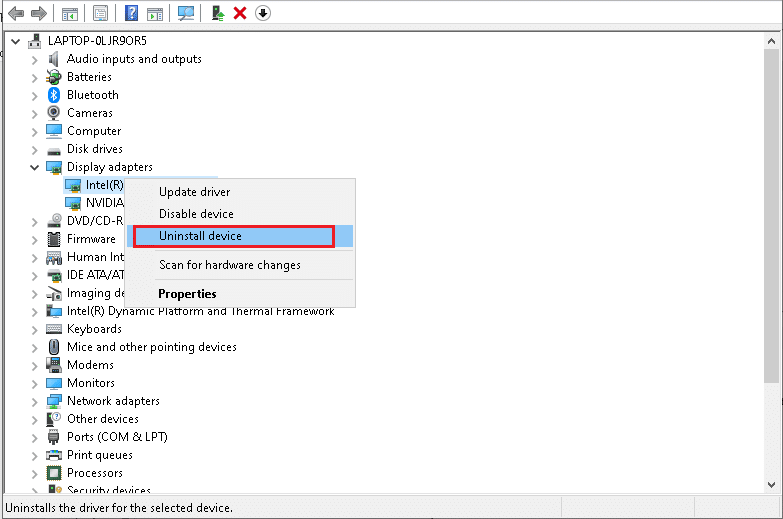
1g Reinstall the GPU driver
If you are still experiencing the issue of MultiVersus not launching after updating your GPU drivers, please reinstall your device drivers to fix any incompatibility issues. There are several ways to reinstall drivers on your computer. However, you can easily reinstall your graphics drivers by following the instructions in our How to Uninstall and Reinstall Drivers in Windows 10 guide.
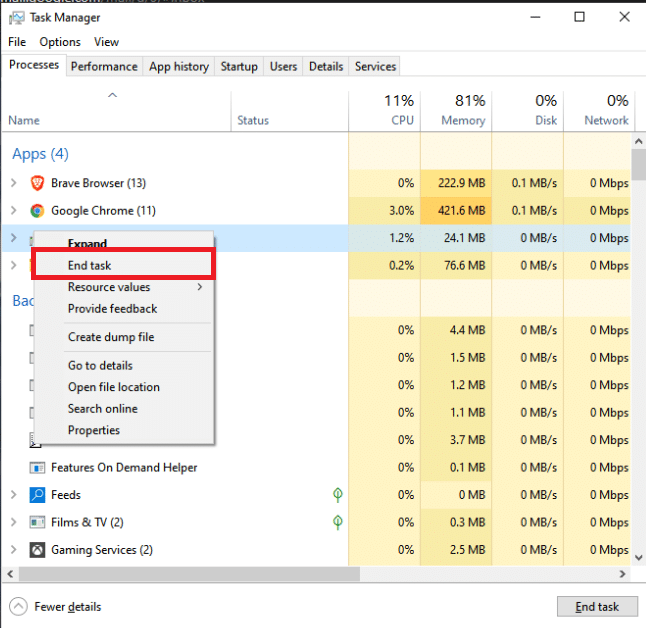
1 hour End background processes
Several users have confirmed that MultiVersus not starting on PC can be resolved by closing all background tasks running on your PC. To complete a task, follow our guide How to complete a task in Windows 10 and proceed according to the instructions.
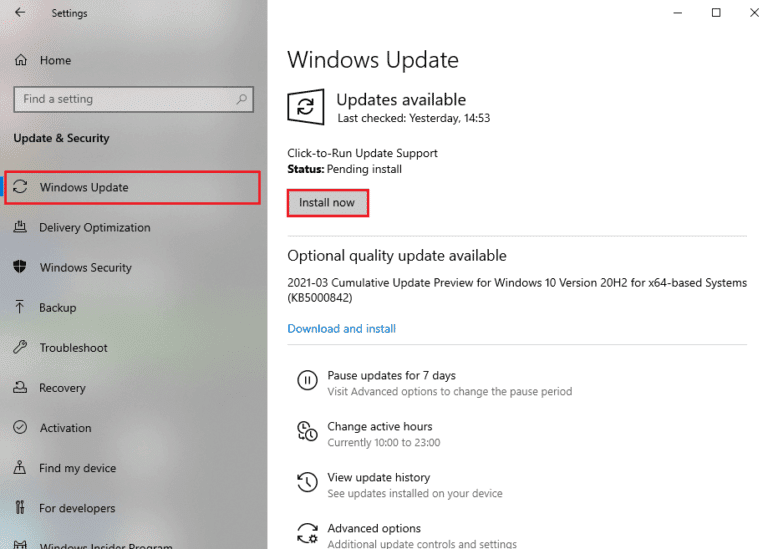
1I. Update Windows
You can also fix errors on your computer and in the game by updating your operating system. Always check if you have updated your Windows operating system and if there are any updates pending, use our guide How to download and install the latest Windows 10 update.
1J. Temporarily disable your antivirus (if applicable)
Some incompatible antivirus programs installed on your computer may cause problems starting MultiVersus. To avoid conflicts, you should verify the security settings of your Windows 10 computer and check if they are stable or not. To find out if the antivirus package is causing the issue under discussion, disable it once and try to connect to the network.
Read our guide on how to temporarily disable your antivirus in Windows 10 and follow the instructions to temporarily disable your antivirus program on your PC.
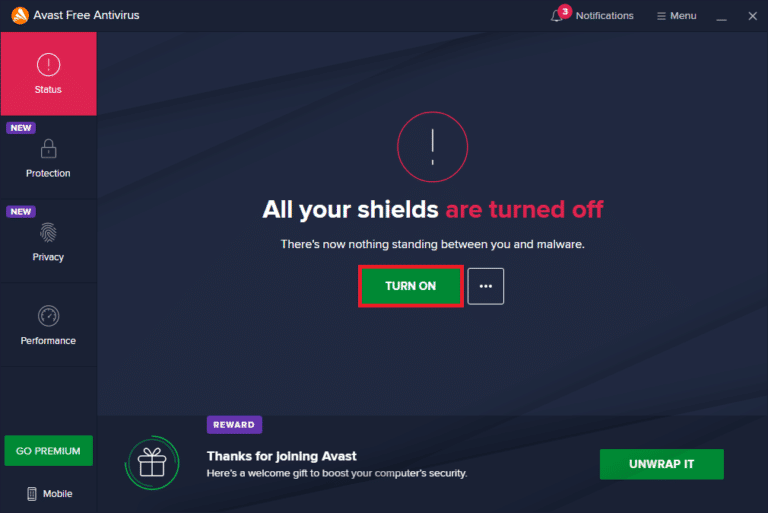
If you have a solution to your problem after disabling the antivirus program on your computer, then you are advised to completely uninstall the program from your computer.
Read our guide on Force Removal of Programs That Won't Remove in Windows 10 to remove an antivirus program from your computer.
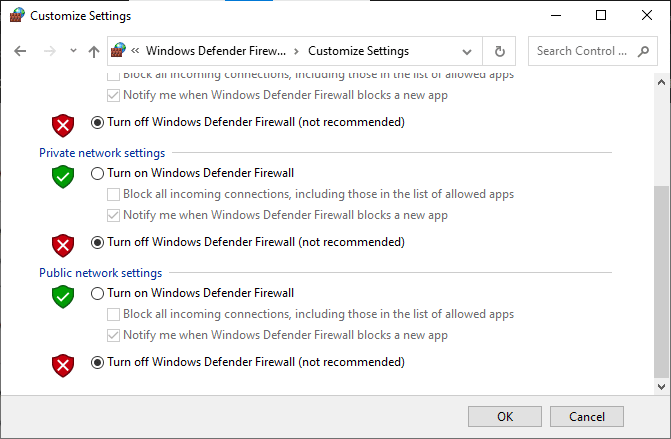
1 to. Disable Windows Defender Firewall (not recommended)
Your PC will face an issue where MultiVersus is not working due to an overly protective firewall suite on Windows 10 PC. To fix this issue, you can either add a new rule for your game, whitelist the game, or as a final fix temporarily disable firewall.
Our guide on how to turn off the Windows 10 firewall will help you.
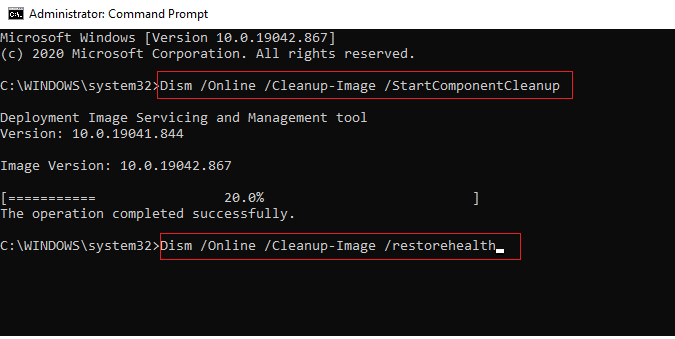
1l. Restore system files
If you have missing or corrupted files on your Windows 10 PC, you will face the problem of running MultiVersus forever. However, you can repair these corrupted files using the built-in utilities, namely System File Checker and Deployment Image Servicing and Management.
Read our guide to restoring system files in Windows 10 and follow the steps to repair any corrupted files.
Method 2: Run the MultiVersus game as an administrator
If MultiVersus does not have the necessary administrator rights, some important features of the game will be limited, which will prevent MultiVersus from launching every time you open the game or install any updates. Follow the instructions below to run the game as an administrator.
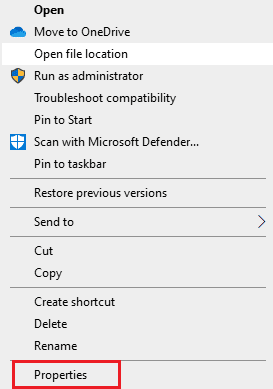
1. Right-click the MultiVersus shortcut on the desktop.
Note. You can also navigate to the installation directory and right click on it.
2. Then select the "Properties" option.
3. Now go to the Compatibility tab and click on Run this program as an administrator.
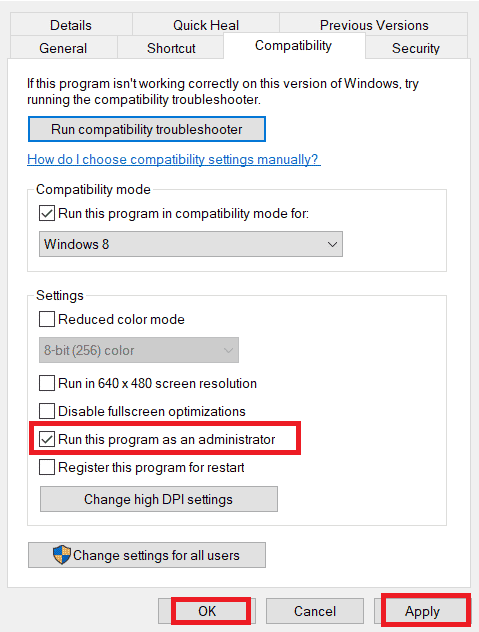
4. Finally, click Apply > OK to save the changes.
Check to see if you've fixed the MultiVersus launch issues.
Method 3: Change Gameplay Priority
The preference of an application or process tells the computer its importance and whether it should be given priority over others when allocating resources. The priority of each application is normal, except for the default system processes. MultiVersus may crash if it doesn't get enough resources.
1. Press the Ctrl + Shift + Esc keys at the same time to open the taskbar.
2. Now find the MultiVersus process.
3. Then change the priority to High priority and check if it works.
Note. Change the priority with great care, as inadvertently changing the priority of a process can make your system very slow or unstable.

4. Close Task Manager and restart your computer.
Method 4: set high performance
You can also optimize your game by setting your high performance meal plan options. These power plans are designed to manage power settings in portable devices. Follow the instructions below to use the high performance power plan settings on your system.
1. Press Windows Key + I at the same time to open Windows Settings.
2. Now click System Preferences.
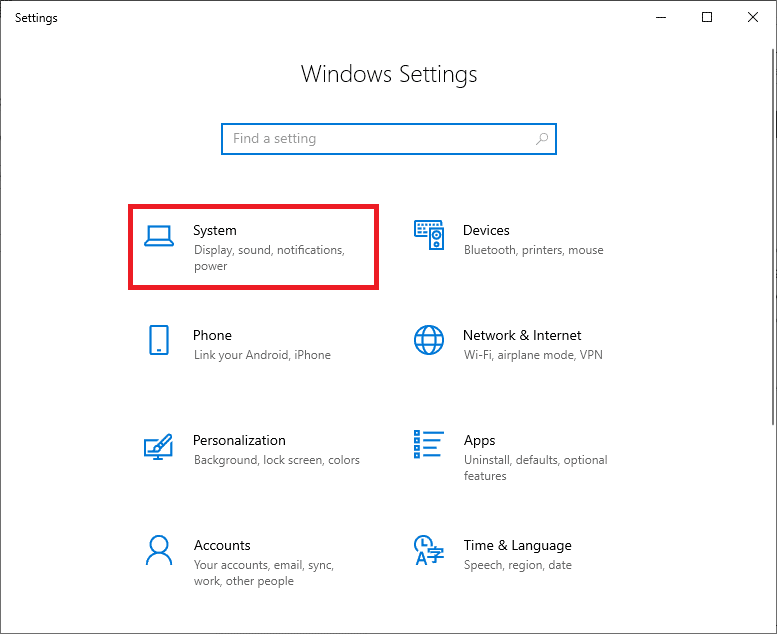
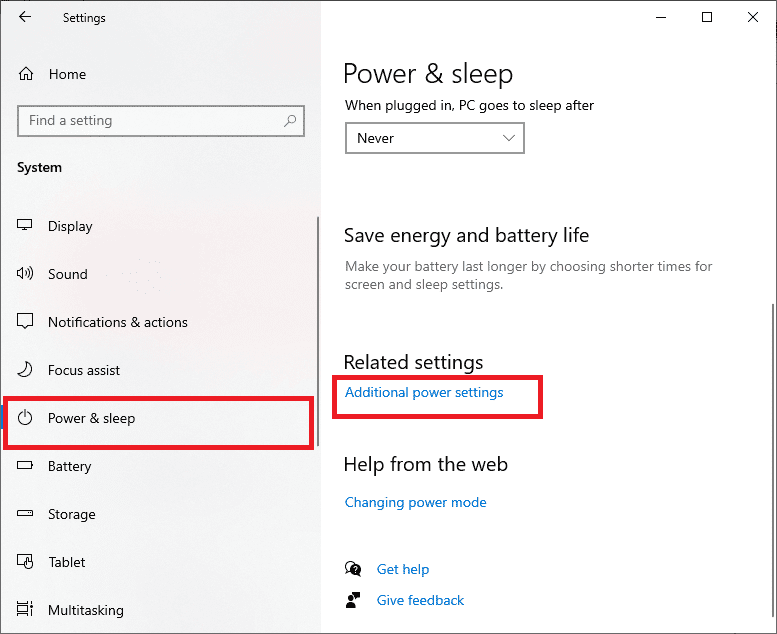
3. Now select the Power and Sleep option and click on Advanced Power Options under Related Options.
4. Now, select the High Performance option under High Optional Plans as shown in the image below.
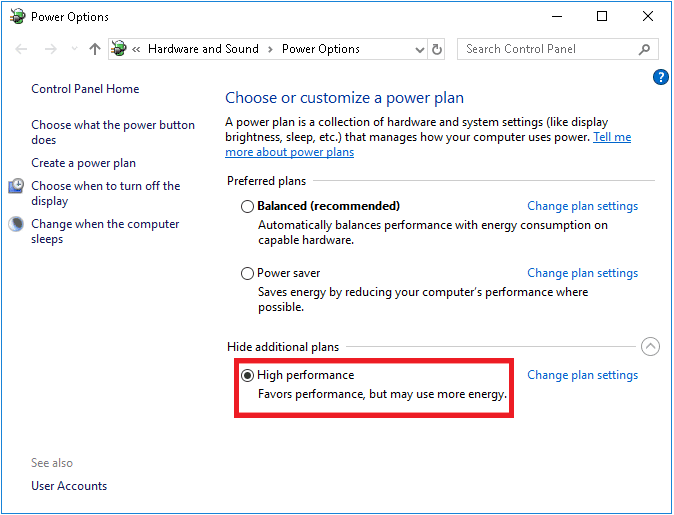
Now you have optimized your system, check if you have fixed MultiVersus not running at startup.
Method 5: Update Steam and MultiVersus Game
If you are using the legacy Steam app, you will not be able to access any of the games smoothly. So always make sure you are running an updated Steam and MultiVersus version of the game before launching it.
1. Press the Windows key and type Steam, then click Open.

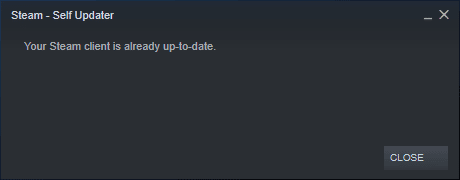
2. Now click "Steam" in the top left corner of the screen and then "Check for Steam Client Updates..." as shown below.
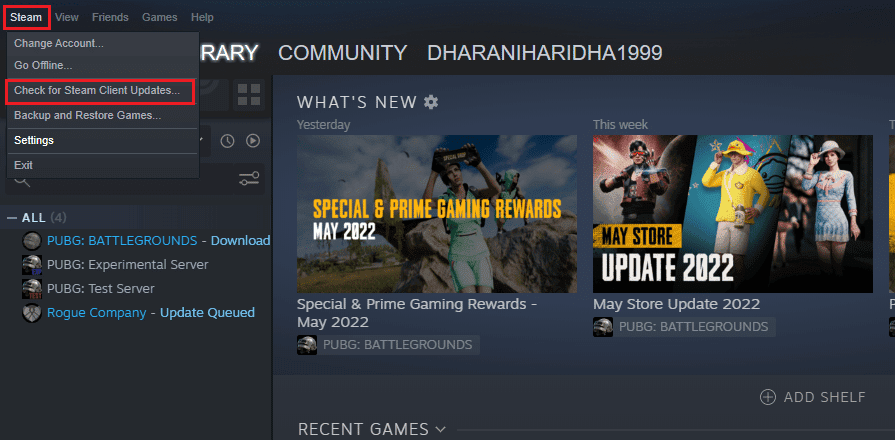
3. If you have any new updates to download, install them and make sure your Steam client is up to date.
4. Now restart Steam and check if the issue is now resolved.
Similarly, it is always important that your game is running on the latest version to avoid any conflicts. Until your game is updated, you will not be able to successfully log into the MultiVersus servers. To update your game, follow the steps below.
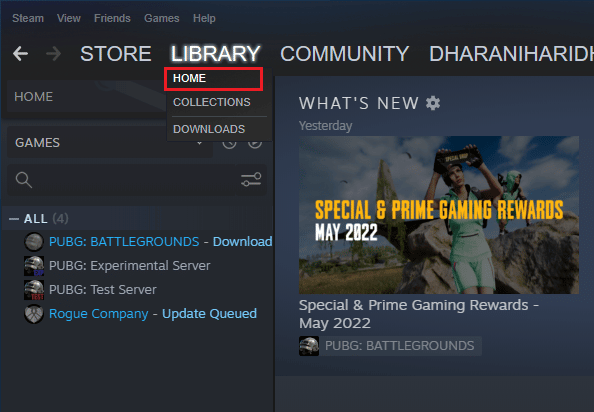
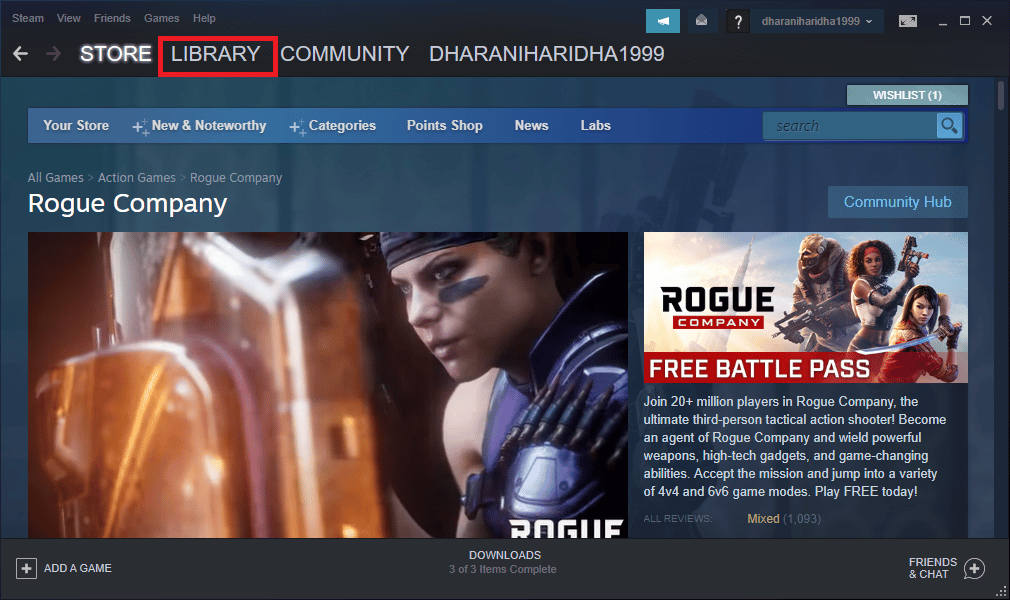
1. Launch Steam and go to the LIBRARY.
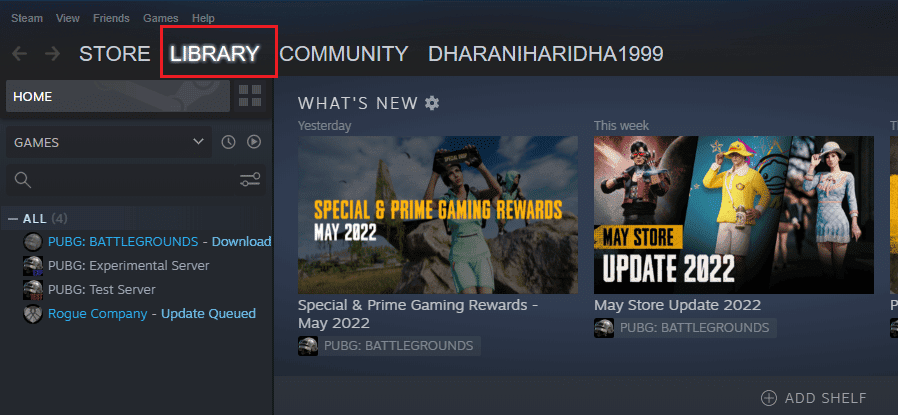
2. Now press HOME and search for MultiVersus.
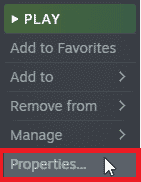
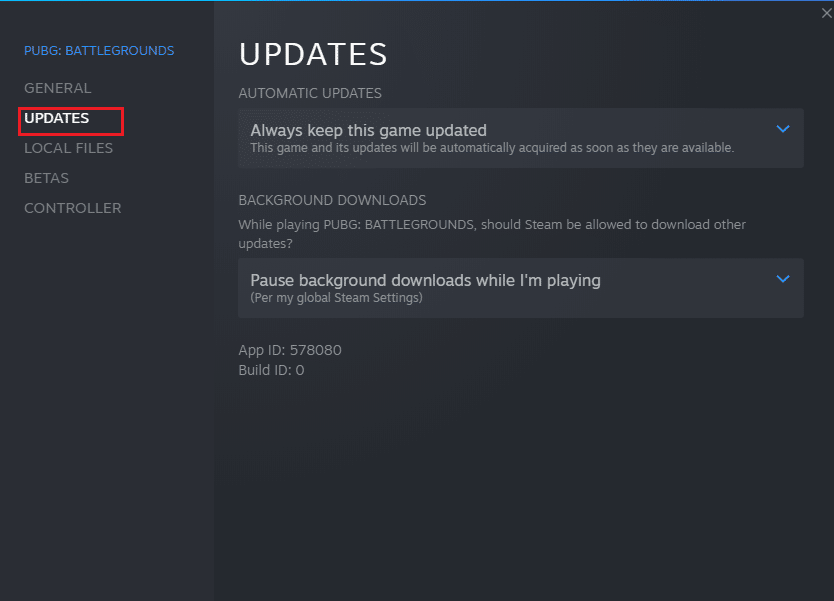
3. Next, right-click on the game and select the "Properties..." option.
4. Now go to the UPDATES tab and check if any updates are pending. If so, follow the on-screen instructions to download the latest updates.
After updating, check if the issue with starting MultiVersus is fixed.
Method 6: Disable Full Screen Optimization
Few users have suggested that disabling Full Screen Optimization on PC helped them resolve the MultiVersus launch issue. Follow the instructions.
1. Go to the Steam LIBRARY menu.
2. Now right-click on the MultiVersus game and select "Properties…".

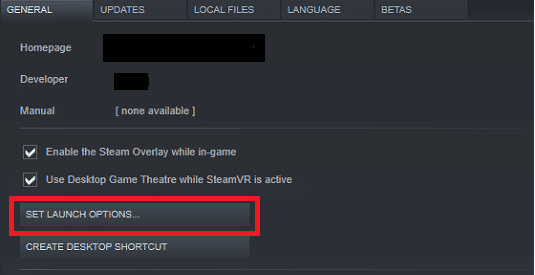
3. Now go to the "GENERAL" tab and click "SET LAUNCH OPTIONS..." as shown in the picture.
4. Now a new advanced user warning window will open. To open the game in windowed mode, enter the -window parameter.
5. Now save your changes by clicking OK and exit the properties window.
6. Now restart the game and make sure it is running in windowed mode.
Note. You can also go to SET LAUNCH OPTIONS… again and enter the following options instead of the last option.
–windowed -w 1024
7. Now save your changes by clicking OK.
This option sets the game to run in windowed mode.
Method 7: Disable In-Game Overlay
The Steam Overlay is a part of Steam that allows users to access their friend list and web browser, and allows for in-app purchases. This is an important tool, but sometimes it causes MultiVersus to not launch at startup. If you want to fix this problem, then disable the Steam game overlay.
1. Open the Steam app and click LIBRARY.
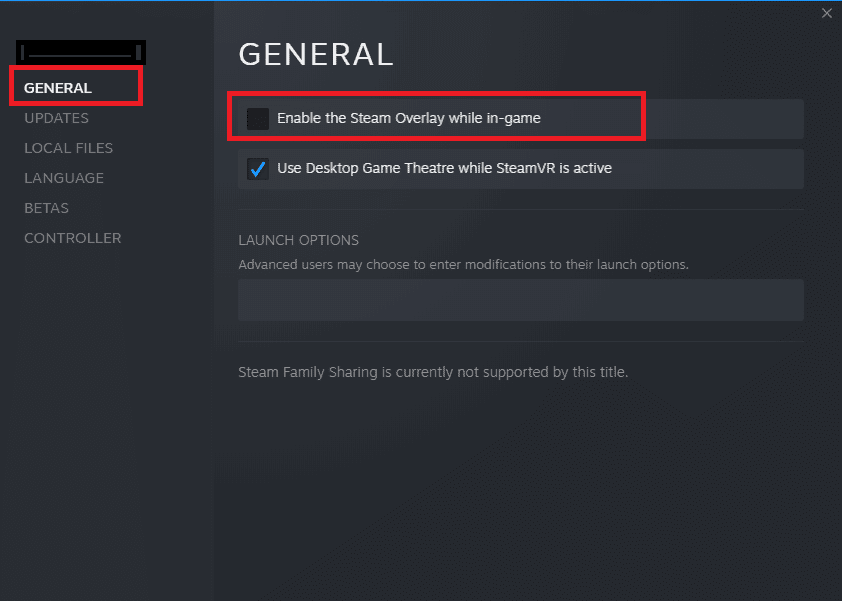
2. Now right click on MultiVersus and select "Properties…".

3. Now go to the GENERAL tab and uncheck "Enable Steam Overlay While Playing".
4. Finally, restart the game and check if the issue with starting MultiVersus is resolved.
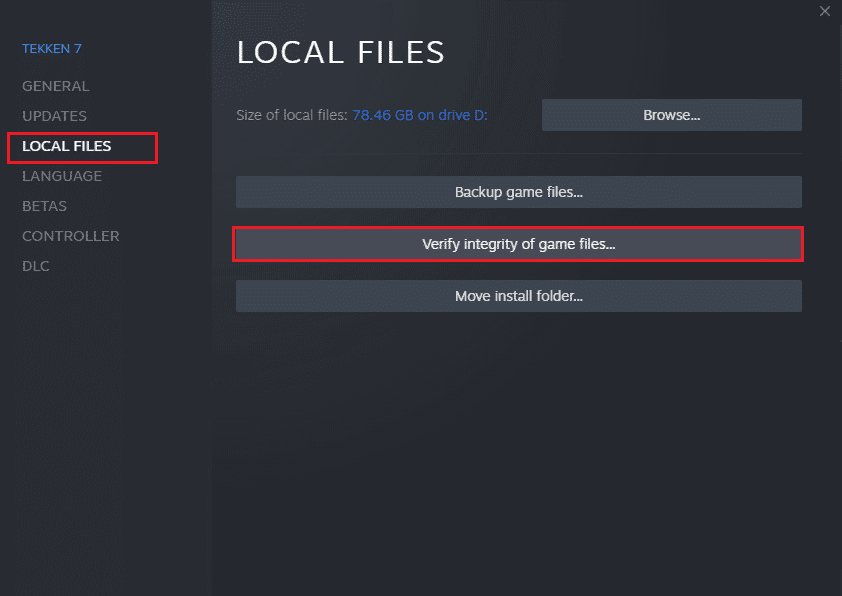
Method 8: Verify the integrity of the game files
We have seen many instances where game files are either missing, corrupted, or have incomplete installations. Users may also experience MultiVersus not launching on PC if they are interrupted by the update process or the game files are moved. In this method, you will open Steam and use the built-in game integrity checker. It will be replaced if the application finds something. Read our guide on how to verify the integrity of game files on Steam.
Method 9: Update the .NET Framework
The .NET platform on a Windows 10 PC is essential for the smooth running of modern apps and games. Many games have an auto-update feature for the .NET framework, so it will update automatically whenever an update is available. Otherwise, if your PC is prompted to update, you can manually install the latest version of the .NET Framework as described below to fix the MultiVersus launch issue.
1. Check for new updates for the .NET platform from the official Microsoft website .
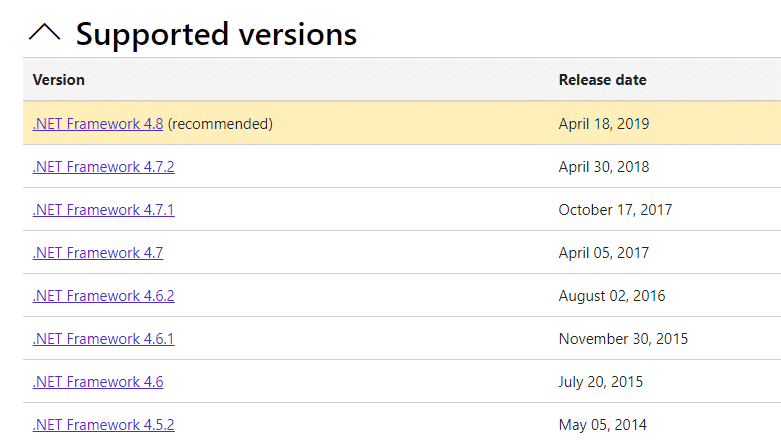
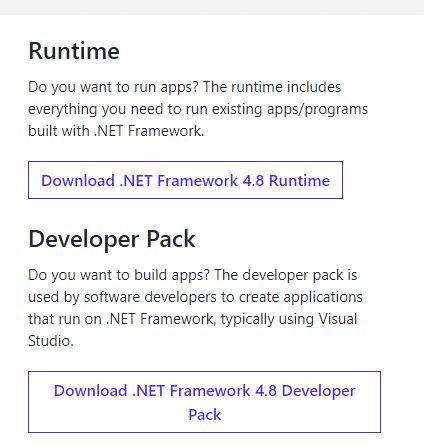
2. If there are any updates, click the appropriate/recommended link and select the Download .NET Framework 4.8 Runtime option.
Note. Do not click "Download .NET Framework 4.8 Developer Pack" as it is used by software developers.
3. Go to My Downloads, double click the setup file to run the downloaded file, and follow the on-screen instructions to successfully install the .NET framework on your Windows PC. After that, check if you have fixed the problem in question or not.
Method 10: Update DirectX
To enjoy smooth media playback in MultiVersus, you must ensure that DirectX is installed and updated to the latest version. DirectX helps improve the visual experience of multimedia, especially in graphical games and applications. Worth updating DirectX required for this game.
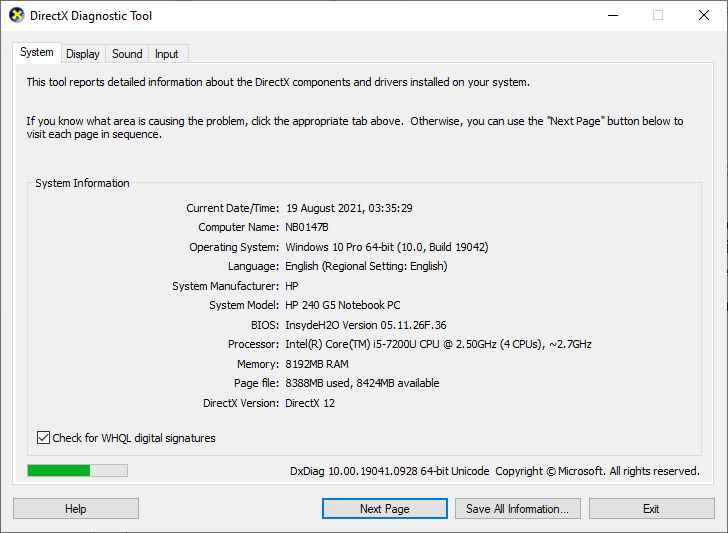
1. Press the Windows + R keys at the same time to open the Run dialog box.
2. Type dxdiag and press the Enter key to open the DirectX Diagnostic Tool.
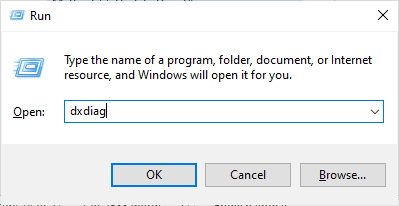
3. Check the version of DirectX whether it contains DirectX 12 or not.
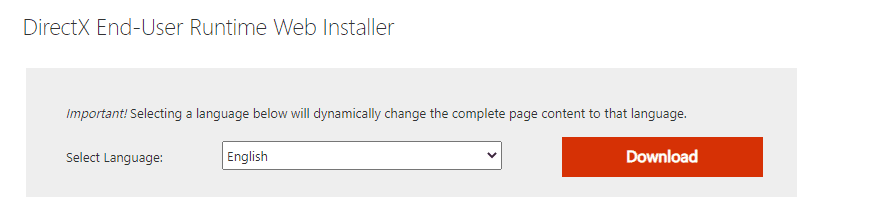
4. If your system does not have DirectX 12, download and install it from the DirectX Download Page following the on-screen instructions.

Note. If you don't have DirectX 12 on your system, download and install it from the official website following the instructions on the screen.
After installing DirectX, check if the problem occurs again.
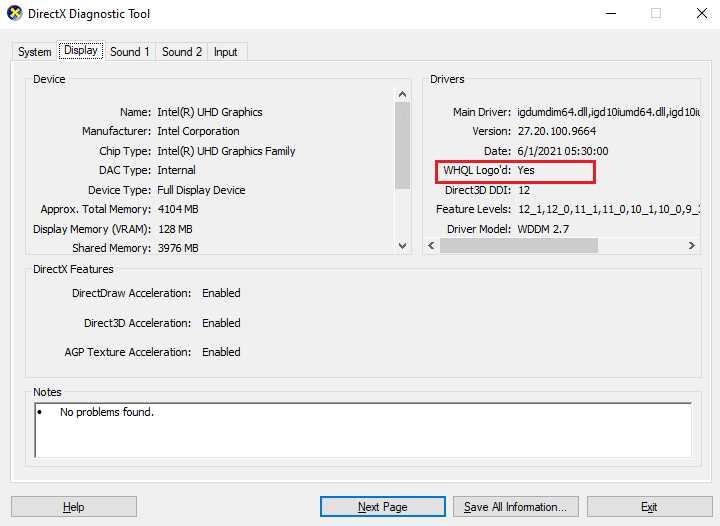
Note. Make sure the Check WHQL Digital Signatures checkbox is checked on the System tab, and on all tabs, check if the WHQL logo is set to Yes.
Method 11: Restore the Microsoft Visual C++ Redistributable Package
Alternatively, you can try repairing the Microsoft Visual C++ Redistributable Packages to fix the MultiVersus launch issue as follows:
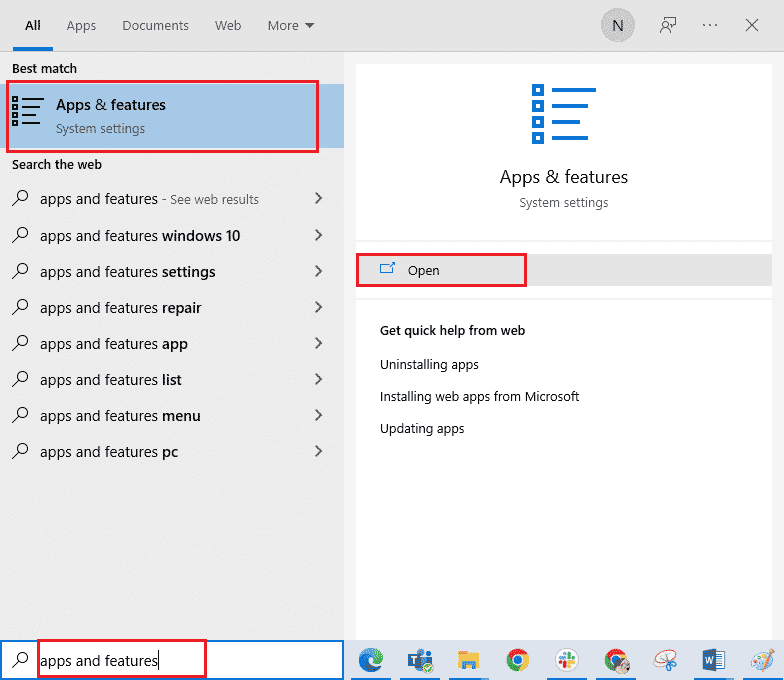
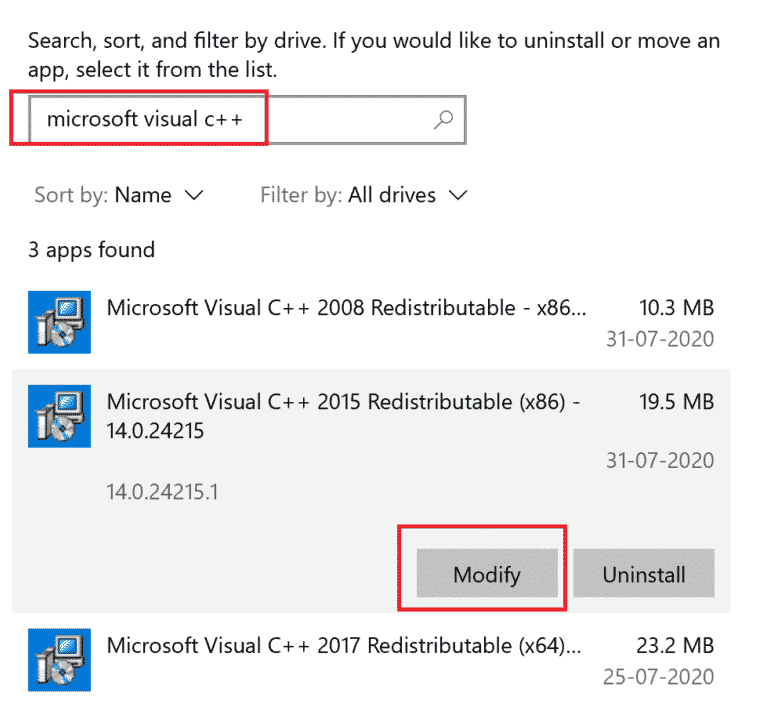
1. Press the Windows key, type Apps & Features, then click Open.
2. Locate the Microsoft Visual C++ Redistributable Package.
3. Then select the package and click Edit.
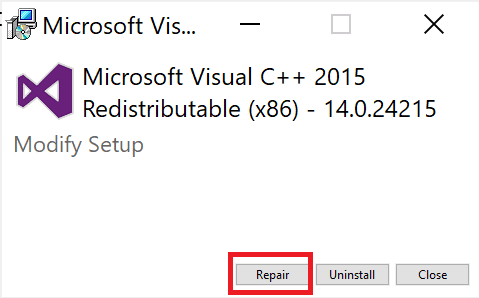
4. Then click "Yes" in the "User Account Control" dialog box.
5. In the pop-up window that appears, click Restore. Wait for the process to complete.
6. Repeat the above steps to modify all Microsoft Visual C++ Redistributable Packages.
7. Finally, restart your computer.
Open an app that you couldn't open before. If that doesn't work, try reinstalling the C++ Redistributable Package.
Method 12: Reinstall the Microsoft Visual C++ Redistributable
If the previous Microsoft C++ Visual Redistributable repair method didn't resolve the issue with running MultiVersus, you will need to reinstall the redistributable. Follow the given steps to uninstall and then install them again.
1. Open system settings for apps and features.
2. Select the Microsoft Visual C++ Redistributable Package, then click Uninstall.
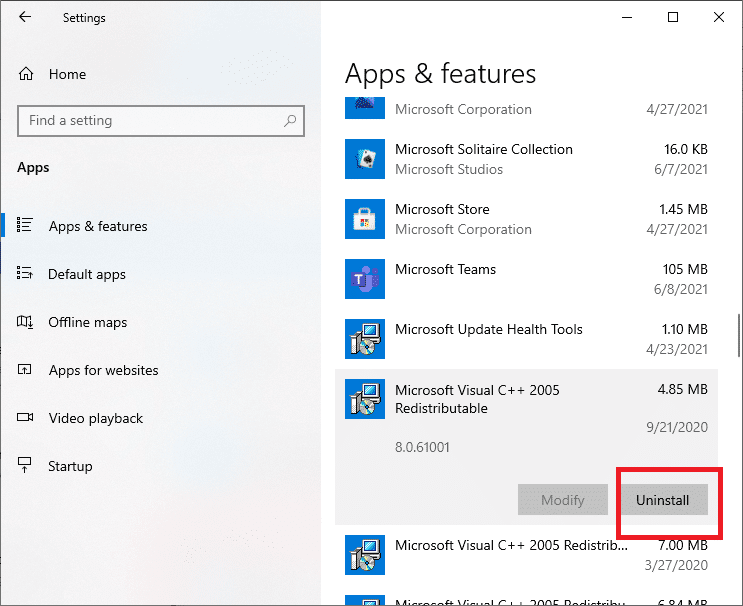
3. Click Remove again to confirm and remove the package.
Note. Be sure to uninstall all Microsoft Visual C++ Redistributable Packages.
4. Press the Windows key, type Command Prompt, then click Run as administrator.
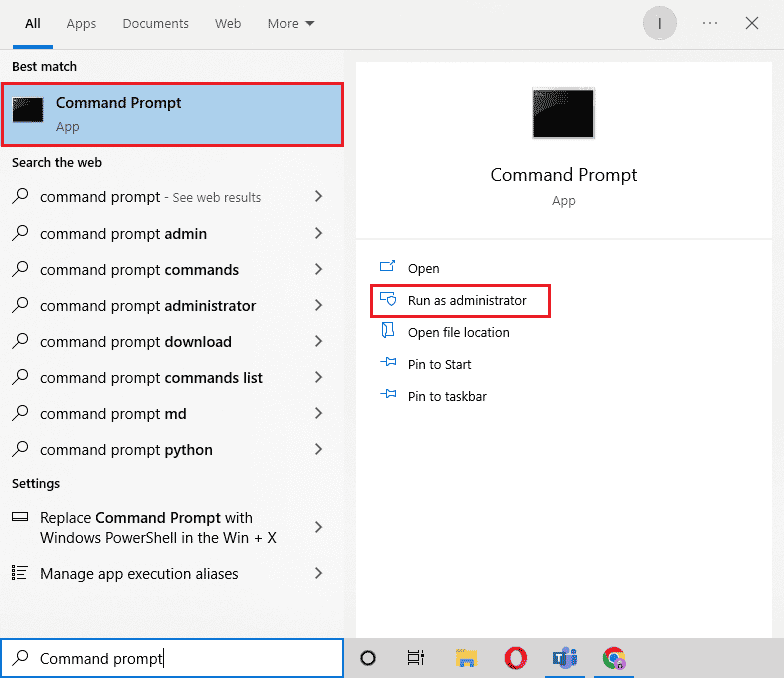
5. Type the following command and press the Enter key.
Dism.exe /online /Cleanup-Image /StartComponentCleanup
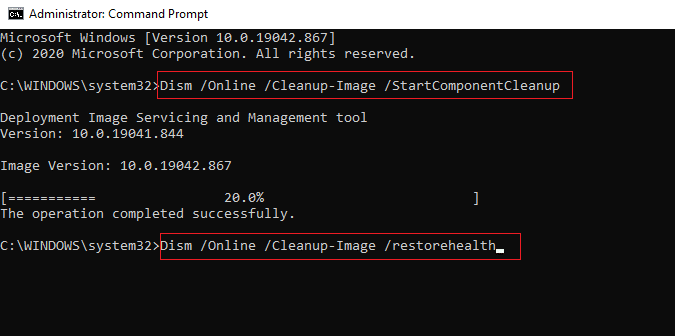
6. After the process is complete, restart your computer.
7. Next, visit the Microsoft Visual C++ Redistributable Webpage to download the latest C++ package as shown here.
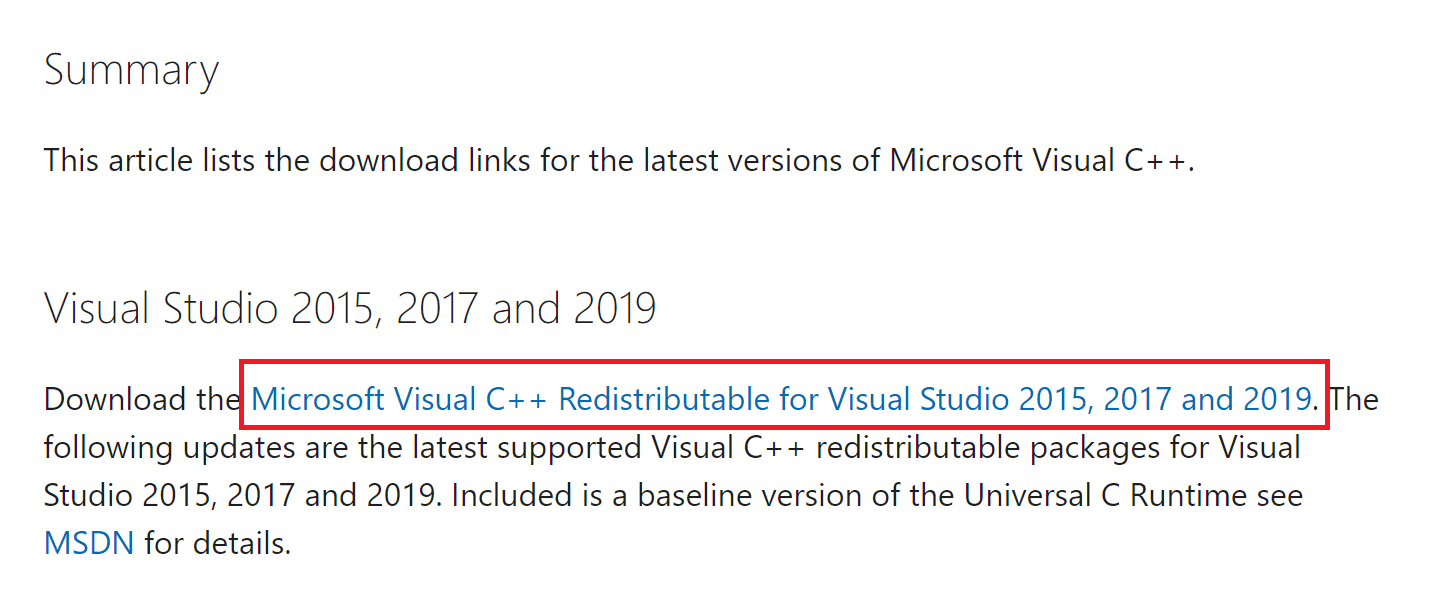
8. Once downloaded, open the downloaded file by double-clicking it in My Downloads. Install the package following the instructions on the screen.
9. Once the installation is complete, reboot your PC permanently.
***
We hope this guide was helpful and you were able to resolve the problem with running MultiVersus on your Windows 10 PC. Let us know which method worked best for you. Feel free to contact us with your questions and suggestions through the comments section below.