Fix iPhone Not Detected in Windows 10
Are you struggling to connect your iPhone to your Windows 10 PC? This can be quite bad and can upset you to the fullest. Sometimes you face this strange problem with your iPhone not being able to connect to Windows 10. And when this happens, even though both devices are connected physically, your OS cannot detect them. Now this question causes a lot of problems. It restricts data transfer, does not allow you to charge your phone, etc. This iPhone does not appear in Windows 10. The problem can be caused by your PC or iPhone for various reasons. If you are facing the same issue, here is a complete guide on how to fix iPhone not detected on Windows 10.
How to fix iPhone not detected on Windows 10
When your computer doesn't recognize your iPhone or any of your iOS devices, it doesn't necessarily often mean it's caused by a serious bug. However, it is still too early to make a decision on this matter. However, check out the causes listed below to understand the causes before trying the following solutions to find a possible fix.
- An outdated version of the Windows operating system, driver, or iTunes may create compatibility issues.
- The presence of faulty hardware on your PC or Apple devices. Sometimes the USB cable takes over as well.
- Active VPN presence on your Apple phone.
- If your iPhone does not enable the trust option, this may be the actual cause of the problem.
Now follow the methods listed below to get a fix for your iPhone not detected in Windows 10 issue.
Method 1: Basic Troubleshooting Steps
You should try the basic restart steps as mentioned below on your PC and iPhone before moving on to more advanced methods.
- Restart your computer. The first basic step to resolve any Windows error is to restart your computer. This is because using your system for long hours without rebooting causes RAM issues, sluggishness, internet connection errors, and performance issues. If any of these factors are the reason for iPhone not showing up in Windows 10 issue, then simply restarting your computer can resolve the error.
- Restart your iPhone. Rebooting the phone always helps to solve any technical problem. This method is known for completely updating your phone and clearing the cache and temporary files. Therefore, this step is mandatory.
- Troubleshooting hardware connection issues: Another important way to fix any connection error is to remove and reconnect the connections. You may well know that the key to the functioning of any hardware device is proper connection. In this case, be sure to check if all relevant hardware devices such as PC port and USB cable are properly connected to your system. Sometimes faulty hardware can also cause problems. Therefore, be sure to check and repair faulty hardware components. If not, replace them completely.

Method 2: Turn on the "Trust this computer" option
Trust is the foundation of everything from real life to digital products. Similarly, mutual compatibility is the main attribute of any two devices connected via cables. Apple products offer great security features, which is a known fact. To get around it, you need to enable trust between your Windows PC and iOS phone device. Here's how to do it.
Option I: from the connection popup
1. Disconnect your Apple device from PC and wait a minute.
2. Reconnect your iPhone to your computer.
3. Tap the "Trust" option for the "Trust this computer?" option. pop-up window on the screen.
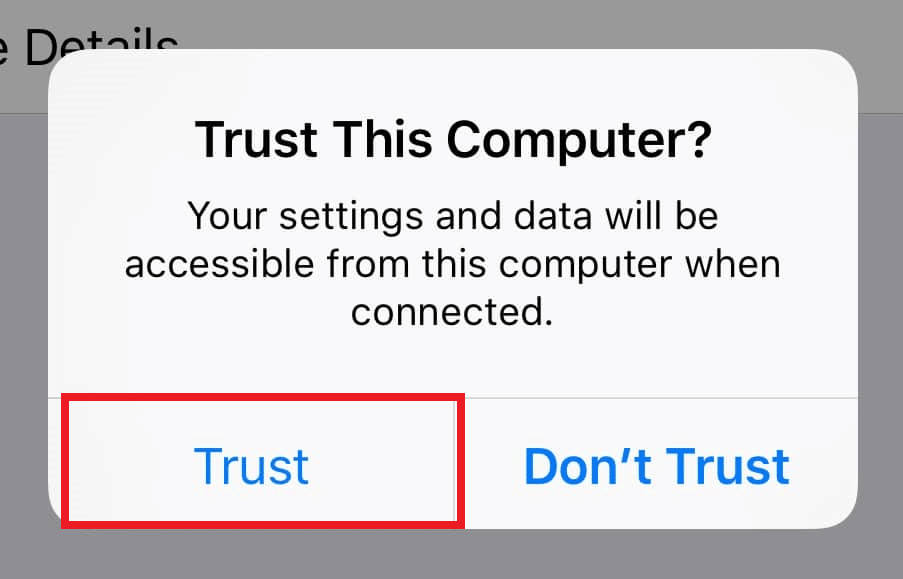
4. Trust is now automatically created between your iPhone and PC and the connection is successfully established.
Option II: From the settings app
If you don't see Trust this computer? pop-up notification, you may have previously clicked the "Do Not Trust" option when trying to connect to the same computer. In this case, you need to reset the settings for this feature. To change this setting, follow the steps below.
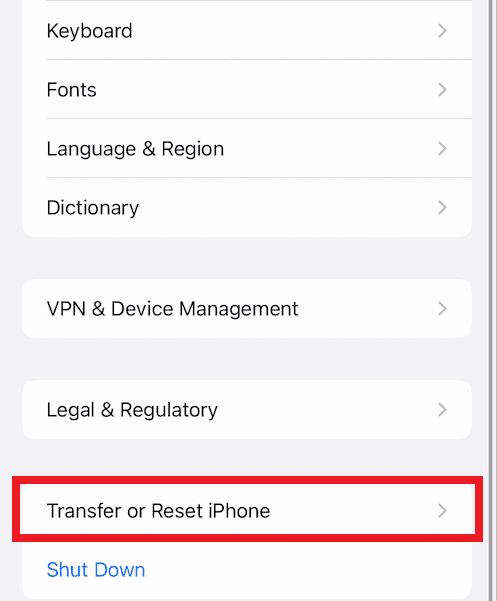
1. Open the Settings app on your iPhone.

2. Scroll down and tap the General option in the list.
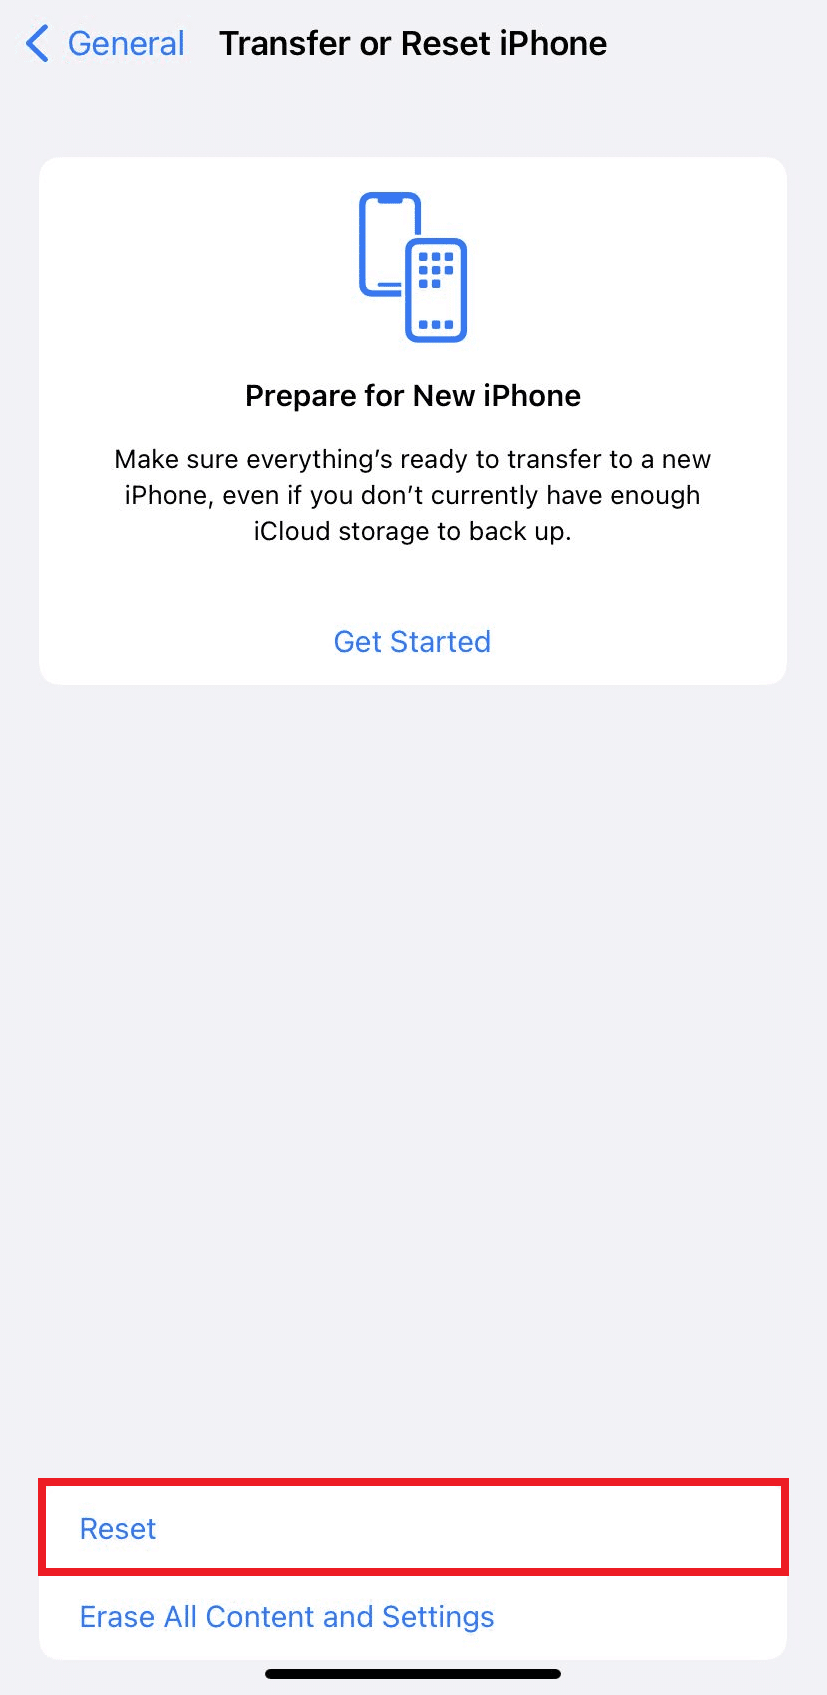
3. Then scroll down and click Transfer or Reset iPhone.
4. Now tap the Reset option from the bottom.
5. Here, tap the Reset Location & Privacy option. Click on it again for a confirmation popup to appear.
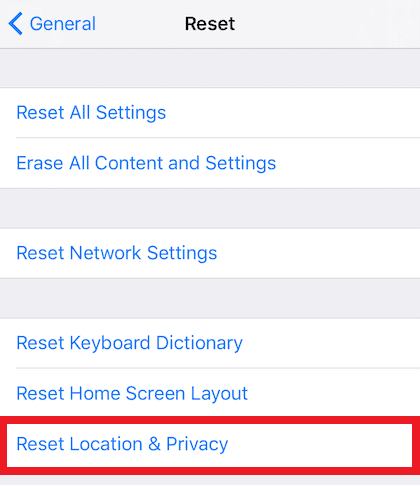
6. After that, enter the code number of your iPhone and follow the displayed instructions.
7. After this reset process, restart your iPhone and PC.
8. Now connect your PC and iPhone to each other. If the connection is successful, tap the "Trust" option for the "Trust this computer?" option. leap out.
Method 3: Disable VPN on iPhone
If you have a VPN on your iPhone, you might want to turn it off as this might be the reason for iPhone not showing up in Windows 10 issue. Typically, a VPN network is used to create an anonymous and secure connection on the internet. Check out our guide on what a VPN is and how it works to learn more about it. But the enabled VPN hides the iPhone from your PC and the connection seems to fail. Thus, it is vital to disable your iPhone VPN. Follow the steps below to disable VPN on iPhone.
1. Open the Settings app on your iPhone.
2. Scroll down and tap the General option in the list.
3. Click on the "VPN and device management" option.
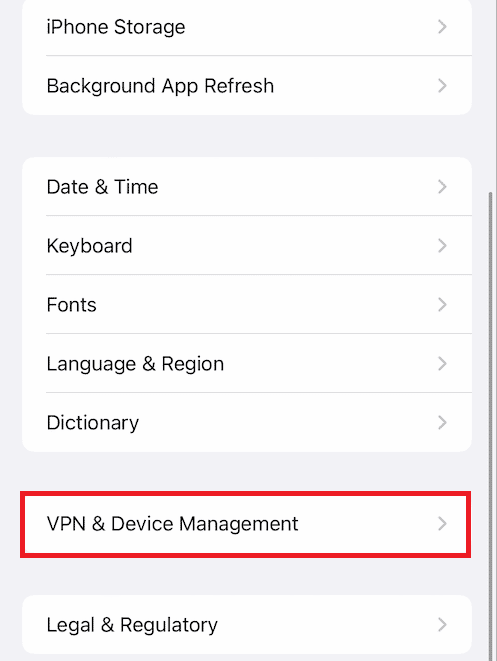
4. Click on the VPN option in the VPN and device management menu.
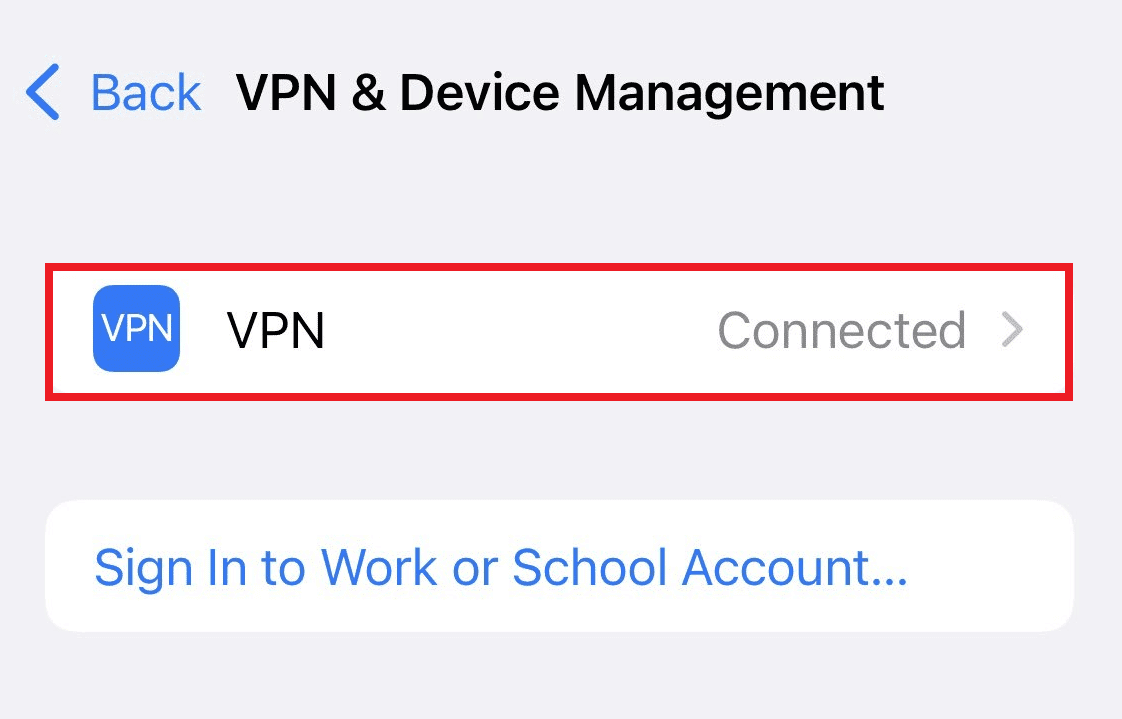
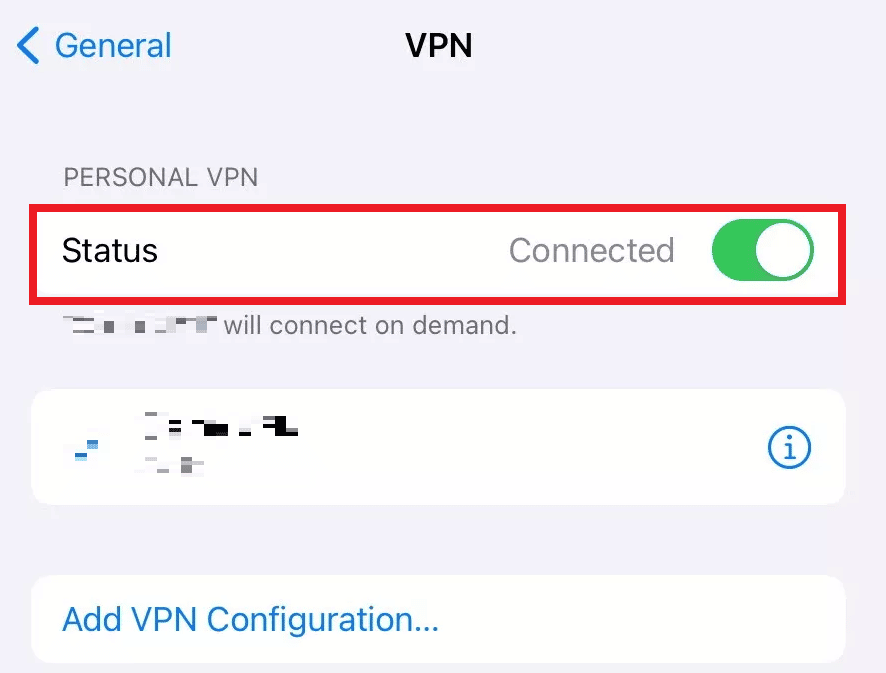
5. Turn off the "Status" slider under "PERSONAL VPN" to disable the VPN connection on your iPhone.
Method 4: Set Apple Services to Start Automatically
It is also possible that you forgot to start Apple services on your Windows PC. If this is the case, you are unable to connect your PC and iPhone to each other due to which iPhone does not show up in Windows 10 issue. To make sure this process is running, please read and follow the steps mentioned below.
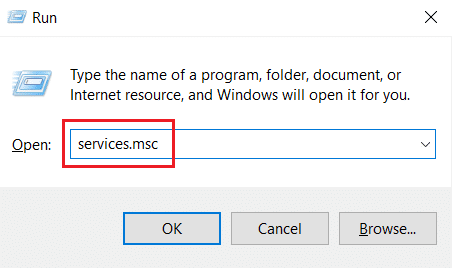
1. Press the Windows + R keys on your keyboard at the same time to open the Run dialog box.
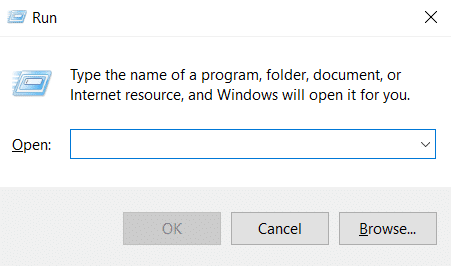
2. Type services.msc in the Run dialog box and press the Enter key.
3. In the Services window, locate and double-click the Apple Mobile Device Service option.
4. In the Properties pop-up window, click the General tab.
5. Here, set the Startup Type to Automatic from the drop-down menu and select the Start option under Service Status to start it.
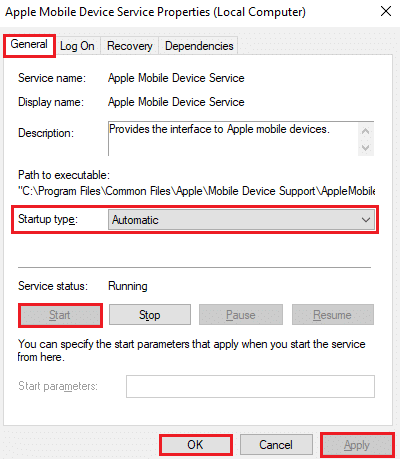
6. Finally, click Apply > OK to save your changes.
Method 5: Update iPhone USB Driver
There is a chance that an outdated iPhone USB driver on your PC is causing the connection issue. To fix this, you need to update your driver. Here's how to do it.
1. Connect your iPhone to your computer with a USB cable.
2. Press the Windows keys, type "Device Manager" and click "Open".

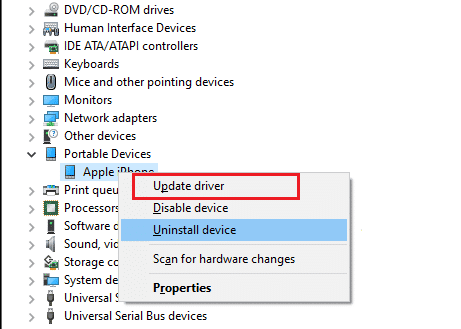
3. Double-click Portable Devices to expand it.
4. Right-click the desired iOS device and select Update Driver as shown below.
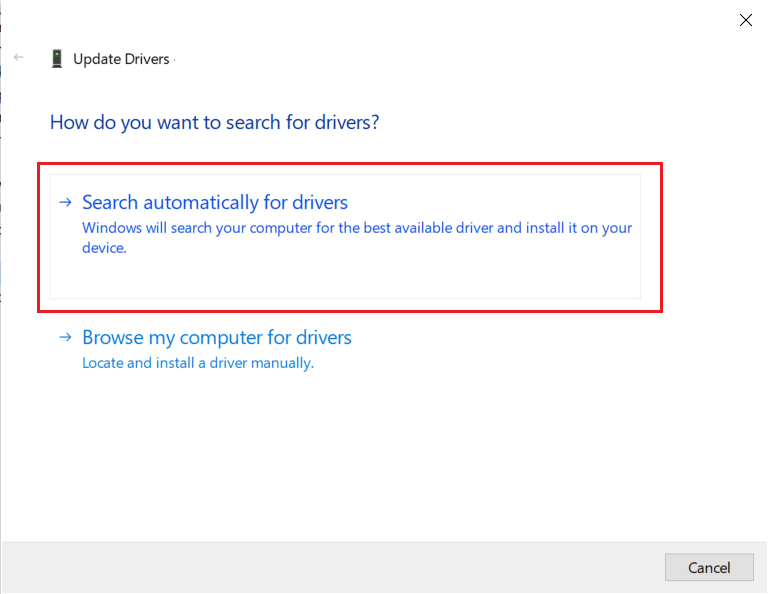
5. Now click "Search for Drivers Automatically".
6. After the update process is complete, restart your computer and reconnect your iPhone to establish a proper connection.
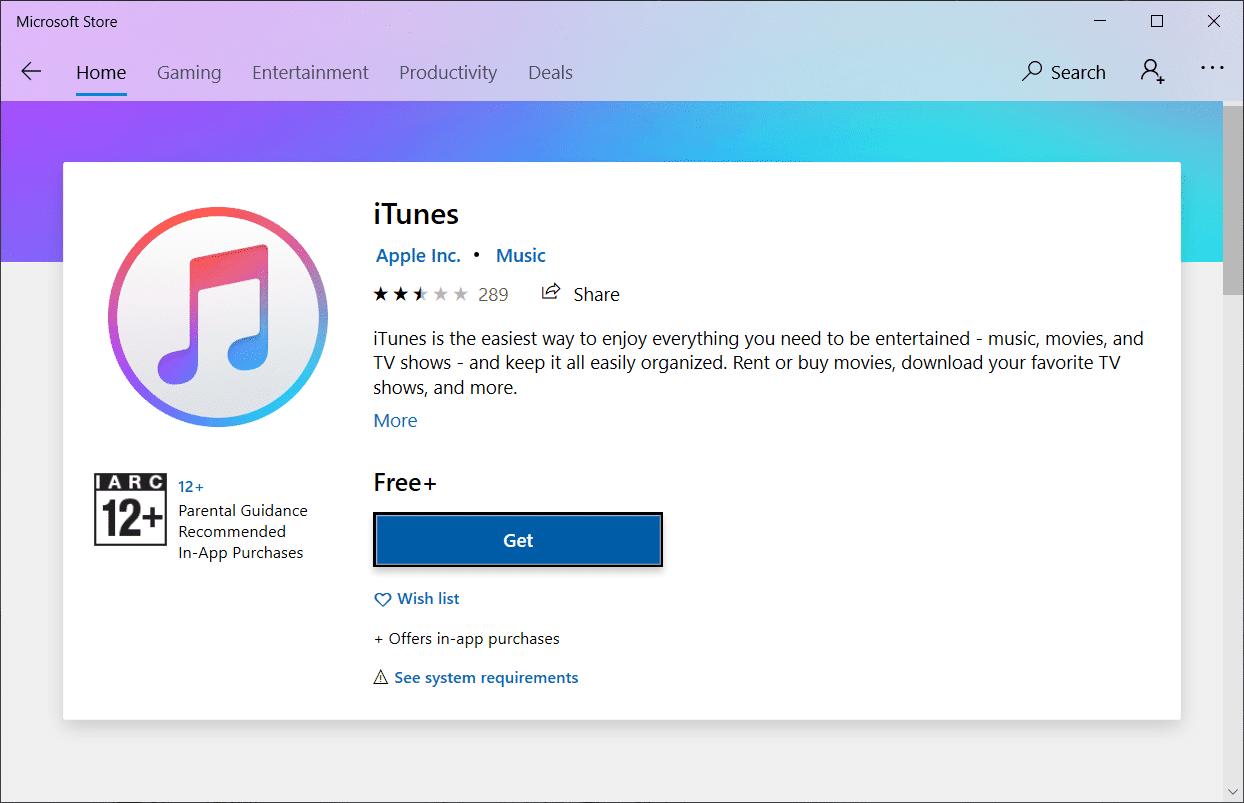
Method 6: Update the iTunes App
Sometimes an outdated version of the iTunes app on your PC can be the reason for iPhone not being detected in Windows 10 issue. A compatibility issue can occur if the app is running on an older version. Thus, follow the instructions below and update iTunes through the Microsoft Store online.
1. Press the Windows key, type Microsoft Store and click Open.
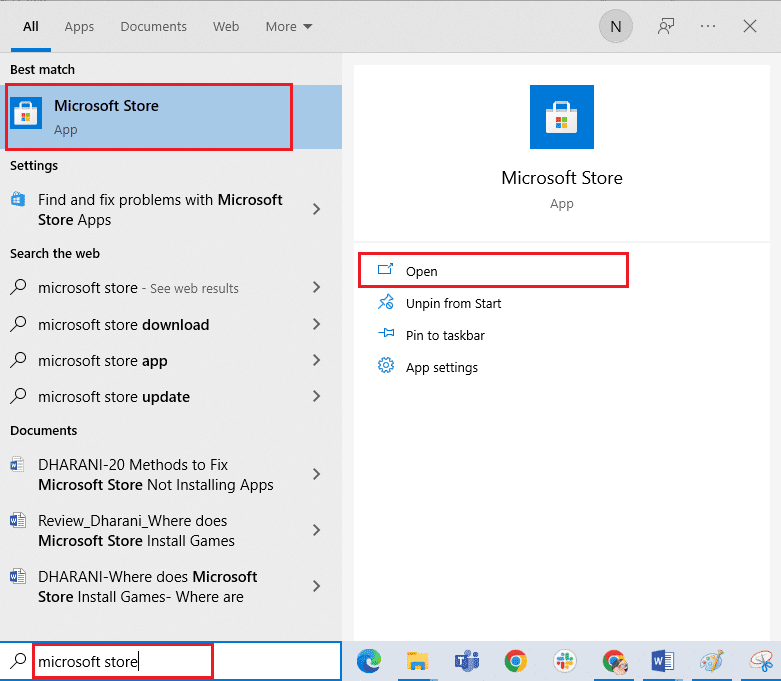
2. Type iTunes in the search bar and click on it.

3. Click "Update" to update the iTunes app.
Method 7: Update Windows
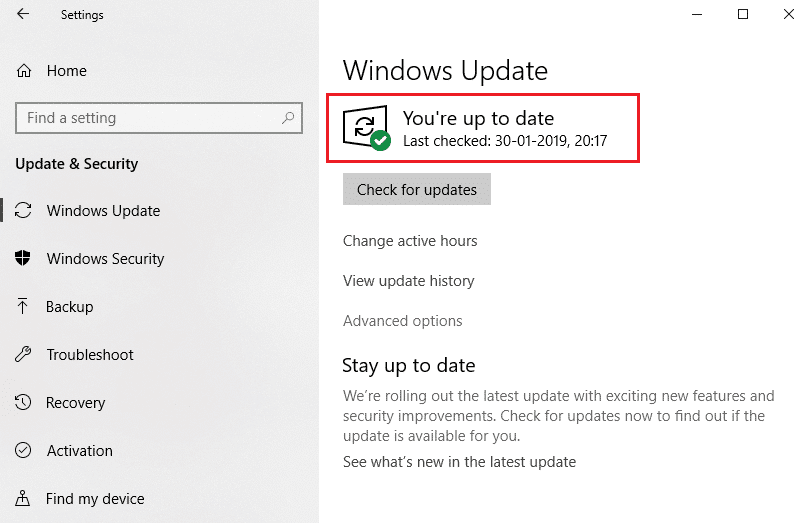
If you still can't fix the problem of iPhone not connecting to PC even after trying the previous methods, you should update your Windows operating system. This is because Microsoft often releases OS updates to fix all the common bugs or issues, mainly related to compatibility. So check and update the Windows OS on your PC to fix the connection issue between iPhone and PC. Read or read the guide on how to download and install the latest Windows 10 update for details on the Windows update process.
Method 8: Update iOS
iPhones typically have automatic updates enabled, which regularly monitors for update packages and performs update tasks automatically. However, you can also manually check and update iOS with the following steps.
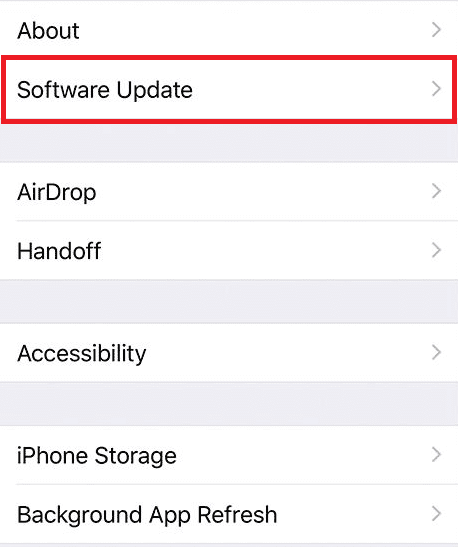
1. Tap the «Settings» application on your iPhone.
2. Scroll down and tap the General option in the list.
3. Here, click "Software Update".
4A. If your iPhone is up to date, this message will appear on the screen: iOS is up to date.
4B. If not, tap the Download and Install option to manually update.
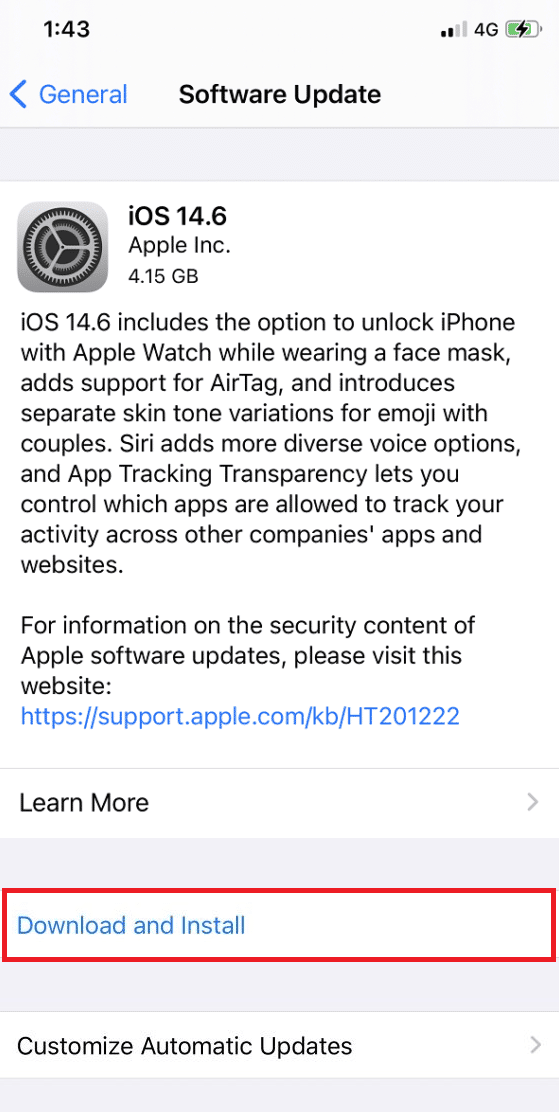
5. Click "Install" again to download the latest version of iOS.
After that, check if the problem of iPhone not detected in Windows 10 is resolved.
Method 9: Reinstall the iTunes App
iTunes usually tends to cause conflicts with iOS when one doesn't support the other. For this reason, connection problems may occur. If the iTunes update method didn't help, try reinstalling the iTunes app by following the instructions below.
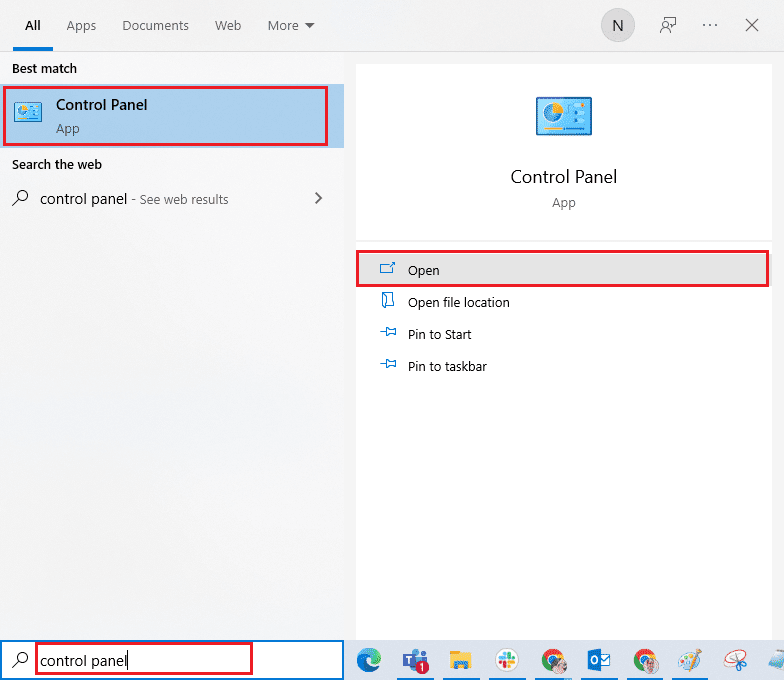
1. Press the Windows key and type Control Panel in the search bar. Click Open to launch the application.
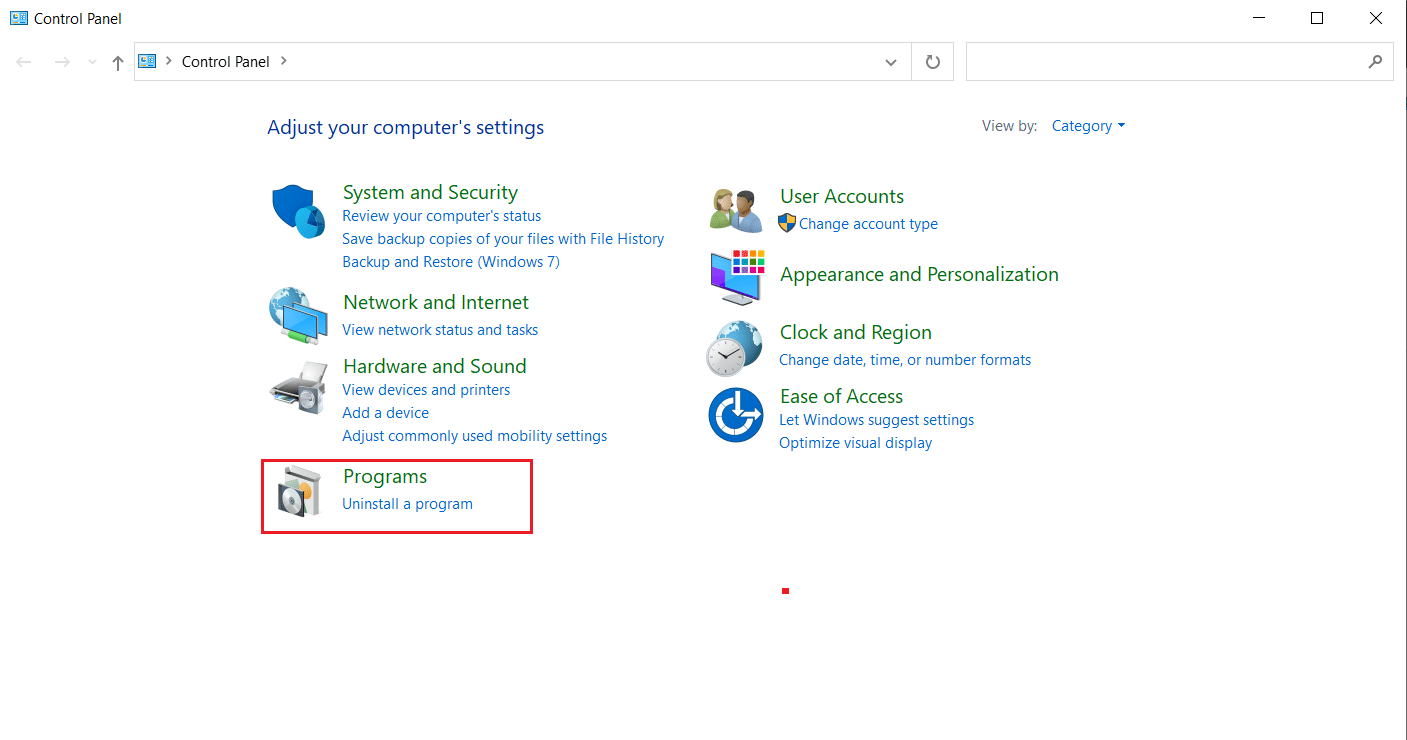
2. Click Programs.
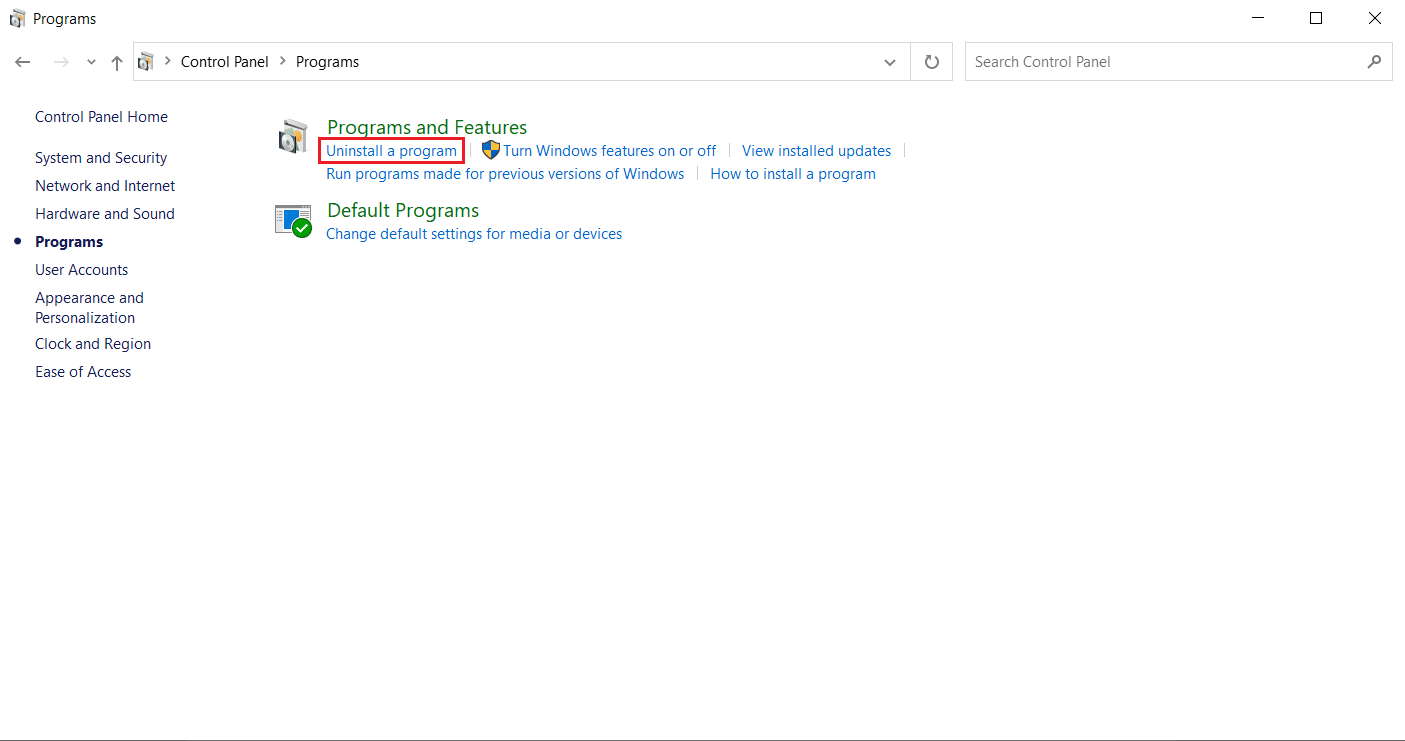
3. Click "Uninstall a program" under "Programs and Features".
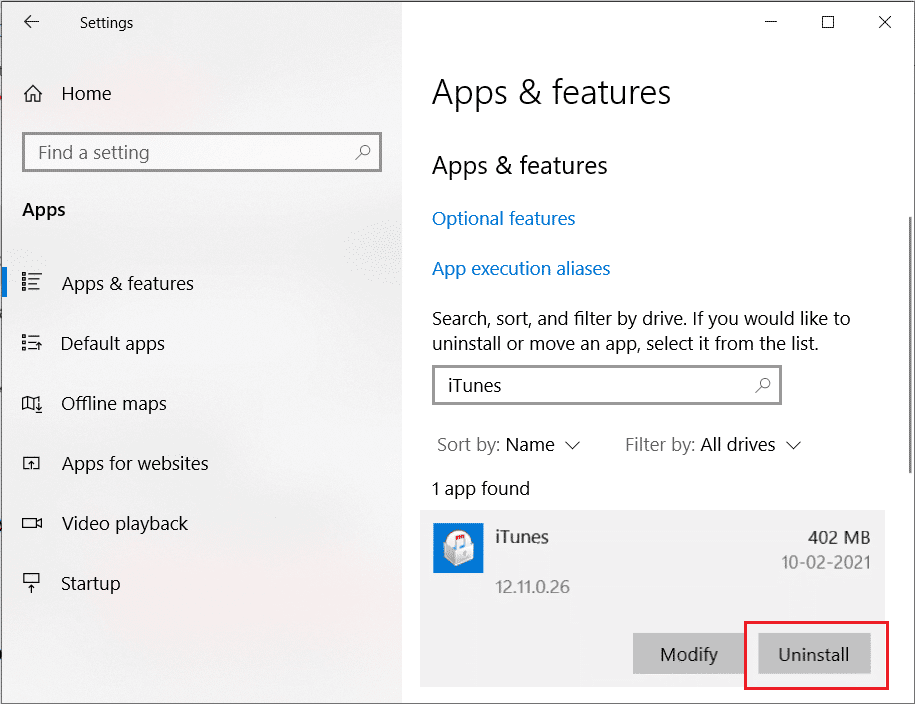
4. Locate and click the Uninstall option for iTunes, as shown in the figure.
5. Then click "Delete" at the confirmation prompt.
6. Now to reinstall iTunes again, open the Microsoft Store on your PC.
7. Type iTunes in the search bar and click on the top result.

8. Click the "Get" button to begin the installation process.
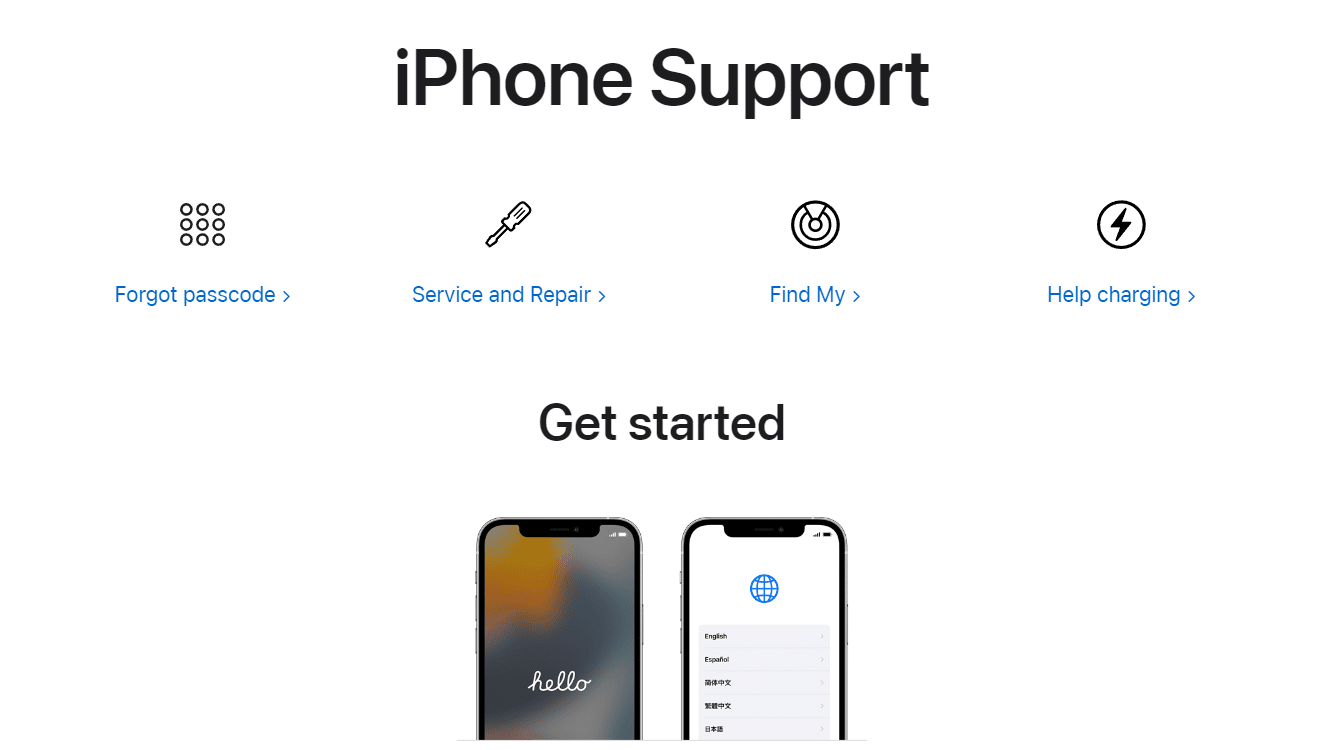
Method 10: Contact iPhone Support
If none of the methods mentioned above helped you solve your connection issue, visit the iPhone support page and contact support to report iPhone not showing up in Windows 10 issue and fix it completely.
***
We hope this guide was helpful and you were able to fix the iPhone not detected issue on Windows 10 using the methods mentioned above. Feel free to contact us with your questions and suggestions through the comments section below.