8 Common Windows 11 Problems and Solutions
Windows 11 has received a completely new design with many new features. Of course, this also means new bugs and users not agreeing with the changes.
I personally found Windows 11 better than previous versions as it is simpler like Windows 7 but more feature rich than Windows 10. Although I understand if you don't like some of the changes as it completely changed some core features like the taskbar , context menu, file explorer, etc.
The good news is that many changes can be reverted and new features can be disabled. You just need to do a bit of tweaking in the settings, or maybe the Windows Registry.
To help you, I've compiled a list of some common Windows 11 issues that users complain about and how to fix them.
The first change you'll notice in Windows 11 is that the Start menu and icons have moved in the middle. This is a significant change, since in almost all versions of Windows they were located on the left. This is understandable if you want them to return to the left side.
Luckily, the Windows 11 taskbar is highly customizable, so you can bring the Start menu back to the left side with a few clicks. Here's how:
Right-click an empty space on the taskbar and select Taskbar Settings.
Here, click on the Taskbar Behavior option and then select Left next to the taskbar alignment option.
That's it, the start menu and icons will be moved to the left side.
In Windows 11, Microsoft has simplified the context menu to a few common options like Open, Copy, Properties, etc. You need to click the Show advanced options button to see all the options found in previous versions of Windows .
For most power users, this is an optional change that simply adds an extra click to perform common tasks. If you don't like the changes, you can bring back the classic context menu with a registry hack that I'll show below.
Note. Make sure you back up your registry before making any changes, as any wrong change could negatively impact your computer. You can also use a third party registry management application for this purpose.
Press the Windows + R keys to open the Run dialog and type regedit to open the registry.
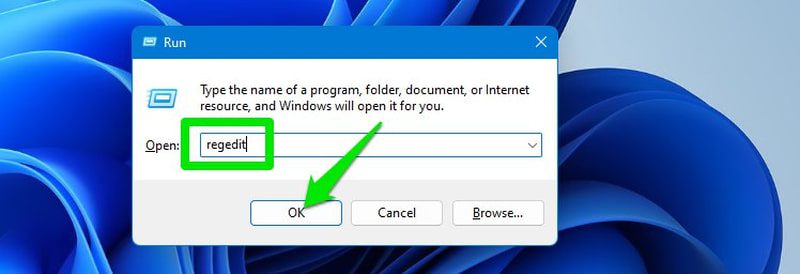
Here go to the location below. You can also copy/paste it into the search bar to open it directly.
HKEY_CURRENT_USERSOFTWARECLASSESCLSID
Now right-click on the CLSID and select New > Key.
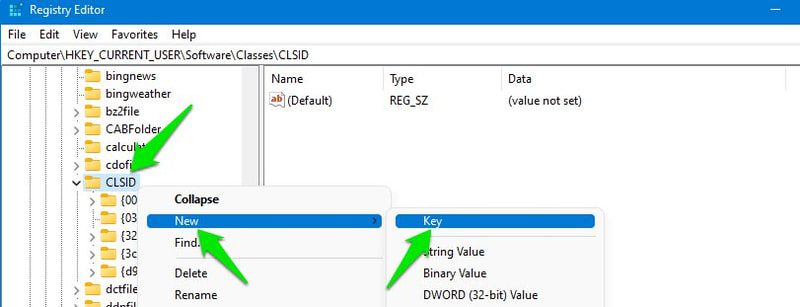
Name this key as {86ca1aa0-34aa-4e8b-a509-50c905bae2a2}.
Right-click the new key and choose New > Key.
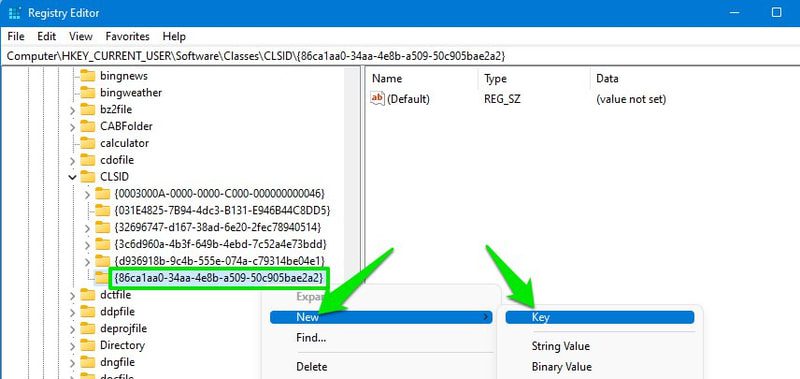
Name it InprocServer32 and make sure its value is left blank.
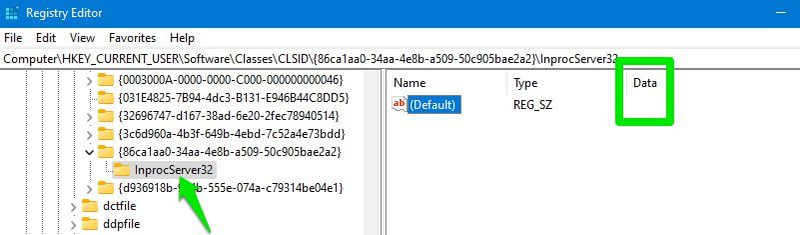
Now either restart your computer or open Task Manager and restart Windows Explorer for the changes to take effect.
Prevent MS Edge from opening links
Microsoft Edge is the default browser in Windows 11, and by default it's set to open all types of links and compatible files. However, even if you set a different browser as your default browser, Microsoft will still open unusual files and links like PDF or HTML, etc. If you don't want Microsoft Edge to open anything at all, here's how do this:
Go to "Settings" from the "Start" menu. Click Apps in the left pane and then click Default Apps.
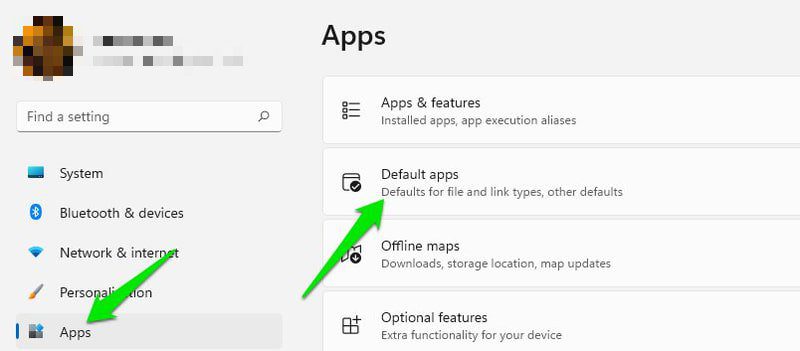
Here, find Microsoft Edge from the list and open it.
You will see all the files/links that the browser can open and the name of the browser that can open them. Here, find the ones that Microsoft Edge opens and click on them. A list will open with all installed browsers, just select the one you like best.
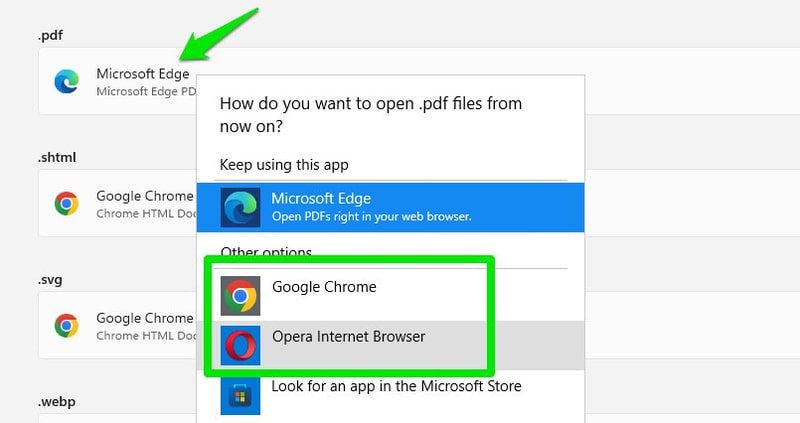
For some links, you may have to click the "More Apps" button to see other browsers.
Remove lock screen
When you start Windows 11, you need to press a key or click anywhere to remove the lock screen and access the login screen.
The lock screen is only needed to show an interesting picture and some information about it. Of course, some people are not interested in random pictures, so this screen delays their access to the login screen.
If you find that the lock screen is an obstacle, you can remove it by editing the registry.
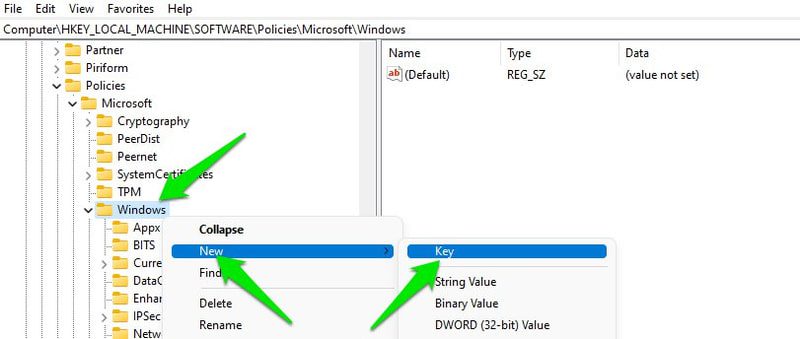
Open the registry as we did above and navigate to the location below:
HKEY_LOCAL_MACHINESOFTWAREPoliciesMicrosoftWindows
Now right-click Windows and select New > Key.
Name the new key "Personalization" and while it's selected, right-click in the right column and choose New > DWORD (32-bit) Value.
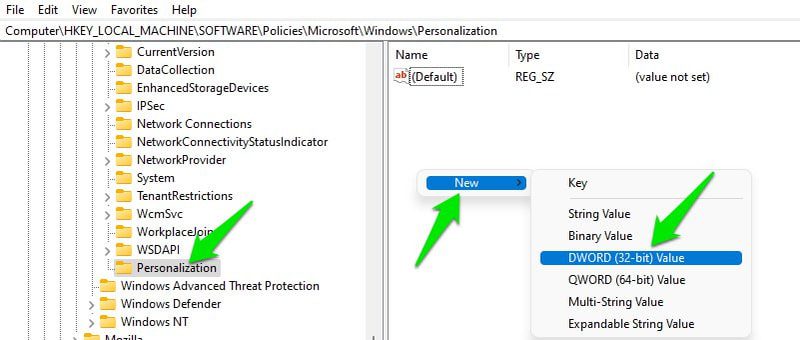
Name this new entry as "NoLockScreen" and then double click on it and change its value to 1.
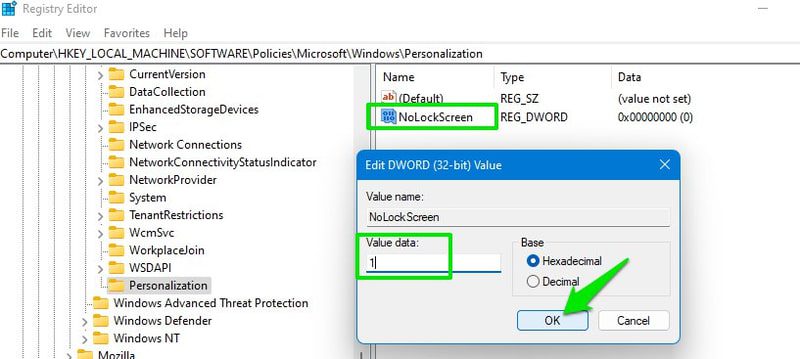
Now the lock screen will not bother you every time you turn on your PC.
Time is not synced
An accurate system time is essential as many websites and services use it to provide their services. Luckily, Windows automatically syncs the time as soon as you connect to the Internet and the clock can access the servers.
Unfortunately, sometimes Windows 11 won't sync time for some reason, or sync time with the wrong time zone. If this happens to you, you will have to sync it from settings manually. Here's how:
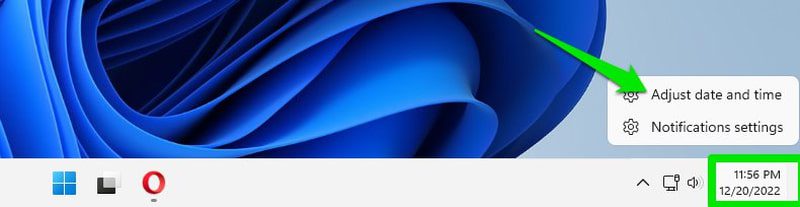
Right-click the clock and select the "Adjust date and time" option.
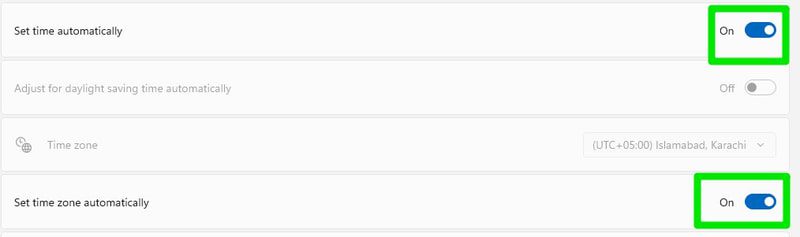
Here, scroll down and click the Sync Now button. This should sync the clock after a short delay.

If that doesn't work, you can also try disabling and then enabling the "Set time automatically" and "Set time zone automatically" buttons.
Disable Highlighting in Windows Search
Windows 11 has a search highlight feature that shows you breaking news and interesting content in the search box. However, not all people like it, especially because it uses your bandwidth and space inside the search box. If you want to disable it, you can do so in the settings.
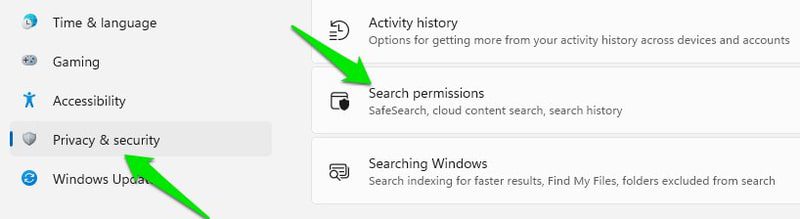
Open "Windows 11 Settings" and click on "Privacy and Security" in the left pane.
Here, scroll down a bit and click on Search Permissions.
Scroll down and turn off the Show Search Highlights option under Advanced Settings.

This will remove the highlights and instead, this area will display quick search suggestions and your most used apps, which is, frankly, much more useful for many users.
Remove "System requirements not met" message
If you installed Windows 11 on an unsupported PC, you must have started seeing the new "System Requirements Not Met" watermark in the bottom right corner of your desktop and in settings. I'm sure you won't like it, as it's about as bad as an "Activate Windows" watermark when you don't buy a Windows key.
Luckily, you don't need to update your computer to remove this message, it can be removed with a registry hack. Here's what you need to do.
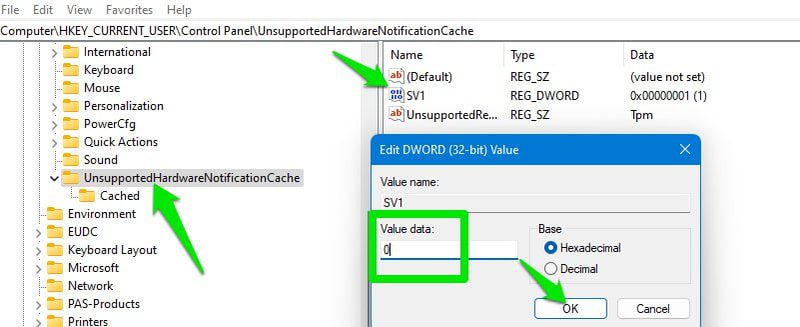
Open the registry and go to HKEY_CURRENT_USER > Control Panel > UnsupportedHardwareNotificationCache.
While UnsupportedHardwareNotificationCache is selected, double-click the SV1 DWORD entry in the right column and change its value to 0.
After that, restart your computer or restart Windows Explorer from Task Manager for the changes to take effect. This will remove the message from both desktop and settings.
Disable Ads in Windows 11
Microsoft has been pretty aggressive in showing ads lately, and in Windows 11, ads are literally everywhere. You can find ads in settings, on the lock screen, and even in notifications. If you don't like seeing ads, you can turn them off in your settings. Below are instructions on how to disable ads in settings, explorer, lock screen, and notification ads.
Disable ads on the lock screen
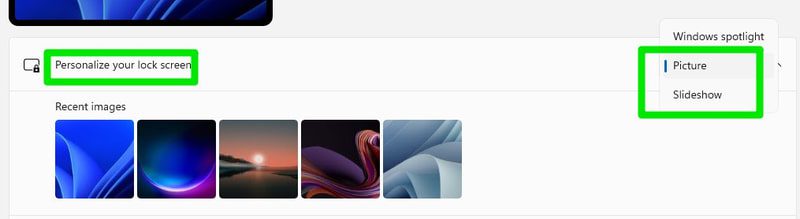
In settings, click on "Personalization" in the right pane and select "Lock Screen".

Here, choose Image or Slideshow next to the Personalize Lock Screen option if it's not already selected. You cannot disable ads if Windows Spotlight is selected here.
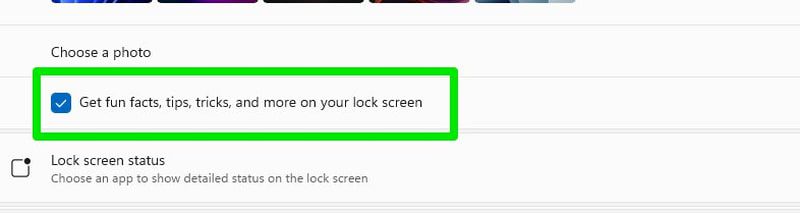
Now uncheck "Get fun facts, tips, tricks and more on your lock screen" to disable ads on your lock screen.
Disable ads in settings
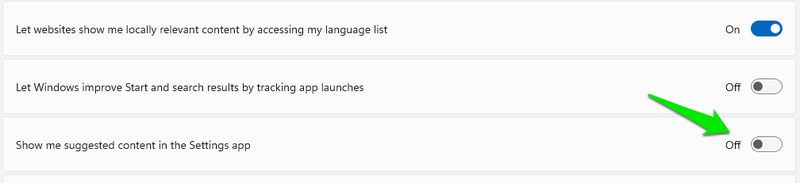
Open "Settings" and go to "Privacy and Security" and then click on "General".
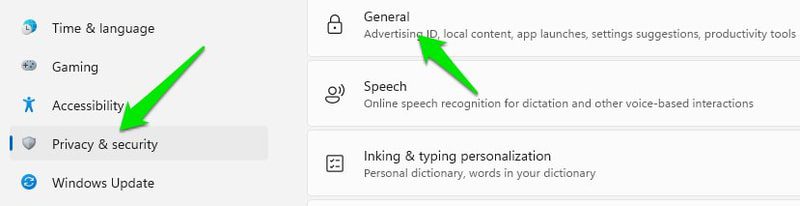
Here, turn off the “Show suggested content in the Settings app” option.
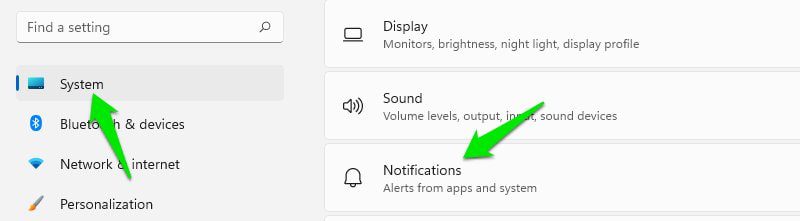
Disable ads displayed as notifications
In Settings, click "System" and then "Notifications".
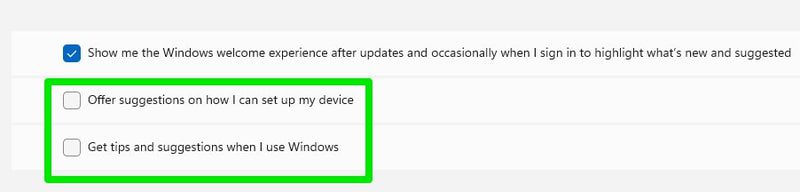
Here, scroll to the very bottom of the page and uncheck Offer advice on device setup and Get advice and guidance when using Windows settings.
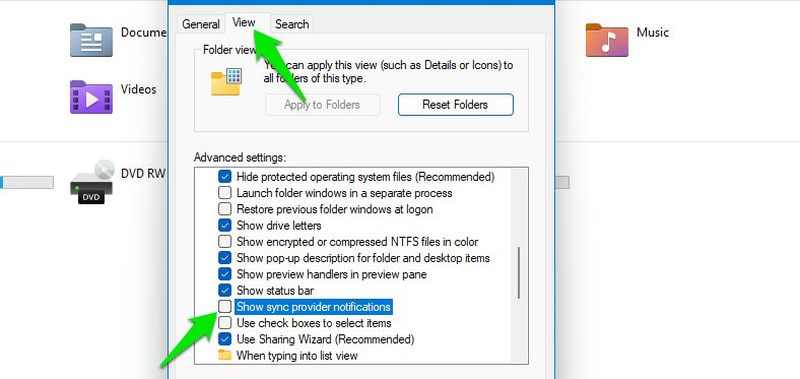
Disable ads in File Explorer
Open File Explorer, click on the three-dot menu at the top and select "Options" from there.
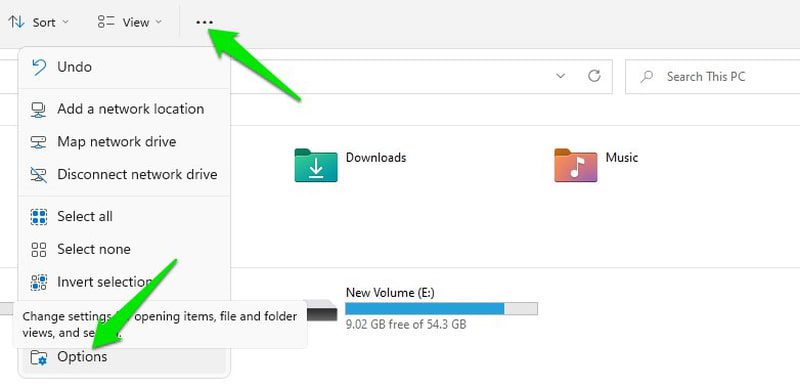
Now go to the "View" section and uncheck "Show Sync Provider Notifications".
Bonus: Use Troubleshooters
In addition to the above solutions to common problems with Windows 11, you can also use the troubleshooters available in Windows 11 to fix common issues related to its components. You can access these troubleshooters in Settings. Just go to System > Troubleshoot > Other Troubleshooters.
Here you will find troubleshooting tools for components such as Windows updates, Internet, sound, camera, power, keyboard, etc. Just click the Run button and the program will automatically find problems and try to fix them.
Final Thoughts 👨🏻💻
Personally, I find Windows 11 much more stable than previous versions and I like most of the new changes. Although the hidden ads and forced message "System requirements not met" put me off a bit. I am sure that your Windows 11 experience will improve once you resolve the above issues.