12 settings you should tweak in Windows 11 for the best experience
Windows 11 comes with a lot of new features and changes to old features. If you want to get the best experience, you should optimize its settings.
At first glance, I personally think that Windows 11 is perfect right out of the box, unlike Windows 10 with its forced "Welcome to the Future" image. However, after fiddling with its settings and features, I noticed many ways to improve it by changing the default settings.
Whether it's tweaking new features, getting rid of unnecessary crashes, or taking advantage of new options added to old features, there's a lot you can do to optimize your Windows 11 experience.
If you're up for it, keep reading as I'll walk you through a few ways to tweak your Windows 11 settings for the best results.
Adjust Windows Update settings
Keeping your PC up to date is essential for security and stability. However, tweaking your Windows Update settings is just as important, because a bad restart time can result in lost hours of work, or worse, a boss fight in your favorite MMOs.
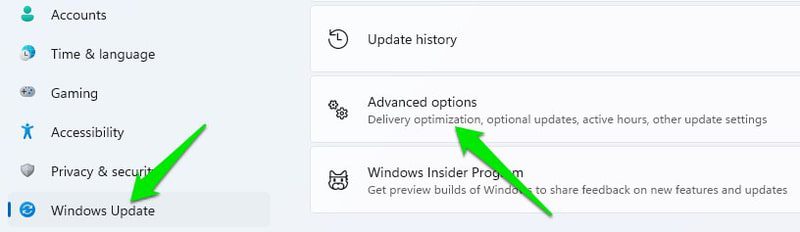
Open Settings from the Start menu and then select Windows Update at the bottom of the left pane. Here you can see downloadable updates and suspend/resume updates. The more important entry here is "Advanced Options", so click on it.
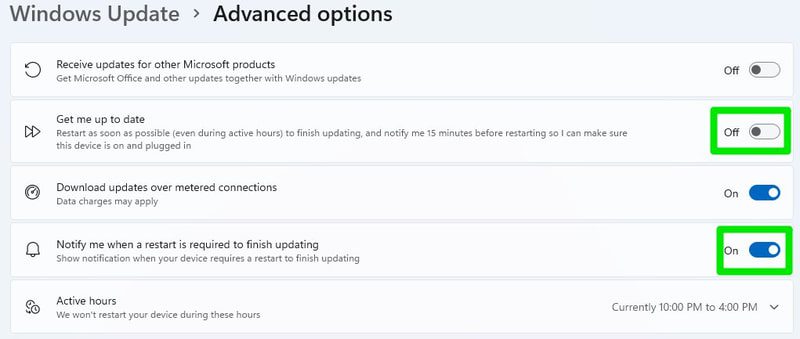
Here you can set the hours of activity during which the computer does not restart, manage update notifications and how updates are downloaded. You can customize these options to suit your needs, but I recommend that you turn off the "Update me" option and turn on the notification before restarting. Otherwise, the PC will restart immediately after downloading the update without prior notice.
Enable dark mode
By default, Windows 11 uses light mode with a very bright theme. If you prefer darker visuals or work in a dark environment and a light theme is tiring your eyes, you should switch to dark mode. Here's how:
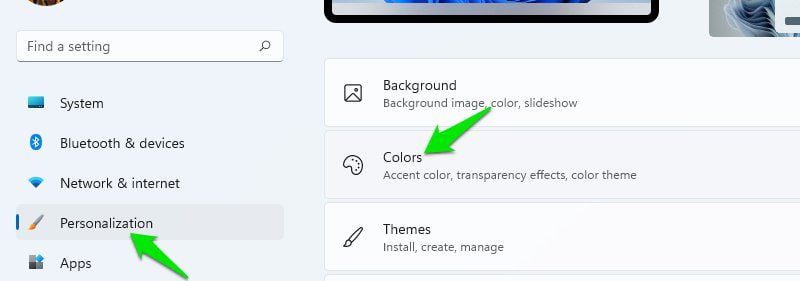
Open Windows Settings again and click on Personalization and then on Colors.
Here, at the very top, select Dark in the Choose your mode section.
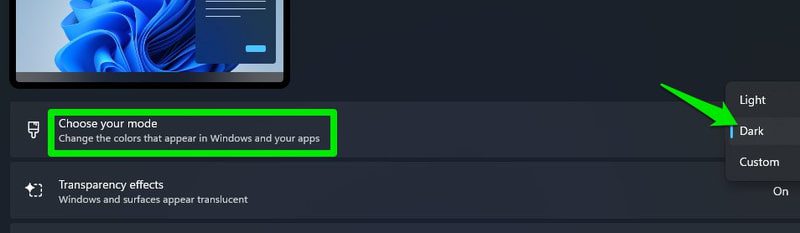
Windows colors will turn dark and dark mode will also be automatically enabled in supported apps.
Select power mode
Windows energy management is essential whether it is Windows 11 or any other version. By default, it is set to balance mode. However, your preferences may vary depending on whether you want to improve performance or save energy.
Select the System option in Windows 11 Settings and then click Power to select the correct power mode.
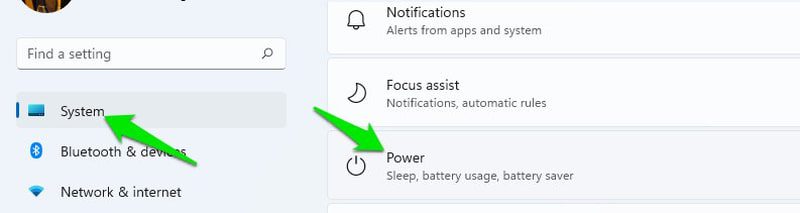
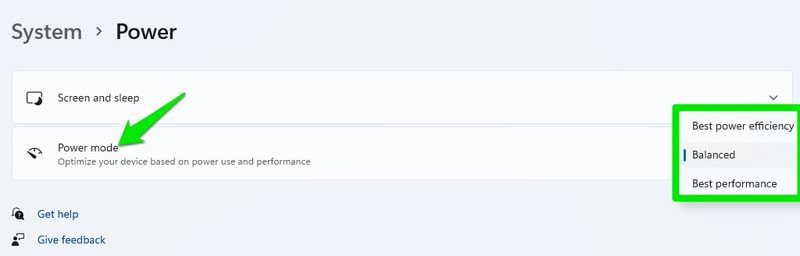
In the Power Mode section, you can select Best Power Efficiency, Balanced, and Best Performance as your preferred power profile.
Add Folders to the Start Menu
The Start menu in Windows 11 is much simpler than in Windows 10, and some features are even missing. However, it adds the ability to add predefined folders to the start menu as small icons. This includes folders such as Downloads, Documents, Pictures, User Folder, etc.
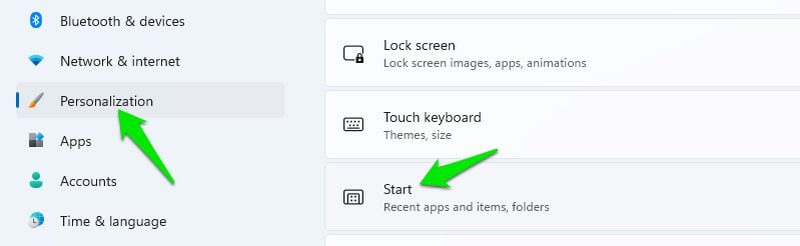
To add folders to the Start Menu, click Personalization in Windows 11 Settings and select Start.
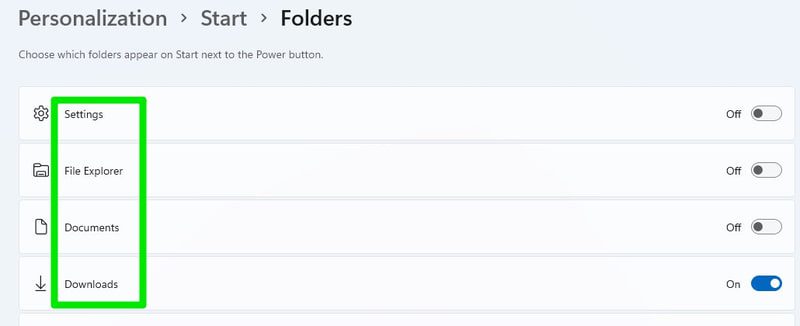
Now select the Folders option and you will see a set of predefined folders with a radio button next to them. Enable the ones you want to see in the start menu and an icon for them will appear next to the power button.
Customize the taskbar
The Windows 11 taskbar is completely new and behaves differently from the previous version of Windows. Luckily, Windows 11 lets you fully customize it to your liking, so you won't get stuck with new changes. You can remove fixed icons, move icons to the left, hide/show the taskbar, and more.
You can check out my Windows 11 taskbar customization guide to learn how to completely customize it to your liking.
Disable Ads in Windows 11
Microsoft has cleverly introduced ads in various areas of Windows 11, which are displayed either as tips or direct product recommendations. If you don't want to see them, here's how to disable them in different areas of Windows 11:
Disable ads in the Settings app
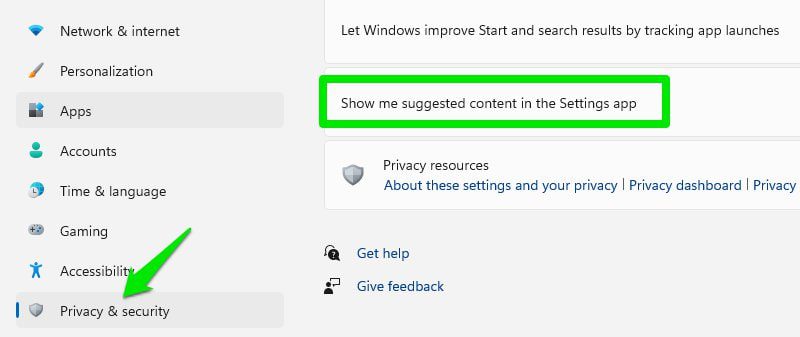
Go to "Settings" in the Start Menu and click on "Privacy and Security" in the left pane.
Here tap "General" and then turn off the "Show Suggested Content" option in the Settings app.
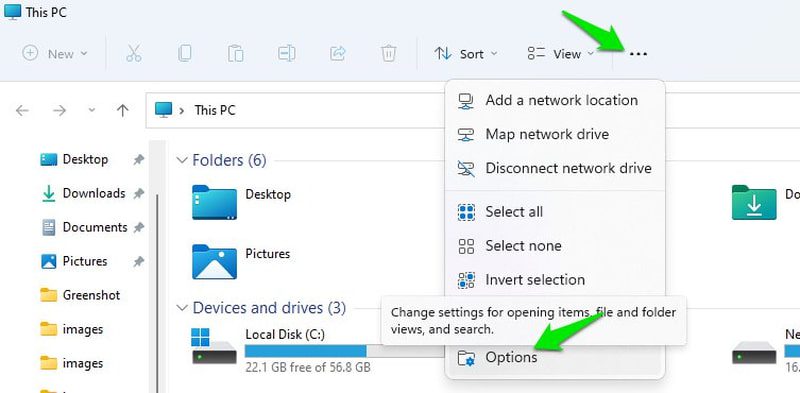
Disable ads in File Explorer
In File Explorer, click the three-dot menu at the top and select Options from it.
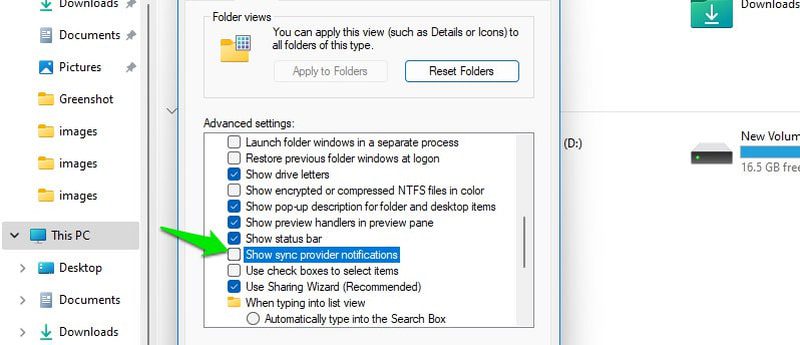
In the Folder Options window, click the View tab and uncheck Show Sync Provider Notifications.
Disable ads displayed as notifications
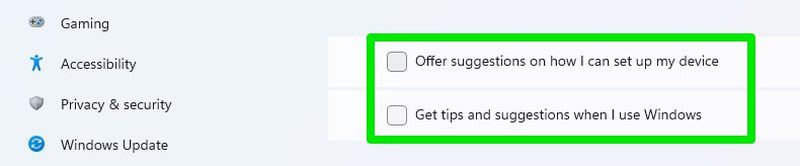
In Windows Settings, click System and then click Notifications.
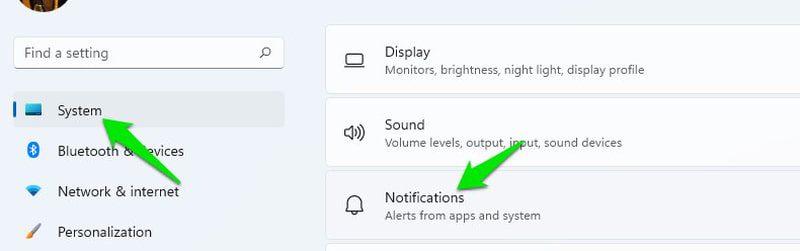
Scroll all the way to the bottom and turn off Suggestions for suggestions on how I can set up my device and get tips and suggestions while using Windows settings.
Notification Management
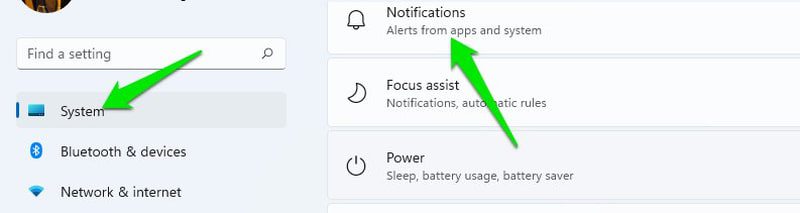
You should definitely set up notifications to avoid being bothered by unnecessary notifications or Microsoft nagging to try out different apps. To do this, tap System in the Settings app and tap Notifications.
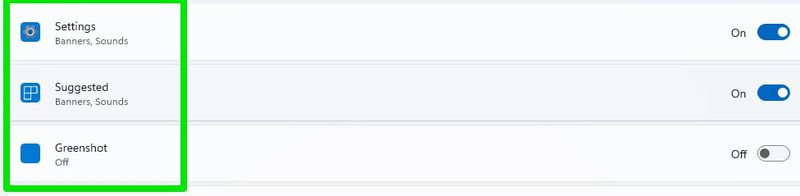
In addition to the option to turn off notifications completely, you'll see a list of apps that can display notifications. You can turn off notifications for individual apps entirely here, or control how they display notifications.
Don't forget to turn off offer notifications at the bottom as we did above so you don't see ads/offers in notifications.
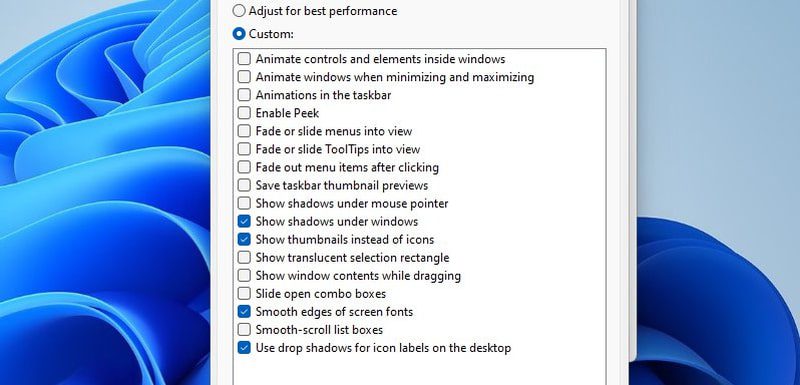
Disable unnecessary visual effects
I personally disable animations and extra effects in every version of Windows I use as it improves Windows performance and provides a faster experience since you don't have to wait for animations.
I'm not suggesting that you turn off all visual effects, but you should definitely try to find a balance between performance and appearance.
While Windows 11 has a button in the Settings app to turn off most animations, I recommend that you use the Performance Options window as it gives you complete control.
In Windows search, type "Advanced" and select "View advanced system settings".
Here click "Settings" under "Performance".
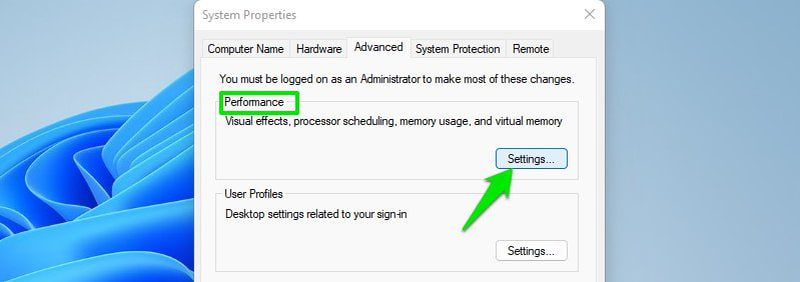
You will now see a list of all visual effects that you can disable/enable. You can disable these effects one by one to decide which effect you want to turn off and which to turn on. If you want pure performance without a noticeable difference in the interface, you can use the exact settings shown in the screenshot below.
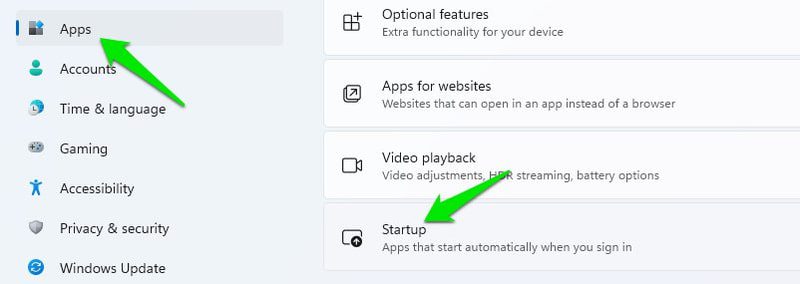
Disable autoloading apps
You can set up many standard and third-party applications to launch on Windows startup, even if you don't intend to use them. They can consume resources in the back end and even use internet data which can disrupt your work. Here's how to disable unnecessary startup apps:
In Windows Settings, click Apps in the left pane and then click Startup.
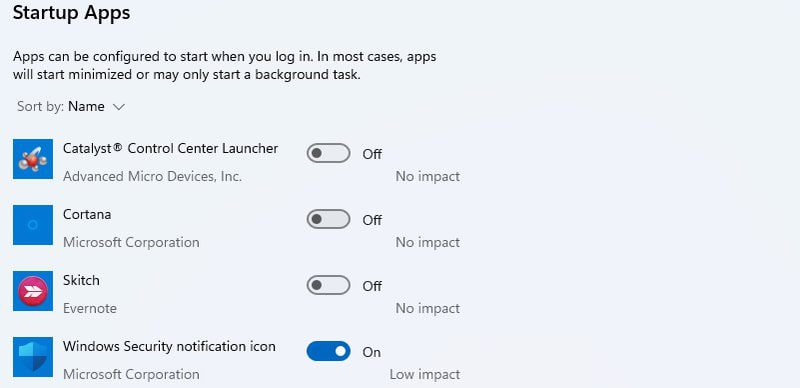
You will see all applications that can run with Windows. Just disable the ones you don't intend to use as soon as the computer boots up.
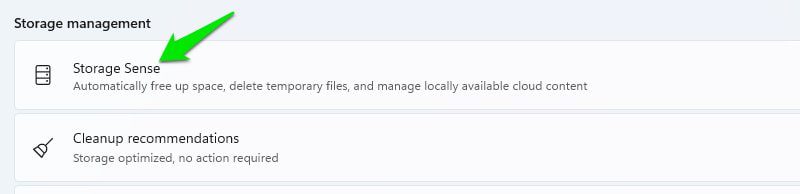
Configuring Memory Sense
Memory Sense helps keep Windows clean by automatically deleting temporary data. By default, it only fires when you're really low on storage space. However, if you want to keep Windows clean, I recommend that you set it to clean junk data at a fixed interval.
In Windows Settings, click on "System" and then select "Storage".
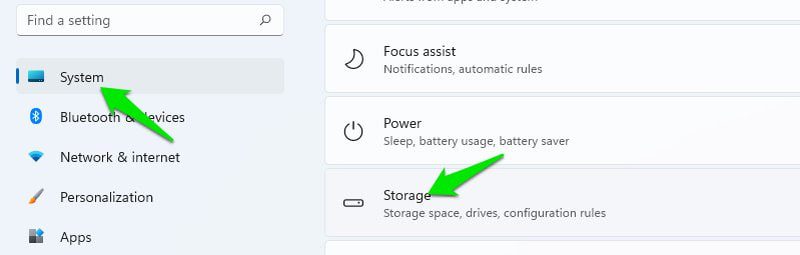
Here, click on the Storage Sense option.
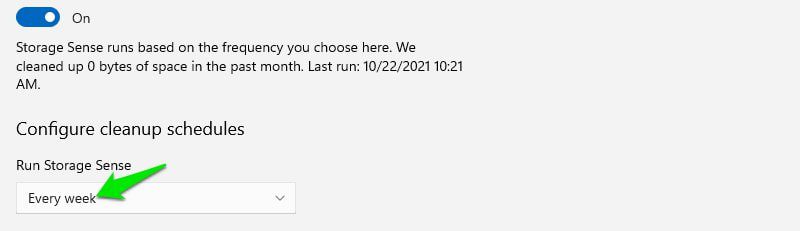
In the Run Storage Sense section, select one of the preset intervals. You can select "Every day", "Every week" or "Every month".
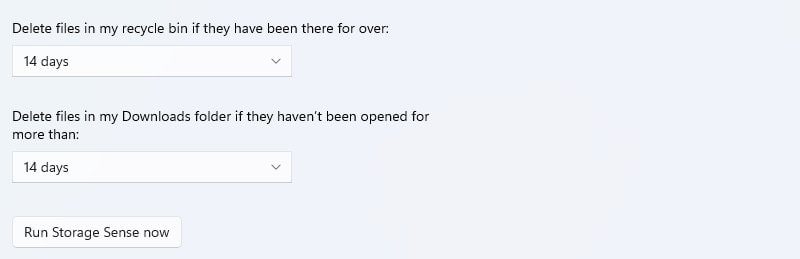
You can also configure settings to automatically delete data in the trash and downloads folder.
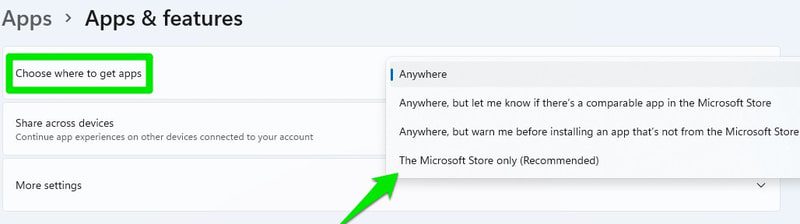
Only allow apps from the Microsoft Store.
Just like on Android, by default you can only install apps from the Google Play Store. You can also set Windows 11 to only allow installation from the Microsoft Store for security reasons. However, because the Microsoft Store isn't that big, this option isn't for everyone and is disabled by default.
Although, if you need to give a Windows 11 PC to someone who might accidentally install malicious apps, such as a child, then enabling this option is important.
To only allow apps from the Microsoft Store, open the Apps section in Windows Settings and click Apps & features.
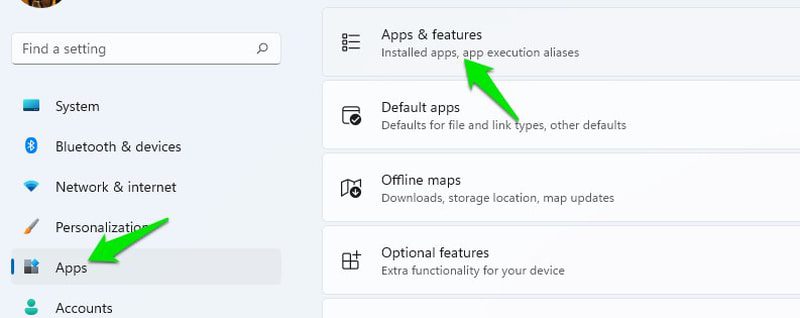
Here, under Choose where to get apps, select Microsoft Store Only. If you prefer, you can also be notified if a third-party app is also available from the Microsoft Store so you can install it from there.
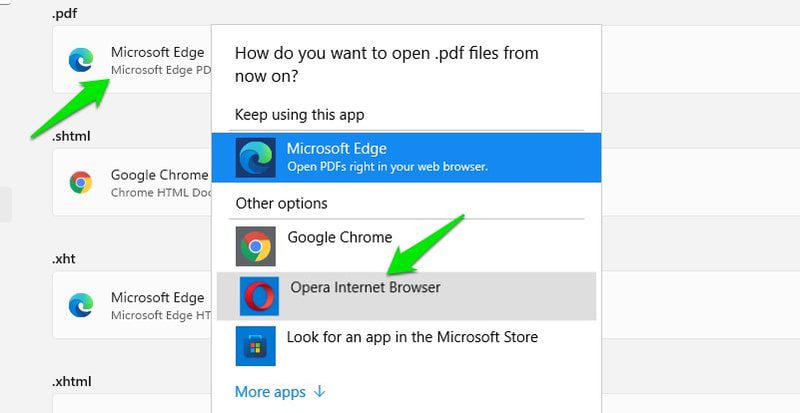
Change your default browser.
Microsoft Edge is the default browser in Windows 11 and Microsoft is working hard to make sure you use it. If you want to use a different browser and even set it as default using the "Set Default" option in your browser, Windows 11 will still use Edge for many types of files/links.
You need to set defaults in Windows settings to set your preferred default browser for everything.
Click Apps in Windows Settings and then click Default Apps.
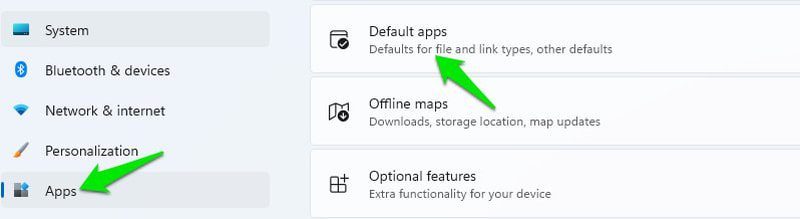
On the next page, open your preferred browser from the application list and you will see all the file types that can be associated with it. Just click on the file types still associated with Microsoft Edge (or any other browser) and change them to your preferred browser.
Final Thoughts
In addition to restricting app installations to only the Microsoft Store, I have personally configured all of these above options and my experience is much better than what the default Windows 11 settings offer. Some of these tweaks are also available in Windows 10. You can also use the instructions in this post to optimize Windows 10.